Are you curious about venturing into the world of homemade tempeh but wondering if your trusty yogurt maker can join the adventure? For many home fermenters, the yogurt maker is a familiar appliance, offering precise temperature control perfect for dairy ferments. The good news is, yes, it is absolutely possible to make fresh, delicious tempeh using a yogurt maker, transforming soybeans (or other legumes) into a nutritious, protein-rich block right in your kitchen. This guide will walk you through the process, ensuring you cultivate perfect tempeh every time.
The Feasibility of Making Tempeh in a Yogurt Maker
Tempeh, a traditional Indonesian fermented food, relies on the growth of a beneficial fungus, Rhizopus oligosporus, to bind cooked legumes into a firm, cake-like block called mycelium. This fermentation process requires specific conditions, which a modern yogurt maker can often replicate effectively.
Understanding Tempeh Fermentation Requirements
|
Our Picks for the Best Yogurt maker in 2026
As an Amazon Associate I earn from qualifying purchases.
|
||
| Num | Product | Action |
|---|---|---|
| 1 | Yogurt Dehydrator, Small-Batch Greek Yogurt Maker with Built-In Date Reminder Fresh, Simple & Just the Right Amount — Food-Grade BPA-Free Materials |

|
| 2 | Yogurt Maker with Adjustable Temperature & Time Control, Probiotic Yogurt Maker Machine with 8 Glass Jars, Automatic Shut-Off for Homemade Probiotic Yogurt, Promoting Gut Health(48OZ) |
|
| 3 | Yogurt Maker with Two Containers, Yogurt Maker Machine with Adjustable Temperature & Time Control, Automatic Shut-Off & Constant Temper for Homemade Probiotic Yogurt, Promoting Gut Health |
|
| 4 | Euro Cuisine YM80 Electric Yogurt Maker Machine- Promote Gut Health with Probiotic Rich Homemade Yogurt -Home Yogurt Incubator with Glass Jars, White |
|
| 5 | Easy Yogurt Maker for Perfect Homemade Yogurt, 1.7 QT Electric Fermenter for Greek Yogurt, Rice Wine, Natto, with Digital Control & Auto Keep Warm, BPA-Free Container |
|
| 6 | Euro Cuisine Yogurt Maker - YMX650 Automatic Digital Yogurt Maker Machine with Set Temperature - Includes 7-6 oz. Reusable Glass Jars and 7 Rotary Date Setting Lids for Instant Storage |
|
| 7 | GDOR Yogurt Maker with Adjustable Temp & Timer– Probiotic-Rich – Digital Greek Yogurt Machine with 8×6oz BPA-Free Glass Jars, Easy to Use for Home, Stainless Steel |
|
| 8 | Ultimate Probiotic Yogurt Maker with Adjustable Time & Temp Control - Make Trillions of Live Probiotics with Two 1-Quart Containers for Larger Batches - Greek Yogurt Maker - ULTIMATE LIFETIME WARRANTY |
|
| 9 | Yogurt Maker Machine, 8 Glass Jars with Lids Reusable for Yoghurt, Oatmeal, Pudding, or Jello, Food-Grade Martial, One-touch Control, Homemade Yogurt |
|
| 10 | Yogurt Maker, Compact Greek Yogurt Maker Machine with Constant Temperature Control, Stainless Steel Container, 1 Quart for Home Organic Yogurt |
|
Successful tempeh fermentation hinges on three critical factors: consistent temperature, adequate humidity, and sufficient air circulation. The Rhizopus oligosporus starter thrives in a warm environment, ideally between 29°C and 32°C (85°F–90°F). Maintaining this range steadily throughout the incubation period is crucial. While high humidity is generally good for fungal growth, excessive moisture can lead to undesirable bacterial growth or spoilage. Furthermore, the mold needs oxygen to flourish, so proper airflow around the tempeh parcels is essential to prevent anaerobic conditions and unwanted molds.
Why a Yogurt Maker Can Work
Many contemporary yogurt makers, especially those with digital controls, offer the ability to set and maintain precise temperatures. This temperature stability is the primary reason they make excellent tempeh incubators. Models with a water bath technology or larger glass jars can create a consistent, warm environment. While a yogurt maker might not inherently provide robust airflow, this can be easily managed by how you prepare and place your tempeh parcels. The consistent heat generated by the appliance ensures the Rhizopus oligosporus can grow optimally, leading to a well-bound, nutty-flavored tempeh.
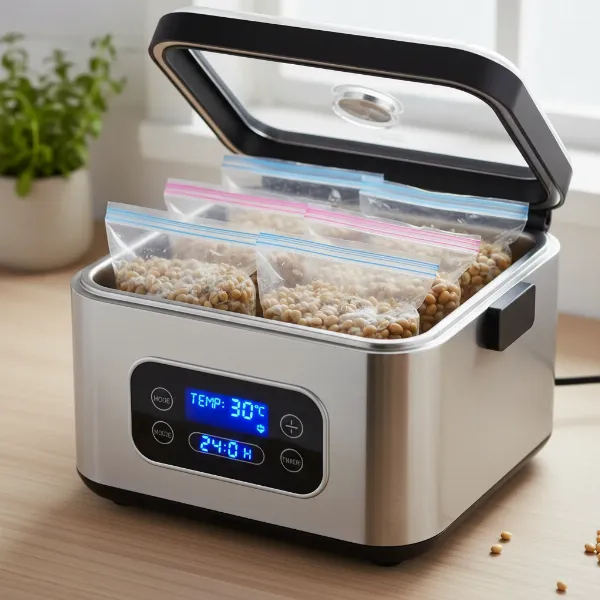 A yogurt maker with tempeh parcels inside, demonstrating the home fermentation process.
Step-by-Step Guide: Crafting Tempeh with Your Yogurt Maker
Ready to get started? Here’s a detailed guide to making tempeh in your yogurt maker.
Essential Ingredients and Equipment
To embark on your tempeh-making journey, gather these items:
- Organic Soybeans: Approximately 300 grams (about 1lb), or other legumes/grains like chickpeas, lentils, or quinoa.
- Tempeh Starter Culture (Rhizopus oligosporus): Available online from specialty stores.
- Vinegar: About 3 tablespoons, helps create a favorable acidic environment.
- Water: For soaking and cooking.
- Yogurt Maker: A model with temperature control is ideal.
- Large saucepan and colander.
- Clean kitchen towel or paper towels.
- Large glass bowl.
- Packaging material: Perforated plastic bags (like Ziploc), banana leaves, baking paper, or even ceramic yogurt maker containers without lids.
Preparing Your Soybeans
Preparation is key to successful fermentation. Start by soaking your soybeans in water overnight, for about 16-24 hours. This softens them and aids in digestion. Discard any discolored or rotten beans that float to the top. After soaking, drain the beans and transfer them to a large saucepan. Add fresh water and vinegar, then cook the soybeans for approximately one hour until they are soft but not mushy.
Once cooked, drain the beans thoroughly in a colander, tapping to remove as much excess water as possible. Moisture is the enemy of spore growth, so ensuring the beans are dry is crucial. Spread them out on a clean kitchen towel to air dry or blot them with another towel. Remove any burst skins or discolored beans. Allow the beans to cool down below 35°C (95°F) before proceeding; adding starter to hot beans will kill the culture.
Inoculating and Packaging the Tempeh
Pour the cooled, dry beans into a large glass bowl. Add the specified amount of tempeh starter culture (typically around 1 gram or half a teaspoon, but always check your packet instructions). Mix thoroughly, ensuring the Rhizopus spores are evenly distributed amongst the beans.
Next, you’ll need to create parcels that allow for proper airflow. Here are a few options:
- Perforated Ziplock bags: Puncture small holes (about 2 cm apart) across the surface of the bag using a toothpick or skewer. Fill the bag halfway and press the beans into a firm, flat layer, no more than 1 inch thick.
- Banana leaves: The traditional, breathable, and compostable method. Wrap the beans securely with toothpicks.
- Baking paper: Wrap the beans and secure them with kitchen string. Perforate the parcel with holes at regular intervals.
- Yogurt maker ceramic containers: If your yogurt maker comes with individual ceramic containers, you can divide and compact the beans into these, incubating them without their silicon lids.
Incubation in the Yogurt Maker
Place your prepared tempeh parcels into the yogurt maker’s main glass jar or directly into the base if using individual containers. If using a model with a water bath, pour water slowly into the base, ensuring it doesn’t exceed the ‘tall line’ indicator. Crucially, do not put the silicon lid on individual jars if you are using them, as ventilation is paramount. Place the main cover lid on top of the yogurt maker.
Set the temperature control to 29°C / 84°F and the timer for 27-30 hours. Press ‘confirm’ to begin incubation. The tempeh will typically start showing signs of white mycelium growth around the 18-hour mark. After approximately 27-30 hours, the fungus should have spread throughout the beans, forming a solid block that feels firm to the touch and looks like it’s been wrapped in cotton wool.
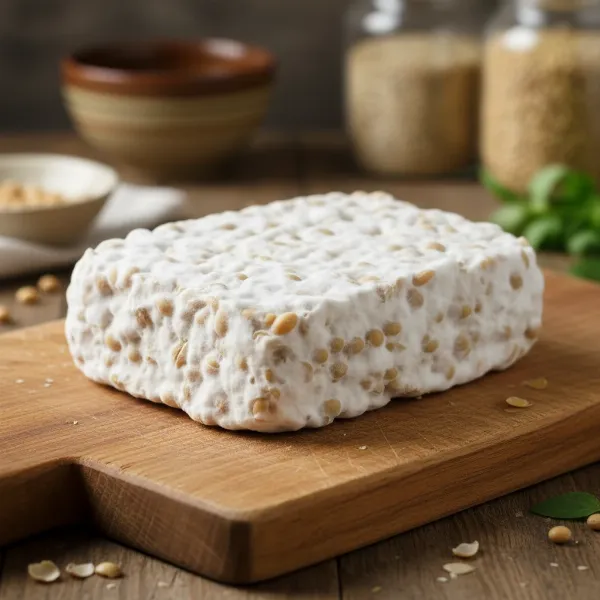 A freshly fermented block of homemade tempeh, covered in dense white mycelium, ready for cooking.
Tips for Success and Troubleshooting Common Issues
Making tempeh at home can be incredibly rewarding, and a few simple tips can help ensure a perfect batch.
Optimizing Your Yogurt Maker for Tempeh
While a yogurt maker provides excellent temperature stability, ensuring adequate ventilation is crucial for tempeh. If your yogurt maker creates a very humid environment, you might need to slightly prop the lid open or place your tempeh parcels on a small rack to ensure air circulation. For models with a water bath, adding water to the base can help maintain a stable temperature, but make sure it doesn’t create excessive moisture around the tempeh. Setting the temperature between 29°C and 32°C (85°F–90°F) is critical.
What to Look For: Signs of Perfect Tempeh
A successful batch of tempeh will be a firm, cohesive block of beans, completely covered in a dense, white, fuzzy mycelium. It should have a pleasant, earthy, mushroom-like aroma, possibly with a slightly sour note. Black or grey spots are natural and indicate the fermentation is complete; these are safe to eat. The entire block should feel solid and not crumbly.
“The magic of tempeh lies in the consistent warmth and gentle air exchange during fermentation. Your yogurt maker creates the perfect snug environment for the mycelium to weave its web.” – Barb Hodgens, Luvele In-House Expert
Common Pitfalls and How to Avoid Them
Even seasoned fermenters encounter issues occasionally. Here are some common problems and solutions:
- No Mold Growth / Slimy Beans: This often indicates too much moisture or the starter culture was too old or killed by high heat. Ensure beans are thoroughly dry before inoculation, and the temperature doesn’t exceed 90°F (32°C).
- Sour or Ammonia Smell: While a slight mushroomy aroma is good, a strong ammonia smell or slimy texture signals spoilage, usually due to overheating or insufficient ventilation. Discard any tempeh with these signs.
- Green or Blue Mold: These are unwanted molds and indicate contamination. Unfortunately, such batches should be discarded to ensure food safety.
- Loose or Crumbly Tempeh: This can happen if the beans weren’t inoculated evenly, packed too loosely, or if the temperature fluctuated too much. Ensure even mixing and firm packaging.
Yogurt Maker vs. Dedicated Tempeh Incubators
While a dedicated tempeh incubator offers features specifically designed for tempeh, such as precise temperature and humidity control with built-in ventilation, a yogurt maker is a fantastic, cost-effective alternative for home enthusiasts. Yogurt makers with adjustable temperatures can provide the stable warmth needed for Rhizopus oligosporus to thrive. The main difference lies in airflow; a yogurt maker might require manual adjustments like perforating bags or slightly propping the lid. For those experimenting with tempeh making without investing in another single-purpose appliance, a yogurt maker is an excellent, readily available tool.
Conclusion
Creating your own tempeh at home using a yogurt maker is not only possible but also a deeply satisfying culinary endeavor. With the ability to control temperature accurately, your yogurt maker provides an ideal environment for the Rhizopus oligosporus culture to transform simple soybeans into a flavorful, nutritious, and versatile protein source. By following careful preparation steps, ensuring proper ventilation, and monitoring the fermentation process, you can enjoy fresh, preservative-free tempeh that far surpasses many store-bought varieties. Why not unlock a new dimension in your fermentation skills and experience the rich, nutty flavor of homemade tempeh today? What will be the first dish you create with your freshly made tempeh?
Frequently Asked Questions
What temperature is best for tempeh fermentation in a yogurt maker?
The optimal temperature range for tempeh fermentation is generally between 29°C and 32°C (85°F–90°F). Many modern yogurt makers allow you to set this precise temperature, providing the stable warmth crucial for the Rhizopus oligosporus fungus to grow effectively and bind the soybeans into a solid block.
How long does it take to make tempeh in a yogurt maker?
Typically, tempeh incubation in a yogurt maker takes between 20 to 30 hours. The exact time can vary depending on the specific yogurt maker, the ambient temperature, and the vigor of your starter culture. It’s ready when the beans are completely covered in dense, white mycelium and form a firm, cohesive block.
Can any yogurt maker be used for tempeh?
While many yogurt makers can be adapted, those with adjustable temperature settings are best for tempeh. Basic models that only heat to a fixed yogurt-making temperature might not be suitable if that temperature falls outside the ideal 29-32°C range for tempeh. Models with larger jars or a water bath also tend to work well.
How do I ensure proper ventilation for tempeh in a yogurt maker?
Proper ventilation is critical for tempeh. If using plastic bags, perforate them with numerous small holes (about 2 cm apart). If using ceramic jars in a water bath type yogurt maker, do not cover them with their individual lids. You might also slightly prop open the main lid of the yogurt maker if humidity seems excessive, allowing for airflow.
What should I do if my tempeh develops colored mold?
If your tempeh develops green or blue mold, it indicates contamination by undesirable fungi, and the batch should be discarded immediately for safety. However, black or grey spots on the white mycelium are natural and simply a sign that the fermentation process is complete; these are perfectly safe to eat.