Keeping your home appliances in top working order often involves more than just ensuring they function; it demands proper maintenance, and a clean heating base is paramount for both performance and longevity. Spills, especially those involving milk or sugary liquids, can quickly turn into stubborn, burnt-on residues, leading to inefficiencies or even damage if not addressed correctly. The thought of cleaning an electrical component can be daunting, with fears of electrocution or irreparable harm to your beloved gadget. But fret not, for this comprehensive guide will walk you through the safest and most effective methods to clean your appliance’s heating base without causing any damage, ensuring your machine runs smoothly for years to come.
Understanding Your Appliance’s Heating Base
Before diving into the cleaning process, it’s essential to understand why maintaining your appliance’s heating base is so crucial and what common issues you might encounter.
Why Cleaning is Crucial
|
Our Picks for the Best Yogurt maker in 2026
As an Amazon Associate I earn from qualifying purchases.
|
||
| Num | Product | Action |
|---|---|---|
| 1 | Yogurt Maker with Adjustable Temperature & Time Control, Probiotic Yogurt Maker Machine with 8 Glass Jars, Automatic Shut-Off for Homemade Probiotic Yogurt, Promoting Gut Health(48OZ) |

|
| 2 | Ultimate Probiotic Yogurt Maker with Adjustable Time & Temp Control - Make Trillions of Live Probiotics with Two 1-Quart Containers for Larger Batches - Greek Yogurt Maker - ULTIMATE LIFETIME WARRANTY |
|
| 3 | Euro Cuisine YM80 Electric Yogurt Maker Machine- Promote Gut Health with Probiotic Rich Homemade Yogurt -Home Yogurt Incubator with Glass Jars, White |
|
| 4 | GDOR Yogurt Maker with Adjustable Temp & Timer– Probiotic-Rich – Digital Greek Yogurt Machine with 8×6oz BPA-Free Glass Jars, Easy to Use for Home, Stainless Steel |
|
| 5 | Yogurt Maker Machine, 8 Glass Jars with Lids Reusable for Yoghurt, Oatmeal, Pudding, or Jello, Food-Grade Martial, One-touch Control, Homemade Yogurt |
|
| 6 | Euro Cuisine Yogurt Maker - YMX650 Automatic Digital Yogurt Maker Machine with Set Temperature - Includes 7-6 oz. Reusable Glass Jars and 7 Rotary Date Setting Lids for Instant Storage |
|
| 7 | Yogurt Maker with Two Containers, Yogurt Maker Machine with Adjustable Temperature & Time Control, Automatic Shut-Off & Constant Temper for Homemade Probiotic Yogurt, Promoting Gut Health |
|
| 8 | Easy Yogurt Maker for Perfect Homemade Yogurt, 1.7 QT Electric Fermenter for Greek Yogurt, Rice Wine, Natto, with Digital Control & Auto Keep Warm, BPA-Free Container |
|
| 9 | Yogurt Maker, Compact Greek Yogurt Maker Machine with Constant Temperature Control, Stainless Steel Container, 1 Quart for Home Organic Yogurt |
|
| 10 | Yogurt Dehydrator, Small-Batch Greek Yogurt Maker with Built-In Date Reminder Fresh, Simple & Just the Right Amount — Food-Grade BPA-Free Materials |
|
A clean heating base is vital for several reasons. First, it ensures optimal performance, allowing your appliance to heat efficiently and consistently. Any buildup, like burnt milk, can create uneven heating spots, forcing the appliance to work harder and consume more energy. Secondly, regular cleaning significantly extends the lifespan of your appliance, preventing corrosion, overheating, and component failure. Lastly, especially for appliances used with food like yogurt makers, a clean heating base is a matter of hygiene, preventing bacterial growth and unpleasant odors.
Common Heating Base Issues
Heating bases, often made of stainless steel or non-stick materials, are prone to a few common problems. The most frequent culprits are burnt-on food residues, particularly milk, which contains sugars and proteins that caramelize and stick stubbornly when overheated. Mineral deposits or limescale can also accumulate over time, especially in areas with hard water, affecting heating efficiency. The critical characteristic of most small appliance heating bases is their non-submersible nature, meaning direct contact with excessive water can cause severe electrical damage.
Essential Safety Precautions Before You Begin
Safety is paramount when cleaning any electrical appliance. Neglecting basic precautions can lead to electric shock, burns, or irreversible damage to your device.
Unplugging and Cooling Down
This step is non-negotiable. Always, always, unplug your appliance from the power outlet before you begin any cleaning. After unplugging, allow the appliance to cool down completely. A hot heating base can cause severe burns, and attempting to clean it while still warm can also make certain residues harder to remove safely. Give it ample time to reach room temperature, perhaps an hour or two, to be absolutely certain it’s safe to touch.
Never Submerge the Heating Base
Perhaps the most critical warning for any electric appliance: never submerge the heating base in water or any other liquid. The heating base houses electrical components that are extremely susceptible to water damage. Even a small amount of liquid entering these areas can cause a short circuit, permanent damage, or pose a severe electrocution risk when you plug it back in. Always remember to clean around electrical parts, keeping moisture to an absolute minimum.
 Electrical appliance heating base with a clear "no water" or "do not submerge" symbol over it.
Gathering Your Cleaning Arsenal
The right tools and cleaning agents make all the difference. To safely clean your heating base, you’ll need:
- Soft cloths or microfiber towels: For wiping and applying solutions.
- Soft sponge or non-abrasive scrubber: For gentle scrubbing.
- Mild dish soap: For general cleaning.
- Baking soda: A natural abrasive and deodorizer, excellent for burnt-on stains.
- White vinegar: Effective for cutting grease, dissolving mineral deposits, and tackling burnt milk.
- Soft brush or cotton swabs: For reaching into crevices.
- Wooden or plastic spatula/scraper: For gently lifting stubborn residue without scratching.
Avoid harsh chemical cleaners, abrasive scouring pads, or metal tools like steel wool, as these can scratch, corrode, or otherwise damage the heating surface.
Step-by-Step Guide to Cleaning Your Heating Base
With safety precautions in place and your tools ready, let’s tackle those stubborn stains and residues.
For Light Spills and Daily Maintenance
For everyday spills or minor residue, a quick wipe-down can prevent buildup. As soon as the appliance is cool and unplugged, use a damp soft cloth with a drop of mild dish soap to gently wipe the heating surface. Follow up with a clean, damp cloth to remove any soap residue, and then dry thoroughly. This routine helps keep your heating base spotless with minimal effort.
Tackling Stubborn Stains and Burnt-On Residue
Burnt-on milk or food can be a challenge, but with patience and the right approach, you can restore your heating base.
Method 1: Baking Soda Paste
Baking soda is a powerful yet gentle cleaning agent for burnt-on messes.
- Prepare the paste: Mix a few tablespoons of baking soda with just enough water to form a thick paste. The consistency should be like toothpaste.
- Apply: Spread the paste generously over the burnt areas of the heating base.
- Let it sit: For light stains, let the paste sit for 15-20 minutes. For more stubborn or heavily burnt residue, allow it to sit for several hours, or even overnight, to really work its magic.
- Gently scrub: Using a soft, non-abrasive sponge or a wooden/plastic spatula, gently scrub and scrape the burnt residue. The baking soda’s mild abrasive quality will help lift the grime without scratching the surface.
- Wipe clean: Wipe away the paste and loosened residue with a clean, damp cloth. Repeat if necessary.
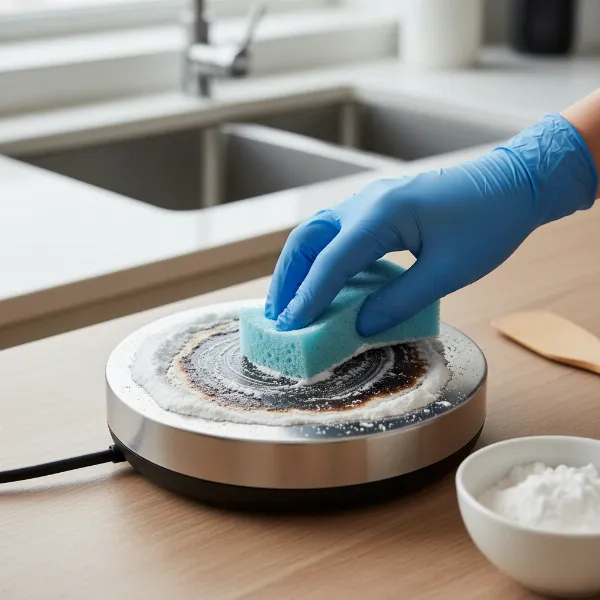 Hand gently scrubbing a burnt-on spill on an appliance heating base with baking soda paste.
Method 2: Vinegar Solution (for mineral deposits and stubborn stains)
White vinegar is excellent for dissolving mineral deposits (limescale) and can also help break down burnt milk proteins.
- Dilute: Mix equal parts white vinegar and water.
- Apply: Dampen a soft cloth or sponge with the diluted vinegar solution.
- Wipe and soak: Gently wipe the affected areas. For tougher spots, lay the vinegar-soaked cloth directly over the stain and let it sit for 10-15 minutes.
- Scrub and wipe: After soaking, gently scrub with a soft brush or sponge. Wipe clean with a fresh damp cloth to remove all vinegar residue, as its acidity can, over time, affect certain finishes.
Method 3: Salt (for fresh burnt food)
For relatively fresh, burnt-on food, salt can act as a gentle abrasive.
- Sprinkle: Cover the burnt area with a layer of table salt.
- Saturate: Add a small amount of warm water, just enough to moisten the salt and create a slurry.
- Rest: Let it sit for about 20 minutes.
- Scrape: Use a wooden spoon or a plastic scraper to gently lift the burnt residue. The salt crystals will aid in loosening the grime without harsh scratching.
- Rinse (carefully): Wipe clean with a damp cloth and ensure all salt is removed.
Cleaning Crevices and Hard-to-Reach Areas
The small gaps and edges of a heating base can collect residue. Use a soft-bristled brush, a toothpick, or a cotton swab lightly dampened with your chosen cleaning solution (baking soda paste or diluted vinegar) to carefully clean these tight spots. Always be mindful not to introduce too much moisture.
The Drying Process
After cleaning, thorough drying is critical. Use a dry microfiber cloth to wipe the entire heating base until no moisture is visible. For an extra layer of caution, allow the appliance to air dry for several hours (or even overnight) before plugging it back in and using it. This ensures all internal components are completely dry, preventing any electrical hazards.
What to Avoid: Common Cleaning Mistakes
Knowing what not to do is as important as knowing what to do when cleaning your appliance’s heating base.
Water Submersion and Excessive Moisture
As reiterated, never submerge the electrical heating base in water. Avoid spraying water or cleaning solutions directly onto the base, and ensure cloths are merely damp, not dripping wet. Any ingress of liquid into the electrical system can lead to severe damage and safety risks.
Harsh Abrasives and Chemicals
Stay away from steel wool, abrasive scouring pads, or harsh chemical cleaners like oven cleaner (unless specifically recommended by the manufacturer for this purpose). These can scratch the surface of the heating element, compromise non-stick coatings, or leave behind chemical residues that could be harmful, especially if your appliance is used for food preparation.
Metal Tools and Scraping
Resist the urge to use metal knives, forks, or other sharp metal objects to scrape off burnt residue. This can easily scratch and permanently damage the heating surface, making future cleaning more difficult and potentially reducing the efficiency of the appliance. Stick to wooden or plastic scrapers.
Maintaining a Pristine Heating Base
Prevention is always better than cure. Adopting a few simple habits can significantly reduce the need for deep cleaning.
Regular Cleaning Habits
Make it a habit to wipe down the heating base after every use, once it has cooled down and is unplugged. A quick wipe with a damp cloth can prevent small spills from turning into stubborn, burnt-on messes. This minimal effort will save you considerable time and frustration in the long run.
Preventing Spills and Buildup
Be mindful when using your appliance. For devices like Yogurt Makers, ensure the inner containers are properly sealed and placed to prevent milk from spilling onto the heating base. When pouring liquids, do so carefully to avoid splashes. If a spill does occur, address it promptly, ideally while it’s still fresh and before it has a chance to burn and adhere to the surface.
Conclusion
A clean and well-maintained appliance heating base is a cornerstone of efficiency, longevity, and safe operation. By diligently following these safety precautions and cleaning methods – primarily unplugging, never submerging, and using gentle yet effective solutions like baking soda and vinegar – you can keep your appliance in excellent condition without causing any damage. Regular, gentle cleaning not only removes unsightly residue but also ensures your appliance performs optimally, saving you energy and extending its life. What are your go-to tips for preventing spills and keeping your appliance’s heating base spotless?
Frequently Asked Questions
Is it safe to use steel wool on a heating base?
No, it is generally not safe to use steel wool on an appliance’s heating base. Steel wool is highly abrasive and can scratch the surface, potentially damaging non-stick coatings or leaving behind tiny metal fragments that could rust or interfere with the heating element’s performance. Always opt for soft cloths or non-abrasive sponges.
How often should I clean the heating base?
For light maintenance, it’s recommended to wipe the heating base after every use, once it has cooled and is unplugged. A deeper clean using baking soda or vinegar might be necessary once a month or whenever you notice significant spills or burnt-on residue that daily wiping can’t handle.
What if I accidentally get water inside the base?
If you accidentally get water inside the heating base, immediately unplug the appliance and do not use it. Turn it upside down (if possible and safe for the appliance design) or place it in a well-ventilated area to allow it to dry completely. This could take several days. Do not plug it back in until you are absolutely certain it is dry, or consult a professional if unsure, as using a water-damaged appliance poses an electric shock hazard.
Can I use commercial degreasers?
It’s generally best to avoid harsh commercial degreasers on your appliance’s heating base unless the manufacturer specifically recommends them. Many commercial cleaners contain chemicals that can be too aggressive for delicate heating elements, potentially damaging surfaces, leaving residues, or even corroding components over time. Stick to milder, natural solutions like baking soda and vinegar for safety and effectiveness.