Crafting your own creamy, probiotic-rich yogurt at home is a rewarding experience, offering superior flavor and control over ingredients. However, the joy of homemade yogurt can quickly diminish if it’s not transported safely, especially when packing it for lunch. The challenge lies in maintaining its cool temperature to prevent spoilage and preserve its delightful texture and taste throughout the day. This guide will walk you through essential food safety principles, recommended gear, and smart packing strategies to ensure your homemade yogurt arrives at lunchtime as fresh and delicious as it left your fridge.
The Essential Yogurt Lunch Packing Guide
Understanding Food Safety: The Golden Rule of 40°F (4°C)
|
Our Picks for the Best Yogurt maker in 2026
As an Amazon Associate I earn from qualifying purchases.
|
||
| Num | Product | Action |
|---|---|---|
| 1 | Yogurt Dehydrator, Small-Batch Greek Yogurt Maker with Built-In Date Reminder Fresh, Simple & Just the Right Amount — Food-Grade BPA-Free Materials |

|
| 2 | Ultimate Probiotic Yogurt Maker with Adjustable Time & Temp Control - Make Trillions of Live Probiotics with Two 1-Quart Containers for Larger Batches - Greek Yogurt Maker - ULTIMATE LIFETIME WARRANTY |
|
| 3 | Yogurt Maker with Adjustable Temperature & Time Control, Probiotic Yogurt Maker Machine with 8 Glass Jars, Automatic Shut-Off for Homemade Probiotic Yogurt, Promoting Gut Health(48OZ) |
|
| 4 | Yogurt Maker, Compact Greek Yogurt Maker Machine with Constant Temperature Control, Stainless Steel Container, 1 Quart for Home Organic Yogurt |
|
| 5 | Yogurt Maker Machine, 8 Glass Jars with Lids Reusable for Yoghurt, Oatmeal, Pudding, or Jello, Food-Grade Martial, One-touch Control, Homemade Yogurt |
|
| 6 | Euro Cuisine YM80 Electric Yogurt Maker Machine- Promote Gut Health with Probiotic Rich Homemade Yogurt -Home Yogurt Incubator with Glass Jars, White |
|
| 7 | Euro Cuisine Yogurt Maker - YMX650 Automatic Digital Yogurt Maker Machine with Set Temperature - Includes 7-6 oz. Reusable Glass Jars and 7 Rotary Date Setting Lids for Instant Storage |
|
| 8 | GDOR Yogurt Maker with Adjustable Temp & Timer– Probiotic-Rich – Digital Greek Yogurt Machine with 8×6oz BPA-Free Glass Jars, Easy to Use for Home, Stainless Steel |
|
| 9 | Easy Yogurt Maker for Perfect Homemade Yogurt, 1.7 QT Electric Fermenter for Greek Yogurt, Rice Wine, Natto, with Digital Control & Auto Keep Warm, BPA-Free Container |
|
| 10 |
|
|
The cornerstone of safely transporting any perishable food, including homemade yogurt, is temperature control. Bacteria thrive in what’s known as the “danger zone,” which spans temperatures between 40°F (4°C) and 140°F (60°C). When yogurt is left within this range for too long, harmful bacteria can multiply rapidly, making it unsafe to eat and potentially causing foodborne illness.
Experts advise that perishable foods should not remain in the danger zone for more than two hours, or just one hour if the ambient temperature is above 90°F (32°C). While this might seem restrictive, proper packing techniques can significantly extend the safe window, allowing you to enjoy your homemade treat hours later. The primary goal is to keep your yogurt consistently below 40°F (4°C) until you’re ready to consume it.
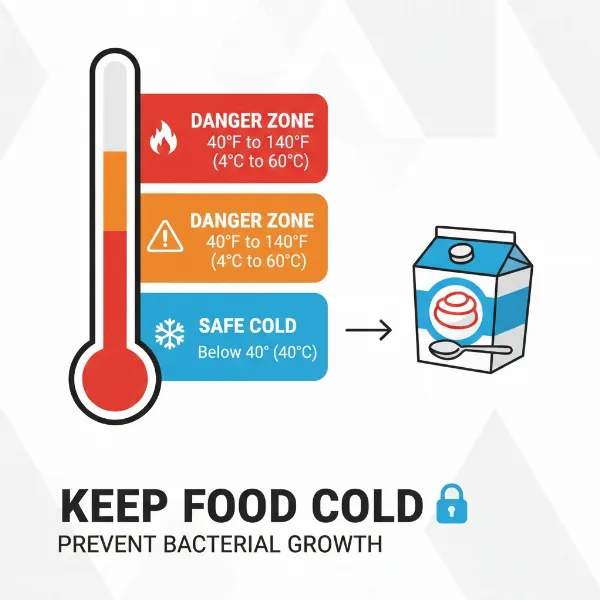 Chart illustrating safe food temperatures, danger zone, and thawing temperatures for perishable items.
Choosing the Right Gear for Your Yogurt
Equipping yourself with the right tools is the first step toward successful yogurt transportation.
Insulated Lunch Bags & Boxes
An insulated lunch bag or box is your primary defense against rising temperatures. These containers are designed with thermal linings that help reflect cold temperatures back towards your food, creating a more stable internal environment. While the insulation itself doesn’t generate cold, it significantly enhances the effectiveness of any chilled items packed inside. Look for bags with robust insulation and a good seal to maximize their protective capabilities.
High-Performance Insulated Containers (Thermos-style)
For superior temperature retention, especially if your lunch period is several hours away or you’re in a warm climate, an insulated food jar (often referred to as a Thermos) is an excellent investment. These containers are specifically engineered to keep foods cold (or hot) for extended periods, often up to 4-5 hours, or even longer depending on the brand and external conditions.
Pro Tip: Pre-chilling your insulated food jar can dramatically improve its performance. Simply fill the jar with ice water and let it sit for 10-15 minutes before emptying and adding your cold yogurt. For even better results, some users freeze their empty Thermos overnight before packing.
Reliable Cold Sources
Insulation works best when paired with effective cold sources.
- Ice Packs/Gel Packs: These are standard and highly effective. Keep several in your freezer and always pack at least one alongside your yogurt.
- Frozen Water or Juice Bottles: A practical and eco-friendly alternative. Freeze a bottle of water or a juice box overnight, and it will act as an ice pack while slowly thawing into a refreshing drink by lunchtime. Remember to pour out a little liquid before freezing to prevent the bottle from bursting as water expands.
- Frozen Yogurt Tubes/Cups: If you use store-bought yogurt tubes, freezing them overnight means they’ll be thawed but still chilled by lunchtime, serving as both a snack and a cold source. You can also partially freeze your homemade yogurt in its container for 20-30 minutes before packing for an extra chill boost.
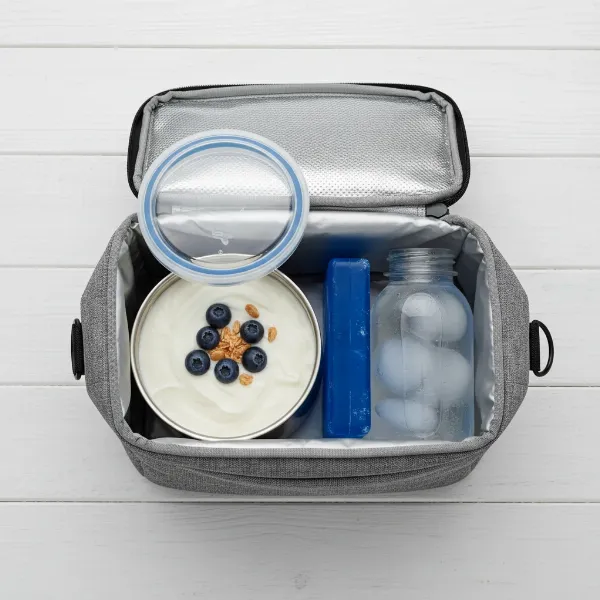 An open insulated lunch bag showing a container of yogurt, an ice pack, and a frozen water bottle.
Step-by-Step Packing for Optimal Freshness
Once you have your gear, follow these steps for safe and delicious yogurt transport:
- Start Cold: Always begin with yogurt that is thoroughly chilled from the refrigerator. Never pack yogurt that has been at room temperature for an extended period.
- Choose the Right Container: Opt for a well-sealing, leak-proof container for your yogurt. Glass, stainless steel, or high-quality BPA-free plastic are excellent choices. If using a Thermos, ensure the lid is tightly secured.
- Pre-chill Everything (Optional but Recommended): If time allows, pre-chill your insulated lunch bag in the refrigerator for 30 minutes before packing. As mentioned, pre-chilling an insulated food jar is highly effective.
- Pack with Cold Sources: Place your yogurt container snugly next to your ice pack, frozen bottle, or frozen yogurt item. The closer they are, the more efficiently the cold transfers.
- Keep Add-ins Separate: If you enjoy toppings like granola, nuts, or fresh fruit with your yogurt, pack them in a separate, small container or baggie. Adding them directly to your yogurt at home will result in soggy, unappetizing additions by lunchtime.
- Seal and Go: Ensure your lunch bag or box is securely zipped or closed to maintain the internal temperature.
“The secret to a perfectly preserved yogurt lunch isn’t just one item, but the synergy of a cold yogurt, an effective cold source, and quality insulation working together.” – Dr. Elena Petrov, Food Safety Specialist
Smart Strategies for Longer Journeys or Warmer Climates
Sometimes, you need your yogurt to stay cold for more than a few hours, or you’re heading into a particularly warm environment.
- Double Up on Cold Packs: Use two or more ice packs if you need extra cooling power. Place one beneath the yogurt and one on top for maximum effect.
- Layered Insulation: If your main lunch bag isn’t extremely robust, consider wrapping your yogurt container (with an ice pack) in an additional layer of insulation, like a small thermal pouch, before placing it in the main lunch bag.
- Partially Freeze Your Yogurt: For a snack that’s still cold and refreshing hours later, partially freeze your homemade yogurt overnight. It will slowly thaw throughout the morning, reaching an ideal eating consistency by lunchtime while helping to keep other items cold.
- Consider Yogurt Consistency: Thicker yogurts, like Greek yogurt, tend to hold their texture better during transport than thinner varieties.
Selecting the Best Containers for Homemade Yogurt
The container you choose plays a significant role in both food safety and enjoyment.
- Material Matters:
- Glass: Excellent for maintaining purity of taste and is non-reactive. However, it can be heavy and fragile.
- Stainless Steel: Durable, lightweight, and excellent for insulation (especially double-walled vacuum-sealed options). It’s non-reactive and easy to clean.
- BPA-Free Plastic: Lighter and less fragile than glass, but ensure it’s high-quality, food-grade, and free from harmful chemicals. Look for containers specifically designed for dairy.
- Leak-Proof Seals: This is non-negotiable. A tight-fitting, leak-proof lid will prevent messy spills in your bag and protect your yogurt from external contaminants. Silicone seals are often highly effective.
- Size and Shape: Choose a container that fits your portion size and fits comfortably in your lunch bag alongside your cold packs. Wide-mouth containers are easier to fill, eat from, and clean.
Troubleshooting Common Yogurt Transportation Issues
Even with the best intentions, challenges can arise.
- Yogurt Getting Warm: This is almost always due to insufficient cold sources or poor insulation. Ensure your ice packs are fully frozen, your insulated bag is well-sealed, and consider a higher-performance insulated food jar if the problem persists.
- Splitting/Wheying: If your yogurt separates into solids and a watery liquid (whey), it can be due to temperature fluctuations, excessive shaking, or the yogurt being past its prime. Keeping it consistently cold and packing it securely can help. A gentle stir before eating usually recombines it.
- Leakage: A clear sign your container’s seal isn’t adequate. Invest in higher-quality containers with robust, leak-proof lids, or try a silicone lid replacement for existing jars.
Eco-Friendly Tips for Your Lunch Kit
Making your own yogurt is already an eco-conscious choice; extend that mindfulness to your lunch packing:
- Reusable Everything: Ditch single-use plastic bags and containers. Invest in durable, reusable lunch bags, food jars, and snack containers.
- Homemade Ice Packs: Freeze water in small, reusable plastic bottles or containers instead of buying disposable gel packs.
- Mindful Toppings: Purchase bulk granola, nuts, and dried fruit to reduce packaging waste.
Where to Buy Reliable Yogurt Transportation Gear?
You can find high-quality insulated lunch bags, food jars, and ice packs at most major department stores, kitchenware retailers, and outdoor supply shops. Online marketplaces also offer a vast selection. When buying online, always check customer reviews for comments on leak-proof capabilities and actual cold-retention performance. Look for reputable brands known for their durability and food-safe materials.
Conclusion
Transporting homemade yogurt safely for lunch is entirely achievable with the right approach. By understanding the importance of maintaining a cold temperature below 40°F (4°C), selecting appropriate insulated containers and robust cold sources, and employing smart packing strategies, you can confidently take your delicious and nutritious homemade yogurt with you wherever you go. Don’t let food safety concerns deter you from enjoying the wholesome goodness of your own creation. With these tips, your lunch will always be a refreshing and safe experience. What are your go-to homemade yogurt flavors for lunch?
Frequently Asked Questions
How long can homemade yogurt stay out of the fridge safely?
Homemade yogurt, like most perishable foods, should not be left at room temperature for more than two hours. In warmer conditions (above 90°F or 32°C), this safe window shrinks to just one hour. To extend this, always pack it in an insulated container with effective cold sources like ice packs, aiming to keep it below 40°F (4°C).
Can I freeze homemade yogurt for lunch to keep it cold?
Yes, you can partially freeze homemade yogurt overnight or for about 20-30 minutes before packing. This helps it stay colder for longer, acting as its own cold source, and will gradually thaw to a pleasant consistency by lunchtime. Freezing it completely might alter its texture slightly upon thawing, but it remains safe to eat.
What’s the best container for keeping yogurt cold for several hours?
For optimal cold retention over several hours, a high-quality, vacuum-insulated food jar (like a Thermos) is highly recommended. Pre-chilling the jar with ice water before adding your cold yogurt significantly boosts its ability to keep the yogurt at a safe temperature until lunch.
How do I prevent my homemade yogurt from getting watery when packed for lunch?
Watery yogurt (wheying) can be caused by temperature fluctuations or excessive agitation. To minimize this, ensure your yogurt stays consistently cold during transport by using good insulation and cold packs. Also, use a container that fits snugly in your lunch bag to prevent too much movement, and try to use a thicker yogurt base if possible.