The pursuit of better gut health and a stronger immune system has led many to explore natural, homemade solutions. Among the most potent and delicious options is cultivating your own probiotics through the ancient art of fermentation. Imagine enjoying vibrant, living foods packed with beneficial bacteria, all crafted right in your kitchen. This guide will walk you through the fascinating world of homemade probiotics, detailing the methods, essential tools, and crucial safety measures to ensure your culinary creations are both nourishing and safe. Prepare to unlock a universe of flavor and wellness as you learn to transform simple ingredients into probiotic powerhouses.
Understanding Probiotics and Home Fermentation
Embarking on the journey of homemade probiotics begins with a clear understanding of what these beneficial microorganisms are and how fermentation works its magic. It’s more than just a culinary technique; it’s a science that supports our well-being.
What Are Probiotics and Why Are They Important?
|
Our Picks for the Best Yogurt maker in 2026
As an Amazon Associate I earn from qualifying purchases.
|
||
| Num | Product | Action |
|---|---|---|
| 1 | Easy Yogurt Maker for Perfect Homemade Yogurt, 1.7 QT Electric Fermenter for Greek Yogurt, Rice Wine, Natto, with Digital Control & Auto Keep Warm, BPA-Free Container |

|
| 2 | Yogurt Maker Machine, 8 Glass Jars with Lids Reusable for Yoghurt, Oatmeal, Pudding, or Jello, Food-Grade Martial, One-touch Control, Homemade Yogurt |
|
| 3 | Euro Cuisine Yogurt Maker - YMX650 Automatic Digital Yogurt Maker Machine with Set Temperature - Includes 7-6 oz. Reusable Glass Jars and 7 Rotary Date Setting Lids for Instant Storage |
|
| 4 | Yogurt Maker, Compact Greek Yogurt Maker Machine with Constant Temperature Control, Stainless Steel Container, 1 Quart for Home Organic Yogurt |
|
| 5 | Yogurt Maker with Adjustable Temperature & Time Control, Probiotic Yogurt Maker Machine with 8 Glass Jars, Automatic Shut-Off for Homemade Probiotic Yogurt, Promoting Gut Health(48OZ) |
|
| 6 | Yogurt Dehydrator, Small-Batch Greek Yogurt Maker with Built-In Date Reminder Fresh, Simple & Just the Right Amount — Food-Grade BPA-Free Materials |
|
| 7 | GDOR Yogurt Maker with Adjustable Temp & Timer– Probiotic-Rich – Digital Greek Yogurt Machine with 8×6oz BPA-Free Glass Jars, Easy to Use for Home, Stainless Steel |
|
| 8 | Yogurt Maker with Two Containers, Yogurt Maker Machine with Adjustable Temperature & Time Control, Automatic Shut-Off & Constant Temper for Homemade Probiotic Yogurt, Promoting Gut Health |
|
| 9 | Euro Cuisine YM80 Electric Yogurt Maker Machine- Promote Gut Health with Probiotic Rich Homemade Yogurt -Home Yogurt Incubator with Glass Jars, White |
|
| 10 |
|
|
Probiotics are live microorganisms, primarily bacteria and yeasts, that, when consumed in adequate amounts, confer a health benefit to the host. Often referred to as “good” or “helpful” bacteria, they play a pivotal role in maintaining a healthy balance within our gut microbiome, which is intrinsically linked to overall health. These microscopic allies are vital for optimal digestion, nutrient absorption, and a robust immune system. Beyond these fundamental roles, scientific research suggests that incorporating live probiotic cultures into your diet can help alleviate symptoms of allergies, reduce inflammation, and even support the management of certain autoimmune diseases. The beneficial bacteria found in fermented foods also contribute to detoxing the body and preventing oxidative stress.
It’s crucial to distinguish between fermentation and pickling. While both are methods of food preservation, traditional pickling often uses vinegar, which kills the live bacteria essential for probiotic benefits. Fermentation, on the other hand, actively cultivates these living bacterial cultures, transforming the food and enhancing its nutritional profile.
Common Probiotic-Rich Foods You Can Make at Home
The world of homemade fermented foods is incredibly diverse, offering a range of flavors and textures to explore. Many common ingredients can be transformed into probiotic powerhouses with simple techniques.
Some of the most popular and accessible options include:
- Sauerkraut: Finely shredded cabbage fermented in its own juices with salt, known for its tangy flavor.
- Kimchi: A spicy Korean staple typically made with fermented cabbage and a variety of seasonings.
- Fermented Vegetables: Beyond cabbage, a wide array of vegetables like carrots, radishes, cucumbers, and even ginger can be lacto-fermented in a salt brine.
- Kefir: A fermented milk drink made using kefir “grains” (symbiotic culture of bacteria and yeasts). Water kefir, a dairy-free alternative, uses water kefir grains with sugar water.
- Kombucha: A fizzy, slightly tart tea made by fermenting sweetened tea with a SCOBY (Symbiotic Culture Of Bacteria and Yeast).
- Rejuvelac: A fermented grain drink made by soaking and sprouting grains like wheat or quinoa, then fermenting the sprouts in water.
- Homemade Yogurt: While store-bought yogurts can contain probiotics, making your own allows for control over strains and freshness.
- Tempeh: A fermented soybean product, often used as a meat substitute, cultured with a specific fungus.
- Natto: Another fermented soybean product, distinct for its sticky texture and strong flavor, made using Bacillus subtilis.
Each of these foods offers a unique set of probiotic strains and nutritional benefits, making them exciting additions to a health-conscious diet.
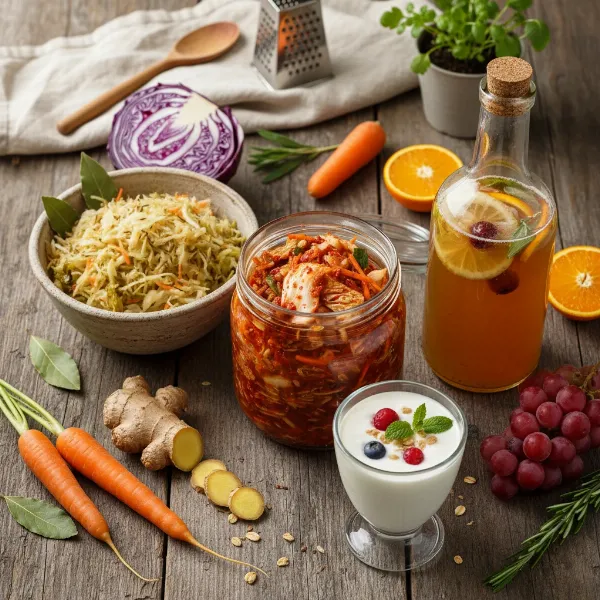 A vibrant assortment of homemade fermented foods, including kimchi, sauerkraut, kombucha, and kefir, showcasing probiotic diversity.
Essential Equipment and Ingredients for Safe Fermentation
Successful and safe home fermentation relies on having the right tools and high-quality ingredients. Preparing your equipment and selecting your components carefully are foundational steps to cultivating thriving probiotic cultures and preventing spoilage.
Must-Have Fermentation Tools
You don’t need a professional kitchen to start fermenting, but a few key items will ensure efficiency and safety.
- Glass Jars: Wide-mouth mason jars are ideal. They must be spotlessly clean and sterilized to prevent the growth of undesirable bacteria.
- Airlocks (Optional but Recommended): These allow gases produced during fermentation to escape without letting outside air (and contaminants) in. They are particularly useful for longer ferments.
- Fermentation Weights: Small glass weights or even a clean stone can be used to keep vegetables submerged under the brine, which is crucial for anaerobic fermentation and preventing mold.
- Clean Kitchen Towels: Used to cover jars (especially those without airlocks) to protect from dust and insects while allowing airflow.
- Knives and Cutting Boards: For preparing your vegetables. Ensure they are thoroughly cleaned.
- Fermentation Crocks: For larger batches of sauerkraut or other vegetable ferments, a traditional ceramic crock with a water seal can be an excellent investment.
- Temperature Control: While many ferments do well at room temperature, some, like Kombucha, Tempeh, and Natto, benefit from a more consistent temperature. A dedicated proofing box or even a simple warming mat can provide the ideal environment for these specific cultures.
Key Ingredients for Success
The quality of your ingredients directly impacts the outcome of your ferment.
- Fresh, High-Quality Vegetables or Ingredients: Always start with fresh produce. Organic options are often preferred to minimize pesticide residue, which could interfere with fermentation.
- Non-Iodized Salt: This is perhaps the most critical ingredient for lacto-fermentation. Use coarse sea salt, pickling salt, or kosher salt. Iodine found in table salt can inhibit the growth of beneficial lactic acid bacteria. The salt acts as a preservative, drawing out water from vegetables and creating a selective environment where beneficial bacteria can thrive while harmful ones are suppressed.
- Filtered Water: Tap water often contains chlorine or chloramine, which are disinfectants designed to kill bacteria – including the good ones you want to cultivate. Using filtered, unchlorinated water is essential for successful fermentation. If filtered water isn’t available, you can often leave tap water out uncovered for 24 hours to allow chlorine to dissipate.
- Starter Cultures: For certain ferments, you’ll need a specific starter culture. This includes kefir grains for kefir, a SCOBY for kombucha, or a starter powder for yogurt or tempeh. These cultures introduce the specific beneficial microorganisms required for that particular ferment.
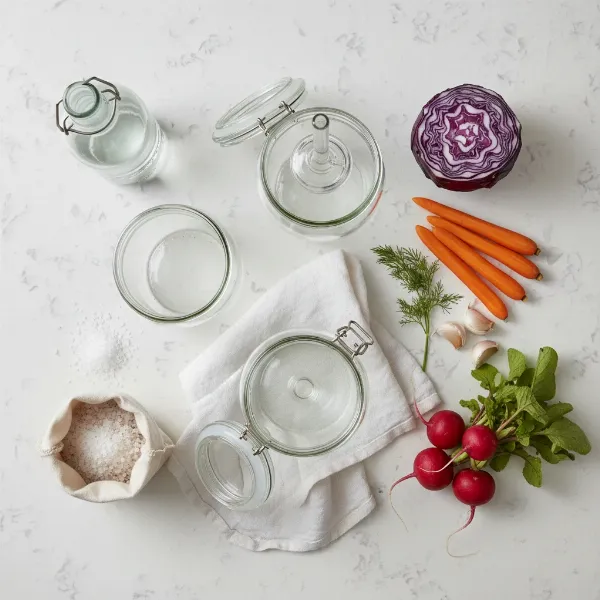 Essential tools for home fermentation like glass jars, airlock, weights, and key ingredients such as salt and fresh vegetables.
Step-by-Step Guide to Fermenting Vegetables (Lacto-Fermentation)
Lacto-fermentation of vegetables is an excellent starting point for home probiotic cultivation due to its simplicity and the wide range of delicious results. This method utilizes naturally occurring lactic acid bacteria on vegetables to create a nutrient-dense, probiotic-rich food.
Preparing Your Workspace and Ingredients
Cleanliness is paramount in fermentation to encourage the growth of desired bacteria and inhibit harmful pathogens.
- Sterilize Equipment: Thoroughly wash your glass jars, lids (if applicable), fermentation weights, and any utensils that will contact the food. Sterilize them by boiling in water for 10 minutes or running them through a hot dishwasher cycle. Allow them to air dry completely. Crucially, avoid using detergents that might leave residues, as these can hinder bacterial growth. Similarly, wash your hands thoroughly, ensuring no soap residue remains.
- Wash and Cut Vegetables: Clean your chosen vegetables (e.g., cabbage, carrots, radishes) under cold running water. Remove any bruised or damaged parts. Chop or shred the vegetables into suitable pieces. Remember, smaller pieces tend to ferment faster, while larger chunks offer a different texture and slower fermentation.
- Prepare Brine (if not dry salting): For many vegetable ferments, you’ll prepare a salt solution. A general rule of thumb is to use 10-15 grams of non-iodized salt per 1 kilogram of vegetables, or 1 tablespoon of salt per 1 liter of water for a brine solution. A common and safe salt concentration for brine is 2-4.5%. For example, to make a 4.5% brine, dissolve 45 grams of salt in 1 liter of filtered water. Heat the water slightly to ensure the salt dissolves completely, then allow the brine to cool down to room temperature before use.
Packing the Jars and Initiating Fermentation
Proper packing creates the anaerobic (oxygen-free) environment that lactic acid bacteria thrive in.
- Pack Vegetables Tightly: Place your prepared vegetables into the sterilized jars, packing them down firmly. This helps to remove air pockets and, in the case of dry-salted ferments (like sauerkraut), encourages the vegetables to release their natural juices.
- Add Brine: If dry salting, ensure the vegetables are submerged in their own released liquid. If using a brine solution, pour the cooled brine over the vegetables until they are completely covered. It is vital that all vegetable matter remains submerged to prevent mold growth. Leave about 5-8 centimeters (2-3 inches) of headspace from the top of the jar to allow for expansion during fermentation.
- Submerge Vegetables with Weights: Place a fermentation weight (or a small, clean plate/stone) on top of the vegetables to keep them fully immersed beneath the brine. This barrier against oxygen is a critical safety step.
- Cover the Jar: Cover the jar opening with a clean kitchen towel secured with a rubber band, or use a lid fitted with an airlock. A towel allows gases to escape while protecting the ferment from dust and insects. A lid with an airlock offers a more controlled anaerobic environment.
Fermentation Process and Monitoring
The environment in which your ferment sits will dictate the speed and success of the process.
- Choose the Right Temperature: Most lacto-fermented vegetables thrive at room temperature, ideally between 18-20°C (64-68°F). Some specific ferments have different optimal ranges:
- Kombucha: 22-28°C (72-82°F)
- Tempeh: 31°C (88°F)
- Japanese Natto: 38°C (100°F)
- Kefir (milk/water): 21-29°C (70-85°F)
If your environment is cooler, fermentation will proceed slower; if warmer, it will be faster. Avoid extreme temperatures.
- Monitor Daily: Over the next few days, regularly check your ferment. You might see small bubbles forming, indicating active fermentation. Foam may also appear on the surface; gently skim this off with a clean spoon. Always ensure the vegetables remain submerged under the brine. If the brine level drops, top it up with a fresh, pre-made brine solution of the same salt concentration.
- Duration and Taste Test: Fermentation typically begins within 2-3 days. For some vegetables, a full fermentation process can take 4-6 weeks, especially if storing for longer periods. You can start tasting your ferment after a few days. The flavor will become progressively more sour and complex over time. When you are happy with the taste, the fermentation process can be slowed by moving the jar to the refrigerator.
Ensuring Safety and Preventing Spoilage
While home fermentation is generally safe, understanding potential issues and adhering to best practices is crucial to avoid spoilage and ensure your probiotic foods are healthy to consume. Safety in fermentation is primarily about controlling the environment to favor beneficial bacteria.
The Golden Rules of Fermentation Hygiene
Successful and safe fermentation hinges on strict adherence to hygiene and ingredient choices.
- Sterilized Equipment: This is arguably the most critical safety step. Any unwanted bacteria or molds on your jars or tools can contaminate your ferment, leading to spoilage. Always sterilize your jars, weights, and utensils thoroughly before use.
- Clean Hands: Your hands carry countless microorganisms. Wash them meticulously before handling any ingredients or equipment to prevent introducing undesirable microbes into your ferment.
- Non-Iodized Salt: As mentioned, iodine can inhibit the growth of beneficial lactic acid bacteria, potentially leading to a failed ferment where spoilage organisms might take over. Stick to pure, non-iodized salts.
- Chlorine-Free Water: Chlorine and chloramine in tap water are designed to kill bacteria. These chemicals will hinder or completely stop your fermentation process by eliminating the good bacteria you are trying to cultivate. Always use filtered water or water that has been left out for at least 24 hours to allow chlorine to dissipate.
Identifying and Avoiding Common Fermentation Issues
Even with careful preparation, issues can sometimes arise. Knowing what to look for can help you decide if your ferment is safe.
- Mold: This is the most common and concerning issue. Mold typically appears as fuzzy, colored patches (white, green, black, or blue) on the surface of the ferment, often on vegetable pieces exposed to air. Mold indicates that oxygen has entered the system and undesirable fungi have taken hold. If you see mold, it is always safest to discard the entire batch. Prevention is key: always keep vegetables fully submerged under the brine.
- Off-Smells: A healthy ferment should have a pleasant, tangy, sour, or yeasty aroma. Foul, putrid, rotten, or intensely cheesy smells are strong indicators of spoilage. Trust your nose – if it smells bad, it likely is.
- Incorrect Temperature/Time: Fermenting at temperatures too low can result in a very slow or stalled process, making it susceptible to spoilage. Temperatures that are too high can accelerate fermentation too rapidly, leading to undesirable flavors or encouraging the growth of spoilage organisms. Adhering to the recommended temperature ranges and fermentation times is crucial for a successful and safe outcome.
- Unsterile Environment: This is the root cause of many fermentation failures. If jars or ingredients are not clean, pathogenic bacteria can be introduced, leading to an unsafe product.
When to Discard Your Ferment
When in doubt, it’s always best to err on the side of caution. Discard your ferment if you observe any of the following:
- Presence of Mold: Any visible fuzzy, colored growth on the surface.
- Foul or Rotten Odor: A truly unpleasant smell that goes beyond a normal sour or tangy aroma.
- Slimy or Unusually Discolored Vegetables: While some color change is normal, overly slimy textures or significant, unusual discoloration can be a sign of spoilage.
- If You’re in Doubt: If anything about your ferment makes you question its safety, it’s best to dispose of it. Your health is not worth the risk.
“Safety in home fermentation boils down to consistency and vigilance. Controlling temperature, salt levels, and oxygen exposure are your primary defenses against unwanted microbes.” – Dr. Elena Petrova, Fermentation Microbiologist
Maximizing the Benefits of Your Homemade Probiotics
Once you’ve successfully cultivated your probiotic-rich foods, the next steps involve proper storage and integration into your diet to ensure you reap the full spectrum of their health benefits.
Storing Fermented Foods
The way you store your homemade probiotics significantly impacts their longevity and potency.
- Refrigerate to Slow Fermentation: Once your fermented food has reached your desired taste and acidity, transfer the sealed jar to the refrigerator. The cold temperature will dramatically slow down the fermentation process, preserving the flavor and the beneficial live cultures.
- Avoid Heat Treatment: To retain the live probiotic cultures, it is crucial to consume fermented foods raw. Cooking or heating them will kill the beneficial bacteria, eliminating their probiotic properties. Add them to dishes after they’ve cooled or enjoy them as a fresh side.
- Shelf Life: Properly refrigerated, many lacto-fermented vegetables can last for several weeks to a few months. Opened jars should generally be consumed within two weeks for optimal freshness and probiotic content. Unopened ferments, especially those prepared for winter storage like sauerkraut, can last much longer in a cool, dark place or refrigerator.
Incorporating Fermented Foods into Your Diet
Integrating fermented foods into your daily routine is simple and can be incredibly beneficial.
- Start Small: If you’re new to fermented foods, begin with a small amount, such as one tablespoon per day. This allows your digestive system to adjust to the influx of new bacteria. Gradually increase your intake to 3-4 spoonfuls daily as your body becomes accustomed.
- Versatile Additions: Fermented vegetables can be enjoyed in numerous ways. Add a spoonful to your salads for a tangy kick, layer them onto sandwiches or wraps, serve them as a vibrant side dish with your meals, or simply enjoy them straight from the jar as a healthy snack.
- Mindful Consumption: Remember that the goal is consistent, raw consumption to ensure the live cultures reach your gut. Avoid pairing them with overly hot foods that might diminish their probiotic value.
By following these guidelines, you can confidently enjoy the rich flavors and profound health benefits of your homemade probiotic superfoods, fostering a healthier gut microbiome one delicious bite at a time.
Conclusion
Cultivating probiotics at home is a rewarding journey that empowers you to take control of your gut health and enrich your diet with delicious, living foods. From crunchy sauerkraut to tangy kefir, the possibilities are vast and the process surprisingly simple with the right knowledge and precautions. By understanding the principles of fermentation, maintaining impeccable hygiene, and recognizing the signs of a healthy ferment, you can confidently create your own supply of beneficial bacteria. These homemade treasures offer an abundance of advantages, supporting digestion, bolstering your immune system, and contributing to overall vitality. With dedication to proper technique and unwavering attention to safety, you’ll soon be enjoying the vibrant flavors and profound health benefits that homemade probiotics bring to your table.
What fermented food will you try making first?
Frequently Asked Questions
What is the ideal salt percentage for vegetable fermentation?
For most vegetable lacto-fermentation, a salt concentration of 2-4.5% is ideal. This typically translates to about 10-15 grams of non-iodized salt per kilogram of vegetables, or 1 tablespoon of salt per liter of water when preparing a brine solution. This range effectively inhibits spoilage organisms while allowing beneficial lactic acid bacteria to thrive.
How do I know if my fermented vegetables have gone bad?
The most definitive signs of spoilage are the presence of mold (fuzzy, colored growth on the surface), a foul or putrid odor (distinctly different from a pleasant sour or tangy smell), or unusually slimy textures. If you observe any of these, or if you are simply unsure, it is always safest to discard the batch to avoid health risks.
Can I use tap water for fermentation?
It is strongly recommended to avoid using tap water directly for fermentation if it contains chlorine or chloramine. These chemicals are designed to kill bacteria and will inhibit the growth of the beneficial microorganisms essential for fermentation. Filtered water is ideal, or you can let tap water sit uncovered for 24 hours to allow chlorine to dissipate.
What’s the difference between pickling and fermenting?
While both are food preservation methods, pickling typically uses an acidic solution like vinegar, which pasteurizes the food and kills most bacteria. Fermentation, on the other hand, relies on beneficial bacteria to transform the food, creating lactic acid or other compounds. This process preserves the food while actively cultivating live probiotic cultures, which are absent in vinegar-pickled foods.
Why do I need to keep vegetables submerged during fermentation?
Keeping vegetables fully submerged under the brine or their own juices is critical for anaerobic fermentation. This creates an oxygen-free environment where lactic acid bacteria thrive and prevents the growth of undesirable molds and yeasts, which require oxygen to multiply. Exposure to air is the most common cause of mold in ferments.
What if my ferment doesn’t bubble?
While bubbling is a common sign of active fermentation as carbon dioxide is produced, a lack of visible bubbles doesn’t always mean your ferment has failed. The intensity of bubbling can vary depending on temperature, ingredients, and the type of ferment. If your ferment smells pleasantly tangy and shows no signs of spoilage, it is likely still fermenting, even without vigorous bubbling.