Embarking on the journey of making homemade cashew yogurt can transform your kitchen into a hub of wholesome, delicious creation. If you’ve been searching for a dairy-free alternative that rivals the creaminess and tang of traditional yogurt, you’re in the right place. This comprehensive guide will walk you through every step, from selecting your cashews to fermenting them to perfection in your yogurt machine, ensuring you achieve a consistently delightful batch every time. Say goodbye to store-bought limitations and hello to customized, gut-friendly goodness!
Why Embrace Homemade Cashew Yogurt?
Making your own cashew yogurt offers a plethora of benefits that extend beyond just satisfying your dairy-free cravings. Firstly, you gain complete control over the ingredients, ensuring no unwanted additives, thickeners, or excessive sugars make it into your bowl. This allows for a truly pure and nourishing product, tailored precisely to your dietary needs and preferences.
Beyond ingredient control, homemade cashew yogurt provides a rich source of probiotics, essential for a healthy gut microbiome. The fermentation process amplifies these beneficial bacteria, potentially offering digestive advantages. Furthermore, crafting your own cashew yogurt can be significantly more cost-effective than repeatedly purchasing specialty vegan yogurts from the store, making it a smart choice for both your health and your wallet. The resulting texture is luxuriously creamy, and the flavor boasts a delightful tanginess that is both refreshing and versatile, perfect for breakfast bowls, smoothies, or savory dishes.
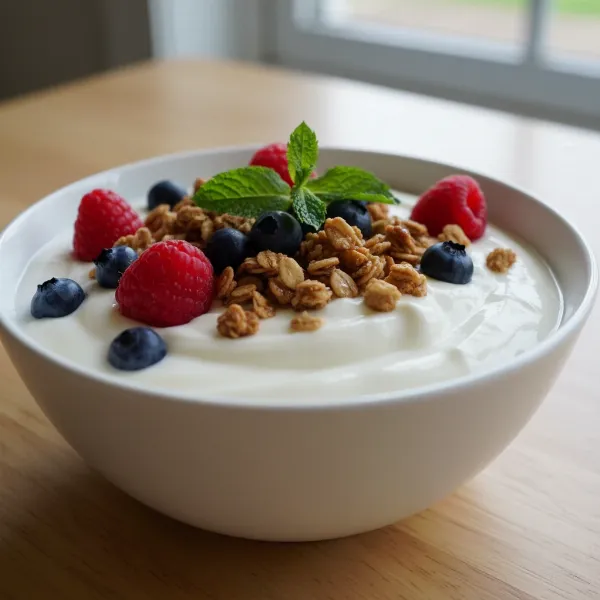 Creamy cashew yogurt bowl with berries, granola, and mint, showcasing healthy dairy-free breakfast.
Essential Ingredients for Your Cashew Yogurt
The magic of homemade cashew yogurt begins with a few simple, high-quality ingredients. Each plays a crucial role in achieving the desired texture and flavor.
The Foundation: Raw Cashews
|
Our Picks for the Best Yogurt maker in 2026
As an Amazon Associate I earn from qualifying purchases.
|
||
| Num | Product | Action |
|---|---|---|
| 1 | Yogurt Maker with Adjustable Temperature & Time Control, Probiotic Yogurt Maker Machine with 8 Glass Jars, Automatic Shut-Off for Homemade Probiotic Yogurt, Promoting Gut Health(48OZ) |

|
| 2 | Yogurt Maker Machine, 8 Glass Jars with Lids Reusable for Yoghurt, Oatmeal, Pudding, or Jello, Food-Grade Martial, One-touch Control, Homemade Yogurt |
|
| 3 | Euro Cuisine YM80 Electric Yogurt Maker Machine- Promote Gut Health with Probiotic Rich Homemade Yogurt -Home Yogurt Incubator with Glass Jars, White |
|
| 4 | Easy Yogurt Maker for Perfect Homemade Yogurt, 1.7 QT Electric Fermenter for Greek Yogurt, Rice Wine, Natto, with Digital Control & Auto Keep Warm, BPA-Free Container |
|
| 5 | Yogurt Maker, Compact Greek Yogurt Maker Machine with Constant Temperature Control, Stainless Steel Container, 1 Quart for Home Organic Yogurt |
|
| 6 | Ultimate Probiotic Yogurt Maker with Adjustable Time & Temp Control - Make Trillions of Live Probiotics with Two 1-Quart Containers for Larger Batches - Greek Yogurt Maker - ULTIMATE LIFETIME WARRANTY |
|
| 7 | Yogurt Dehydrator, Small-Batch Greek Yogurt Maker with Built-In Date Reminder Fresh, Simple & Just the Right Amount — Food-Grade BPA-Free Materials |
|
| 8 | Euro Cuisine Yogurt Maker - YMX650 Automatic Digital Yogurt Maker Machine with Set Temperature - Includes 7-6 oz. Reusable Glass Jars and 7 Rotary Date Setting Lids for Instant Storage |
|
| 9 | GDOR Yogurt Maker with Adjustable Temp & Timer– Probiotic-Rich – Digital Greek Yogurt Machine with 8×6oz BPA-Free Glass Jars, Easy to Use for Home, Stainless Steel |
|
| 10 | Yogurt Maker with Two Containers, Yogurt Maker Machine with Adjustable Temperature & Time Control, Automatic Shut-Off & Constant Temper for Homemade Probiotic Yogurt, Promoting Gut Health |
|
Raw, unsalted cashews are the star of this recipe. Their naturally creamy texture makes them an ideal base for a luscious plant-based yogurt. It’s vital to use raw cashews, as roasted varieties will alter the flavor and can interfere with the blending process. Soaking the cashews is a non-negotiable step; it softens them, making them easier to blend into a super-smooth milk, which is key to a creamy yogurt. For best results, soak them in filtered water overnight, or if you’re in a hurry, soak them in hot water for 1-4 hours. Always drain and rinse them thoroughly after soaking.
The Elixir: Filtered Water
Filtered water is essential for both soaking your cashews and blending them into milk. Using filtered water ensures your yogurt’s purity, avoiding any chlorine or impurities that could negatively impact the fermentation process or flavor.
The Catalyst: Probiotic Culture
This is where your cashew milk transforms into yogurt. You’ll need a starter culture to introduce the beneficial bacteria responsible for fermentation. There are a few reliable options:
- Probiotic Capsules: Look for vegan probiotic capsules with at least 20-30 billion live bacteria per dose, specifically containing strains like Lactobacillus bulgaricus, Streptococcus thermophilus, L. acidophilus, and B. lactis. These strains are effective for non-dairy fermentation and often contribute to thickness.
- Vegan Yogurt Starter Powder: Specialized vegan yogurt starter cultures (available from brands like Cultures for Health) are formulated specifically for plant-based milks and can yield excellent results.
- Store-Bought Vegan Yogurt: An unsweetened, plain vegan yogurt with “live and active cultures” can also serve as a starter. However, be aware that commercial yogurts, especially non-dairy ones, often use direct-set cultures which may weaken after one or two re-cultures, meaning you might need fresh starter for subsequent batches. Heirloom cultures, common in dairy yogurt, typically don’t thrive long-term in non-dairy environments due to the lack of lactose.
Sweetener (Optional)
Unlike dairy milk, nut milk doesn’t naturally contain much sugar for the bacteria to feed on. A small amount of sweetener, such as maple syrup or granulated sugar, can provide a food source to kickstart the fermentation process and enhance the flavor. About one teaspoon of sugar or one tablespoon of maple syrup per batch is usually sufficient. Avoid raw honey, as its antimicrobial properties can inhibit fermentation.
Thickening Agents (Optional)
While proper cashew preparation often yields a creamy texture, some prefer an even thicker, Greek-style yogurt. You can achieve this by incorporating:
- Chia Seeds: Stir a tablespoon or two into the blended cashew milk before refrigeration after fermentation. They will absorb liquid and thicken the yogurt significantly.
- Starches: A small amount (1-2 tablespoons) of arrowroot starch, tapioca starch, or cornstarch can be blended into the cashew milk base to aid in thickening.
Selecting the Ideal Yogurt Maker for Non-Dairy Delights
The beauty of a dedicated yogurt maker lies in its ability to maintain a consistent temperature, which is paramount for successful fermentation. Most electric yogurt makers are well-suited for non-dairy yogurts, as the principle remains the same: provide a warm, stable environment for beneficial bacteria to thrive.
When choosing a yogurt maker, consider these features:
- Temperature Control: A machine that allows you to set and maintain a precise temperature (ideally between 100-110°F or 38-44°C) offers the best control over the fermentation process.
- Digital Timer: A timer feature is incredibly useful for setting your desired fermentation duration, especially since non-dairy yogurts often benefit from longer incubation times.
- Capacity and Jars: Consider how much yogurt you want to make. Many yogurt makers come with individual glass jars, which are excellent for single servings and help prevent unwanted plastic contact. Glass is also easy to sterilize, crucial for successful yogurt making.
Popular brands often lauded for their reliability with vegan yogurts include Euro Cuisine, Luvele, and other models with adjustable temperature and timer functions. Even multi-cookers like the Instant Pot often have a “yogurt” setting that works perfectly.
Step-by-Step Guide: Making Cashew Yogurt in Your Machine
With your ingredients and equipment ready, it’s time to create your delicious cashew yogurt!
1. Preparation and Sterilization
First and foremost, sterilize all your equipment that will come into contact with the cashew mixture. This includes your blender jar, mixing spoons, and the yogurt maker jars or container. Improper sterilization is a common cause of failed batches and unwanted mold. Wash everything thoroughly with hot, soapy water, then rinse completely. For an extra layer of protection, you can rinse jars with boiling water or use a sterilizer.
Next, soak your cashews. If using a high-speed blender, 1-4 hours in filtered water is usually sufficient. For standard blenders, an overnight soak (8-12 hours) will yield a smoother result. After soaking, drain the cashews thoroughly and rinse them under running water.
2. Blending the Cashew Base
Combine the drained and rinsed cashews with fresh filtered water in your high-speed blender. The ratio can vary, but a good starting point is 1 cup of raw cashews to 3-3.5 cups of water for a creamy consistency. Blend on high speed for 3-5 minutes, or until the mixture is exceptionally silky smooth. There should be no gritty texture. The friction from blending may warm the mixture slightly, which is often ideal for introducing the starter.
Optional Step (for thicker yogurt or added security): Some recipes suggest gently heating the blended cashew milk to a boil on the stovetop, stirring constantly, then cooling it back down to 100-110°F (38-44°C) before adding the starter. This step can help thicken the yogurt and eliminate any wild bacteria. If you choose this method, allow the milk to cool sufficiently before proceeding.
3. Incorporating the Starter Culture
Once your cashew milk is blended and at the appropriate temperature (100-110°F or 38-44°C – it should feel barely warm to the touch, not hot), add your chosen starter culture.
- If using probiotic capsules, twist them open and empty the powder into the blender with the cashew milk. Discard the capsule casing.
- If using yogurt starter powder or store-bought vegan yogurt, add the recommended amount to the blender.
- Add your optional sweetener (maple syrup or sugar) at this stage.
Blend for just a few more seconds to thoroughly incorporate the starter and sweetener into the cashew milk. Avoid over-blending once the starter is added.
4. Fermentation in Your Yogurt Maker
Carefully pour the cashew milk mixture into your sterilized yogurt maker jars or container. Secure the lids if individual jars are used, or cover the main container loosely if your machine has a larger incubation chamber.
Place the jars/container into your yogurt maker. Set the temperature to around 100-110°F (38-44°C). Next, set the timer for your desired fermentation duration. For a milder yogurt, start with 8-12 hours. For a tangier, more probiotic-rich yogurt, you can ferment for 12-24 hours, or even up to 36 hours for a “24-hour yogurt” effect, which can result in more beneficial bacteria. Experiment to find your preferred level of tanginess.
During fermentation, condensation will likely collect under the lid; this is completely normal. Resist the urge to open the yogurt maker frequently, as this can disrupt the consistent temperature needed for proper culturing.
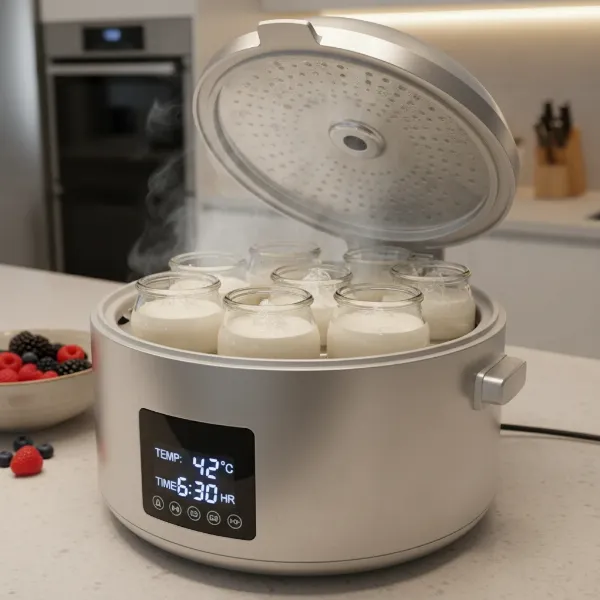 Yogurt maker actively fermenting cashew milk in glass jars, maintaining stable temperature for probiotics.
5. Chilling and Thickening
Once the fermentation cycle is complete, carefully remove the jars or container from the yogurt maker. At this stage, your cashew yogurt may still appear somewhat runny. This is normal. Gently stir the yogurt, then cover and transfer it to the refrigerator.
Chilling is a critical step, as the yogurt will continue to thicken significantly as it cools. Allow it to chill for at least 4 hours, or preferably overnight. If you opted to add chia seeds for thickening, you’ll notice a much firmer consistency after refrigeration.
Troubleshooting Common Cashew Yogurt Challenges
Even experienced home yogurt makers encounter occasional issues. Don’t be discouraged if your first batch isn’t perfect!
- My Yogurt is Too Thin/Runny:
- Insufficient fermentation time: Try fermenting for a few more hours in your next batch.
- Inactive starter: Ensure your probiotic capsules or starter culture are fresh and viable.
- Incorrect temperature: The yogurt maker’s temperature might have been too low (inhibiting growth) or too high (killing the culture).
- Cashews not blended enough: A gritty base will result in a less creamy, thinner yogurt.
- No thickener (if desired): Consider adding arrowroot starch or chia seeds next time.
- My Yogurt Isn’t Tangy Enough:
- This is usually a sign of short fermentation time. Extend the fermentation by a few more hours in subsequent batches until you achieve your preferred tang.
- My Yogurt Tastes Off or Has Mold:
- This almost always points to improper sterilization of your equipment. Any lingering bacteria or contaminants can outcompete your starter culture. Discard the batch immediately and meticulously re-sterilize everything for your next attempt.
- An expired or compromised starter can also contribute to off-flavors.
- Too high a temperature during fermentation can also encourage the growth of undesirable bacteria.
Savory & Sweet: Flavor Variations and Serving Ideas
Once you’ve mastered the basic cashew yogurt, the possibilities for customization are endless.
- Sweet Variations: Stir in fresh fruits (berries, mango, peaches), a drizzle of maple syrup or honey, vanilla extract, cinnamon, or a spoonful of fruit jam after chilling.
- Savory Applications: Use plain cashew yogurt as a base for dips like tzatziki, as a creamy component in curries, or as a cooling dollop alongside spicy dishes. It can also replace sour cream in many recipes.
- Breakfast Boost: Serve your cashew yogurt with granola, nuts, seeds, or a medley of fresh fruit for a wholesome start to your day.
Care and Storage: Keeping Your Machine and Yogurt Pristine
Proper care ensures both the longevity of your yogurt maker and the freshness of your homemade cashew yogurt.
- Yogurt Maker Maintenance: Always clean your yogurt maker according to the manufacturer’s instructions after each use. Most inner components and jars are dishwasher safe or easily hand-washed. Ensure the heating element area is kept dry.
- Yogurt Storage: Store your finished cashew yogurt in an airtight container in the refrigerator. It will typically remain fresh for up to 5-7 days. While it’s tempting to use a portion of your homemade yogurt as a starter for the next batch, remember that non-dairy cultures, especially from probiotic capsules, can weaken after one or two re-cultures. For consistent results, it’s often best to use fresh starter for each new batch.
Conclusion
Creating your own cashew yogurt in a machine is a truly rewarding endeavor, opening up a world of dairy-free, probiotic-rich possibilities right in your kitchen. By following these detailed steps, paying close attention to sterilization, ingredient quality, and fermentation temperatures, you’ll soon be enjoying luxuriously creamy and tangy cashew yogurt that surpasses any store-bought alternative. Embrace the process, experiment with flavors, and relish the satisfaction of crafting a truly wholesome food from scratch. What unique flavor combinations will you discover on your cashew yogurt journey?
Frequently Asked Questions
Can I use roasted cashews instead of raw cashews?
No, it is highly recommended to use raw, unsalted cashews. Roasted cashews can impart a different flavor to the yogurt and may not blend as smoothly, affecting the final texture and taste.
How do I know if my yogurt is fermenting properly?
During fermentation, you might notice a slight thickening and a subtle tangy aroma beginning to develop. The true tang and thickness will become more apparent after the chilling period. If there are any off-smells or visible mold, the batch should be discarded.
My cashew yogurt separated; what went wrong?
Separation can occur due to fluctuations in temperature during fermentation, or sometimes it’s just a characteristic of certain non-dairy yogurts. Gently stir it before serving. If the separation is significant and accompanied by an unpleasant odor, it might indicate an issue with the culture or contamination.
Can I make cashew yogurt without a yogurt maker?
While a yogurt maker offers the most consistent results, you can try alternative methods that maintain a warm environment, such as an oven with just the light on, a cooler with hot water bottles, or a dehydrator. However, precise temperature control will be more challenging.
How long does homemade cashew yogurt last?
When stored in an airtight container in the refrigerator, homemade cashew yogurt typically lasts for 5 to 7 days. Beyond that, its freshness and probiotic activity may diminish.