There’s nothing quite like the satisfaction of making your own fresh, wholesome yogurt at home. The anticipation builds as you follow each step, imagining that perfect, creamy texture. But then, disappointment strikes: your homemade yogurt is runny, more like milk than the luscious treat you envisioned. This common frustration can be disheartening, making many home cooks wonder what went wrong. The good news is that runny yogurt is a solvable problem, and often, the fix is simpler than you think. This comprehensive guide will delve into the science behind yogurt making, expose the most common culprits behind a thin batch, and equip you with practical, expert-backed solutions to achieve consistently thick, velvety homemade yogurt every single time.
Understanding the Science Behind Yogurt Making
To truly troubleshoot runny yogurt, it helps to understand the fundamental process that transforms simple milk into this fermented delight.
Key Ingredients and Their Roles
At its core, yogurt making requires just two main ingredients: milk and a starter culture.
- Milk: The foundation of your yogurt. Milk contains proteins, primarily casein, and lactose (milk sugar). The fat content in milk plays a significant role in the final texture and richness of your yogurt.
- Starter Culture: This is where the magic happens. A starter culture is a carefully selected blend of live, active bacteria (probiotics), such as Lactobacillus bulgaricus and Streptococcus thermophilus. These tiny organisms are responsible for the fermentation process.
|
Our Picks for the Best Yogurt maker in 2026
As an Amazon Associate I earn from qualifying purchases.
|
||
| Num | Product | Action |
|---|---|---|
| 1 | Yogurt Maker Machine, 8 Glass Jars with Lids Reusable for Yoghurt, Oatmeal, Pudding, or Jello, Food-Grade Martial, One-touch Control, Homemade Yogurt |

|
| 2 | Yogurt Maker with Adjustable Temperature & Time Control, Probiotic Yogurt Maker Machine with 8 Glass Jars, Automatic Shut-Off for Homemade Probiotic Yogurt, Promoting Gut Health(48OZ) |
|
| 3 | Euro Cuisine YM80 Electric Yogurt Maker Machine- Promote Gut Health with Probiotic Rich Homemade Yogurt -Home Yogurt Incubator with Glass Jars, White |
|
| 4 | Easy Yogurt Maker for Perfect Homemade Yogurt, 1.7 QT Electric Fermenter for Greek Yogurt, Rice Wine, Natto, with Digital Control & Auto Keep Warm, BPA-Free Container |
|
| 5 | GDOR Yogurt Maker with Adjustable Temp & Timer– Probiotic-Rich – Digital Greek Yogurt Machine with 8×6oz BPA-Free Glass Jars, Easy to Use for Home, Stainless Steel |
|
| 6 | Yogurt Maker with Two Containers, Yogurt Maker Machine with Adjustable Temperature & Time Control, Automatic Shut-Off & Constant Temper for Homemade Probiotic Yogurt, Promoting Gut Health |
|
| 7 | Euro Cuisine Yogurt Maker - YMX650 Automatic Digital Yogurt Maker Machine with Set Temperature - Includes 7-6 oz. Reusable Glass Jars and 7 Rotary Date Setting Lids for Instant Storage |
|
| 8 | Yogurt Dehydrator, Small-Batch Greek Yogurt Maker with Built-In Date Reminder Fresh, Simple & Just the Right Amount — Food-Grade BPA-Free Materials |
|
| 9 | Ultimate Probiotic Yogurt Maker with Adjustable Time & Temp Control - Make Trillions of Live Probiotics with Two 1-Quart Containers for Larger Batches - Greek Yogurt Maker - ULTIMATE LIFETIME WARRANTY |
|
| 10 | Yogurt Maker, Compact Greek Yogurt Maker Machine with Constant Temperature Control, Stainless Steel Container, 1 Quart for Home Organic Yogurt |
|
The Fermentation Process Explained
The transformation from milk to yogurt is a delicate biochemical dance:
- Lactose Consumption: Once introduced into the milk, the bacteria in the starter culture begin to feast on the lactose, the natural sugar present in milk.
- Lactic Acid Production: As the bacteria consume lactose, they produce lactic acid as a byproduct.
- Protein Coagulation: The increasing acidity from the lactic acid causes the milk proteins (casein) to denature and coagulate, forming a complex matrix. This matrix traps water and milk solids, creating the characteristic gel-like structure of yogurt.
For this process to occur successfully, two factors are absolutely critical: a precise temperature range and sufficient time for the bacteria to work their magic. Any deviation can interrupt this delicate balance, leading to a runny result.
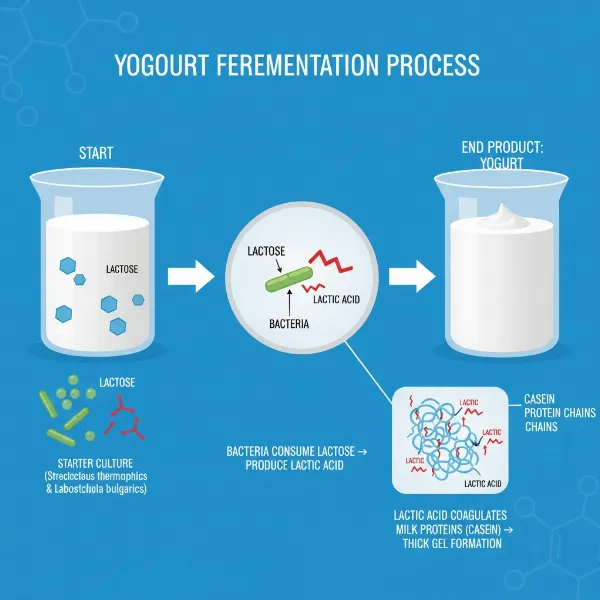 Diagram illustrating the scientific process of milk fermentation into yogurt by bacteria.
Common Reasons for Runny Homemade Yogurt
Many factors can contribute to a batch of homemade yogurt that fails to set properly. Identifying the specific issue is the first step toward fixing it.
Insufficient or Inactive Starter Culture
The starter culture is the engine of your yogurt. If it’s not performing optimally, your yogurt won’t set.
- Not Enough Bacteria: Using too little starter culture means there aren’t enough active bacteria to effectively ferment all the milk. This leads to weak acid production and poor protein coagulation.
- Old, Expired, or Compromised Culture: Starter cultures have a shelf life. If your starter is old, expired, or has been improperly stored, the bacteria may be dormant or dead, rendering them ineffective. A starter taken from a store-bought yogurt that has been open for too long, or used for too many consecutive batches, can also weaken.
Incorrect Milk Preparation
The type of milk you use and how you prepare it are fundamental to yogurt texture.
- Not Scalding Milk Properly: Heating milk to a specific temperature (scalding) and holding it there for a period is crucial. This process denatures the whey proteins in the milk, preventing them from interfering with the casein’s ability to form a strong gel. If the milk isn’t heated enough or held for long enough, these whey proteins can lead to a weaker set.
- Ultra-Pasteurized (UHT) Milk: Milk labeled “ultra-pasteurized” or “UHT” has been heated to very high temperatures for a short time to extend its shelf life. While convenient, this extreme heating can sometimes over-denature the proteins, making it difficult for the new cultures to form a firm yogurt consistency.
- Low-Fat Milk: The fat content in milk contributes to yogurt’s richness and thickness. Using skim or low-fat milk will naturally result in a thinner yogurt because there are fewer milk solids to contribute to the overall body.
Inconsistent or Incorrect Incubation Temperature
Temperature is arguably the most critical factor in successful yogurt making.
- Temperature Too Low: If the incubation temperature is below the optimal range for your specific starter culture (mesophilic or thermophilic), the bacteria will become sluggish or even inactive. They won’t metabolize lactose efficiently, and the milk proteins won’t coagulate, leaving you with runny yogurt.
- Temperature Too High: Conversely, if the temperature is too high, especially above 116°F (46°C), you risk killing the beneficial bacteria in your starter. Even slightly above the optimal range (e.g., above 110°F/43°C) can hinder their activity, causing them to ferment too quickly and potentially separate the whey from the curds, leading to a watery, lumpy, or “cottage cheesy” texture.
- Fluctuating Temperatures: An inconsistent incubation temperature, with frequent drops or spikes, can disrupt the steady growth of bacteria, preventing the yogurt from setting properly.
Disturbed Fermentation
Patience is a virtue when making yogurt.
- Shaking or Stirring: During the incubation period, the delicate protein matrix is forming. Shaking, stirring, or even frequently checking on the yogurt can disrupt these forming bonds, preventing it from setting firmly and leading to a runny result.
Incubation Time Issues
The duration of fermentation also plays a role in texture.
- Too Short: If you don’t allow the yogurt to incubate for a sufficient amount of time, the bacteria won’t have enough opportunity to convert lactose into lactic acid and fully coagulate the milk proteins. This results in a weak, runny set.
- Too Long (Over-culturing): While less common for runny yogurt, over-culturing can lead to excessive whey separation, resulting in a watery layer with lumpy, overly sour yogurt solids. The proteins become too tightly bound, expelling the liquid.
Contamination
While not always leading to simply “runny” yogurt, contamination can certainly impact consistency.
- Unwanted Bacteria or Wild Yeast: If your equipment isn’t perfectly clean, unwanted bacteria or airborne wild yeast can be introduced into your milk. These competing microorganisms can interfere with your starter culture’s activity, leading to unpredictable results, including a failure to set, off-flavors, or even a slimy or stringy texture.
Step-by-Step Troubleshooting Guide
Don’t despair over a runny batch! Here’s how to diagnose and address common issues to get your yogurt back on track.
Assess Your Ingredients
The foundation of good yogurt starts with good ingredients.
- Check Milk Type: If you’re consistently getting runny yogurt, consider switching from low-fat or UHT milk to whole milk. Whole milk offers more fat and milk solids, which inherently contribute to a thicker consistency. If UHT is your only option, know that it might require a more robust starter or additional thickeners.
- Verify Starter Culture: Ensure your starter is fresh and active. If using a store-bought yogurt as a starter, choose one with a simple ingredient list, live and active cultures, and no added thickeners. For powdered starters, check the expiry date and storage instructions. If you’ve used an old or questionable starter, it’s best to start fresh with a new one.
Optimize Milk Preparation
Proper milk treatment is key to creating a protein structure ready for fermentation.
- Scald Milk Properly: For thermophilic yogurt (most common homemade type), gently heat your milk to 180-185°F (82-85°C). Hold it at this temperature for 15-30 minutes. This crucial step denatures the whey proteins, allowing the casein to form a stronger, thicker gel. After scalding, cool the milk to the target incubation temperature (105-115°F/40-46°C for thermophilic cultures, 70-78°F/21-26°C for mesophilic cultures) before adding your starter.
- Accurate Thermometer: A reliable and calibrated thermometer is your best friend in yogurt making. Inaccurate temperature readings are a leading cause of failure. Always double-check your thermometer’s accuracy.
Perfect Your Incubation Environment
A stable, warm environment is essential for bacterial activity.
- Maintain Consistent Temperature: Whether you use a dedicated yogurt maker, an oven with the pilot light on, an insulated cooler with warm water, or a slow cooker on a “warm” setting, ensure your chosen method maintains a steady temperature within the optimal range for your starter. Avoid opening the incubation vessel frequently, as this can cause temperature fluctuations.
- Avoid Disturbances: Once your milk and starter are combined and placed in their incubation environment, leave them undisturbed. Find a quiet spot where the yogurt won’t be jostled or moved for the duration of its fermentation.
Prevent Contamination
Cleanliness is paramount to healthy fermentation.
- Sanitize All Equipment: Before you begin, thoroughly wash and sanitize all jars, spoons, thermometers, and containers that will come into contact with your milk and yogurt. This eliminates any competing bacteria or wild yeasts that could hinder your starter culture. A quick rinse with boiling water or a run through the dishwasher on a sanitize cycle usually suffices.
Tips for Consistently Thick Homemade Yogurt
Once you’ve troubleshot any immediate issues, here are some proactive measures to ensure every batch is gloriously thick.
Boost Milk Solids
Increasing the solid content of your milk provides more material for the bacteria to work with, resulting in a denser yogurt.
- Add Dry Milk Powder: This is one of the most effective ways to thicken yogurt without significantly altering the flavor. Stir in about 1/3 cup of dry milk powder per liter (quart) of milk before heating it. This boosts the protein content, leading to a firmer set.
- Use Higher-Fat Milk: Opting for whole milk (full-fat) instead of reduced-fat or skim milk will naturally yield a creamier, thicker yogurt due to its higher fat content. You can also enrich your milk by adding a splash of heavy cream or half-and-half before culturing.
Strain for Greek Yogurt
If you crave exceptionally thick yogurt, similar to Greek yogurt, straining is the answer.
- Simply pour your finished, chilled yogurt into a colander lined with cheesecloth, a clean thin dishtowel, or a dedicated yogurt strainer. Place this over a bowl to catch the expelled whey and refrigerate for several hours, or even overnight. The longer you strain, the thicker your yogurt will become. The leftover whey is packed with nutrients and can be used in smoothies or baking.
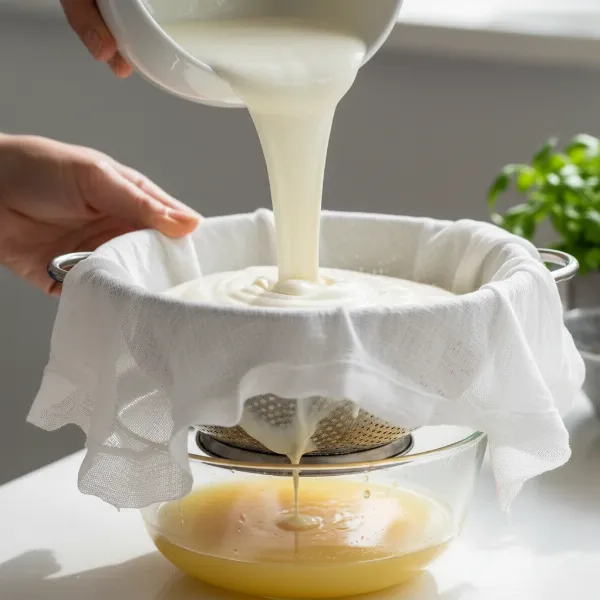 Hands straining homemade yogurt through cheesecloth over a bowl to create thick Greek yogurt.
Introduce Natural Thickeners
For an extra boost in firmness, certain natural thickeners can be added before fermentation.
- Unflavored Gelatin: For every 4 cups (1 liter) of cold milk, dissolve 1 teaspoon of unflavored gelatin in a small amount of cold milk, let it bloom, then whisk it into the larger batch of milk before heating. Gelatin needs to be heated to at least 95°F (35°C) to activate, but never boiled.
- Pectin or Guar Gum: These can also be used, typically added to cold milk before heating. Always follow package instructions for precise ratios, as too much can result in an undesirable texture. Note that adding thickeners might sometimes interfere with re-culturing, so it’s wise to keep a separate, untampered starter batch if you plan to use a continuous culture.
Experiment with Incubation Time
Once you’ve mastered the ideal temperature, playing with incubation duration can refine your yogurt’s texture and tang.
- A longer incubation period (within the optimal temperature range) generally allows for more lactic acid production, resulting in a tangier flavor and a firmer yogurt. Keep an eye on it after the minimum recommended time and extend it incrementally until you achieve your desired consistency.
Best Practices for Homemade Yogurt Success
Making consistently delicious homemade yogurt is an art, but these best practices can turn you into a master.
Invest in Quality Tools
While yogurt can be made with minimal equipment, certain tools can significantly improve your success rate. A reliable kitchen thermometer (digital is often best for accuracy) and a dedicated Yogurt Maker that maintains a stable temperature are invaluable investments.
Maintain a Yogurt Journal
Become a scientist in your kitchen! Keep a simple journal to record details of each batch: the type of milk used, the brand and amount of starter, the exact temperatures you reached, the incubation method and duration, and the final texture and taste. This journal will help you identify patterns, pinpoint successful techniques, and quickly troubleshoot any future issues.
Start Fresh When in Doubt
If you’ve had a few consecutive runny or otherwise failed batches, sometimes the best course of action is to completely discard your current starter and milk. Begin anew with fresh, high-quality milk and a new, trusted starter culture. This resets your process and eliminates any lingering issues from compromised ingredients or cultures.
Conclusion
The journey to making perfect homemade yogurt is a rewarding one, even with a few bumps along the way. While a runny batch can be frustrating, it’s almost always a sign that a simple adjustment is needed in your process or ingredients. By understanding the critical roles of milk preparation, starter culture vitality, and precise temperature control, you’re empowered to troubleshoot common issues effectively. Don’t let a thin consistency deter you; embrace these tips, and you’ll soon be enjoying wonderfully thick, creamy, and satisfying homemade yogurt. So, what’s your secret for achieving that ideal, luscious texture in your homemade batches?
Frequently Asked Questions
Can I fix a runny batch of yogurt after it’s made?
Yes, you can often salvage a runny batch. The most common method is to strain it through cheesecloth or a fine-mesh sieve to remove excess whey, which will thicken the yogurt. You can also blend in a small amount of milk powder or a thickener like gelatin, but this is often done before fermentation for best results.
What is the ideal temperature range for making yogurt?
For thermophilic cultures (the most common type for homemade yogurt), the ideal incubation temperature range is typically between 105-115°F (40-46°C). For mesophilic cultures, which ferment at room temperature, the range is usually 70-78°F (21-26°C).
Why is it important to scald milk before making yogurt?
Scalding milk (heating it to 180-185°F / 82-85°C and holding it there for 15-30 minutes) denatures the whey proteins. This prevents them from interfering with the casein proteins, allowing the casein to form a much stronger, thicker gel during fermentation, leading to a firmer yogurt.
Can I use skim milk for homemade yogurt, and will it be thick?
You can use skim milk for homemade yogurt, but it will naturally result in a thinner consistency due to its lower fat and milk solids content. To achieve a thicker yogurt with skim milk, you can add dry milk powder before heating the milk, or strain the finished yogurt.
How long should I incubate my homemade yogurt?
The incubation time typically ranges from 6 to 12 hours. A shorter time (6-8 hours) generally yields a milder, slightly thinner yogurt, while a longer incubation (10-12 hours or more) produces a tangier, firmer yogurt, assuming optimal temperatures are maintained. Experiment to find your preferred balance of thickness and tang.
My yogurt is slimy or stringy, not just runny. What could be the cause?
A slimy or stringy texture in homemade yogurt is often an indication of contamination, frequently by wild yeast or certain undesirable bacteria strains. Ensure all your equipment is impeccably sanitized, use a fresh and robust starter culture, and maintain strict hygiene during the entire yogurt-making process.