Imagine spooning into a bowl of perfectly thick, luxuriously creamy yogurt, made right in your own kitchen. It’s a rewarding experience that offers not only superior taste and texture but also a host of health benefits and significant cost savings compared to store-bought varieties. As a technician with over a decade of experience in yogurt maker technology, I’ve seen firsthand how simple it can be to achieve this culinary magic at home. This guide will walk you through the essential steps, expert tips, and troubleshooting advice to ensure your homemade yogurt is consistently rich, smooth, and utterly delicious.
Your Ultimate Guide to Crafting Thick and Creamy Homemade Yogurt
Creating the ideal thick and creamy texture in homemade yogurt isn’t just luck; it’s a blend of understanding the right techniques and knowing which ingredients to choose. From selecting your milk to the crucial incubation process, every step plays a vital role in achieving that coveted consistency.
The Science Behind Silky Smooth Yogurt
|
Our Picks for the Best Yogurt maker in 2026
As an Amazon Associate I earn from qualifying purchases.
|
||
| Num | Product | Action |
|---|---|---|
| 1 | Euro Cuisine Yogurt Maker - YMX650 Automatic Digital Yogurt Maker Machine with Set Temperature - Includes 7-6 oz. Reusable Glass Jars and 7 Rotary Date Setting Lids for Instant Storage |

|
| 2 | GDOR Yogurt Maker with Adjustable Temp & Timer– Probiotic-Rich – Digital Greek Yogurt Machine with 8×6oz BPA-Free Glass Jars, Easy to Use for Home, Stainless Steel |
|
| 3 | Yogurt Maker with Two Containers, Yogurt Maker Machine with Adjustable Temperature & Time Control, Automatic Shut-Off & Constant Temper for Homemade Probiotic Yogurt, Promoting Gut Health |
|
| 4 | Euro Cuisine YM80 Electric Yogurt Maker Machine- Promote Gut Health with Probiotic Rich Homemade Yogurt -Home Yogurt Incubator with Glass Jars, White |
|
| 5 | Yogurt Maker Machine, 8 Glass Jars with Lids Reusable for Yoghurt, Oatmeal, Pudding, or Jello, Food-Grade Martial, One-touch Control, Homemade Yogurt |
|
| 6 | Yogurt Maker with Adjustable Temperature & Time Control, Probiotic Yogurt Maker Machine with 8 Glass Jars, Automatic Shut-Off for Homemade Probiotic Yogurt, Promoting Gut Health(48OZ) |
|
| 7 | Yogurt Maker, Compact Greek Yogurt Maker Machine with Constant Temperature Control, Stainless Steel Container, 1 Quart for Home Organic Yogurt |
|
| 8 | Yogurt Dehydrator, Small-Batch Greek Yogurt Maker with Built-In Date Reminder Fresh, Simple & Just the Right Amount — Food-Grade BPA-Free Materials |
|
| 9 | Ultimate Probiotic Yogurt Maker with Adjustable Time & Temp Control - Make Trillions of Live Probiotics with Two 1-Quart Containers for Larger Batches - Greek Yogurt Maker - ULTIMATE LIFETIME WARRANTY |
|
| 10 | Easy Yogurt Maker for Perfect Homemade Yogurt, 1.7 QT Electric Fermenter for Greek Yogurt, Rice Wine, Natto, with Digital Control & Auto Keep Warm, BPA-Free Container |
|
At its core, yogurt making is a fascinating process of bacterial fermentation that transforms simple milk into a complex, tangy, and often thick dairy product. The thickness and creaminess you desire depend heavily on a few scientific principles. When milk is heated to a specific temperature and held there, its proteins (primarily casein) begin to denature, or unfold. This restructuring of proteins prevents them from separating later and helps form a stronger protein network, which is the backbone of thick yogurt. Higher milk solids content also contributes significantly to a firmer set, as there’s more material for the protein network to grab onto. Finally, the live active cultures introduced as a starter convert the lactose in the milk into lactic acid, which causes the milk to coagulate and thicken further during incubation.
Selecting the Perfect Milk and Starter Culture
The foundation of truly exceptional yogurt begins with your ingredients. The type of milk and the quality of your starter culture are paramount to achieving that desired thick and creamy texture.
- Milk Type: For maximum creaminess, whole milk is highly recommended due to its higher fat content. While 2% milk can work, it will naturally yield a thinner yogurt. Many experienced makers prefer non-homogenized milk (if available) as it is less processed. Be cautious with ultra-pasteurized milk; its proteins are often so denatured during processing that it can struggle to set properly, leading to a thinner consistency. If ultra-pasteurized is your only option, some find success by adding dry milk powder to boost milk solids. Experiment with different brands to find the milk that gives you the best results.
- Starter Culture: Your starter is where the magic begins. It introduces the beneficial bacteria that ferment the milk.
- Heirloom Cultures: These are often preferred for their ability to be re-cultured indefinitely, allowing you to use a portion of your previous batch as the starter for your next. They can also impart unique flavor profiles, such as the milder, sweeter notes of a Bulgarian starter.
- Store-Bought Yogurt: Opt for plain, unsweetened yogurt clearly labeled with “live active cultures.” Ensure it’s fresh for the strongest bacterial activity.
- Freeze-Dried Cultures: These provide a consistent starting point and are excellent for ensuring a potent culture, especially if you’re not making yogurt frequently.
Aim for about 1 tablespoon of starter culture per liter (or quart) of milk, or follow specific package instructions.
Essential Tools for Consistent Results
While some minimalist methods exist, having the right tools can significantly enhance your success, particularly in maintaining the crucial temperatures needed for thick yogurt.
- Accurate Thermometer: A good quality candy or digital thermometer is indispensable for precisely monitoring milk temperature during heating and cooling.
- Heavy-Bottomed Saucepan: Prevents scorching and allows for even heating of the milk.
- Yogurt Maker: These appliances are designed to maintain a stable incubation temperature (typically around 100-115°F or 38-46°C), which is ideal for consistent yogurt production.
- Instant Pot: Many modern Instant Pots have a dedicated “Yogurt” function, offering a convenient, hands-off way to incubate.
- Dehydrator: Some dehydrators can also be set to low temperatures, providing another excellent environment for controlled incubation.
- Glass Jars or Containers: For culturing and storing your finished yogurt. Ensure they are clean and sanitized.
The key across all methods is consistent temperature control during the incubation phase. Fluctuations can lead to runny yogurt.
 A collection of essential tools for homemade yogurt, including a thermometer, saucepan, and yogurt maker.
Step-by-Step: Mastering the Art of Thick Yogurt
Follow these steps carefully to ensure a consistently thick and creamy result.
- Preparation: Start with thoroughly clean and sanitized equipment to prevent unwanted bacteria from interfering with your culture.
- Heating the Milk: Pour your chosen milk into a heavy-bottomed saucepan. Over medium-low heat, slowly bring the milk’s temperature up to 175-185°F (79-85°C). Stir occasionally to prevent scorching. Once it reaches this temperature, maintain it for 15-30 minutes. This extended heating period is critical as it denatures milk proteins, creating a stronger structure for your yogurt to thicken without the need for straining.
- Cooling the Milk: After holding the temperature, remove the saucepan from the heat. Allow the milk to cool down to 110-115°F (43-46°C). This is a vital step; if the milk is too hot, it will kill your starter cultures, and if it’s too cool, the cultures won’t activate properly, resulting in thin yogurt. You can speed up cooling by placing the saucepan in an ice bath.
- Adding the Starter: Once the milk reaches the target temperature, gently skim off any “skin” that may have formed on the surface. In a separate small bowl, whisk your starter culture with about a cup of the cooled milk until smooth. Then, pour this mixture back into the main batch of milk and stir gently until well combined. Avoid vigorous whisking at this stage.
- Incubation: Pour the inoculated milk into your clean jars or yogurt maker containers. Place them in your chosen incubation environment (Yogurt Maker, Instant Pot, dehydrator, or even an oven with just the light on) and maintain a stable temperature of 100-115°F (38-46°C). The incubation time typically ranges from 6 to 12 hours. For a tangier, often thicker yogurt, you can extend this up to 14-24 hours. Resist the urge to jostle or stir the yogurt during this phase, as it can disrupt the setting process.
- Chilling: Once fermentation is complete (the yogurt appears set), carefully remove it from the incubator. Place the yogurt directly into the refrigerator and chill for at least 4 hours, or ideally overnight. Chilling further firms up the yogurt and halts the fermentation process, preventing it from becoming excessively tangy.
Advanced Techniques for Extra Thickness and Creaminess
While the basic method yields great results, certain techniques can elevate your yogurt to new levels of richness and density.
- Extended Milk Heating: As mentioned, holding milk at 175-185°F for 15-30 minutes significantly denatures proteins, making the yogurt naturally thicker without straining. This is perhaps the most impactful “no-strain” thickening secret.
- Boosting Milk Solids: One of the most effective ways to achieve exceptional thickness is by increasing the milk solids content. Adding 1/3 cup of dry milk powder per liter (or quart) of cold milk before heating it up will yield a remarkably firm and creamy yogurt. Ensure it’s whisked in thoroughly before heating to prevent clumps.
- The Power of Straining: For an undeniably thick, Greek-style yogurt, straining is your best friend. After the yogurt has chilled, line a colander with cheesecloth or a clean, thin kitchen towel and place it over a bowl. Pour the yogurt into the lined colander, cover it, and refrigerate. The longer you let it strain (from a few hours to overnight), the more whey will drain off, resulting in an increasingly thicker yogurt, eventually achieving a cream cheese-like consistency.
- Gentle Whisking: After chilling, if your yogurt is set but you desire an even silkier texture, gently whisk the finished yogurt for a minute or two. This can break up any slight graininess and create a smoother mouthfeel.
“The secret to truly thick yogurt lies in understanding the milk’s proteins. By giving them the right conditions to restructure, you’re building a stronger foundation for your yogurt, even before the cultures are added.”
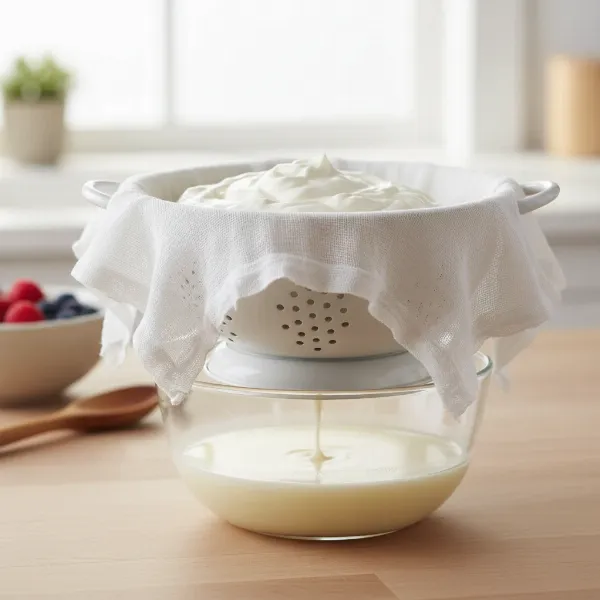 A close-up of homemade yogurt being strained through cheesecloth in a colander over a bowl.
Troubleshooting Common Homemade Yogurt Challenges
Even with careful attention, sometimes things don’t go exactly as planned. Here are solutions to common issues:
- Runny Yogurt:
- Cause: Incubation temperature too low or inconsistent.
- Solution: Ensure your incubation method maintains a stable temperature between 100-115°F.
- Cause: Starter culture wasn’t fresh or potent enough.
- Solution: Use fresh starter or try a new batch of freeze-dried culture.
- Cause: Milk was too hot when starter was added (killed cultures).
- Solution: Always cool milk to 110-115°F before adding starter.
- Cause: Not holding milk at high temperature long enough.
- Solution: Ensure milk is held at 175-185°F for the full 15-30 minutes.
- Cause: Using ultra-pasteurized milk.
- Solution: Try regular pasteurized whole milk or add dry milk powder if ultra-pasteurized is unavoidable.
- Too Tangy Yogurt:
- Cause: Fermented for too long.
- Solution: Reduce incubation time for future batches.
- Grainy Texture:
- Cause: Milk may have been heated too quickly or to too high a temperature, causing proteins to curdle slightly.
- Solution: Heat milk slowly and precisely. Gentle whisking after chilling can also help smooth it out.
Storing Your Homemade Delights
Proper storage ensures your homemade yogurt remains fresh and delicious.
- Refrigeration: Store your yogurt in airtight containers in the coldest part of your refrigerator. It will typically last for up to two weeks, with the best quality usually within 7-10 days. Beyond that, it may become tangier or show more whey separation, which is normal.
- Freezing: While homemade yogurt can be frozen for up to a month, be aware that its texture may become slightly grainy or less smooth upon thawing. It’s still perfectly usable for smoothies, baking, or as a starter for a new batch.
- Signs of Spoilage: Discard yogurt if you notice any mold (green, black, or pink), an excessively sour or “off” smell that goes beyond normal tanginess, or a slimy or curdled texture that isn’t due to straining.
Conclusion
Making thick and creamy homemade yogurt is a gratifying journey that empowers you to control ingredients, save money, and enjoy a truly superior product. By understanding the simple science, choosing the right components, meticulously following the heating and cooling steps, and mastering the incubation process, you can consistently achieve that perfect texture every single time. Don’t be afraid to experiment with different milks or extend heating times to discover your ideal batch. The world of homemade yogurt is rich with possibilities, waiting for you to explore its delicious depths. What new flavors or textures will you create in your next batch?
Frequently Asked Questions
Can I use ultra-pasteurized milk to make thick yogurt?
While not ideal, some makers successfully use ultra-pasteurized milk. It often requires adding dry milk powder to boost milk solids and encourage a firmer set, as the intense heating process it undergoes can make it harder for the proteins to coagulate effectively on their own.
How long does homemade yogurt last in the refrigerator?
Homemade yogurt, when stored in airtight containers in the coldest part of your refrigerator, typically stays fresh for up to two weeks. Its peak quality and mildest flavor are usually maintained within the first 7 to 10 days.
Why is my homemade yogurt consistently runny?
Runny yogurt is commonly caused by inconsistent incubation temperatures, a weak or old starter culture, or not heating the milk adequately to denature its proteins. Ensuring a stable temperature of 100-115°F during fermentation and holding your milk at 175-185°F for 15-30 minutes are key to preventing this issue.
What is the ideal temperature for incubating homemade yogurt?
The ideal temperature range for incubating homemade yogurt is between 100-115°F (38-46°C). Maintaining a stable temperature within this range is crucial for the live cultures to thrive and effectively thicken the milk into yogurt.
Can I add fruit or other flavorings to my homemade yogurt?
It’s best to add fruit, sweeteners, or other flavorings to your homemade yogurt after it has fully fermented and chilled. Adding them beforehand can interfere with the bacterial activity and the yogurt’s setting process, potentially leading to a thinner or less consistent result.