Embarking on the journey of making homemade rice milk yogurt can be a delightful and rewarding experience. For those seeking dairy-free alternatives or simply eager to explore the world of fermentation, rice milk yogurt offers a versatile and delicious option. This comprehensive guide will walk you through every step, from selecting the right ingredients and equipment to mastering the fermentation process, ensuring you can create creamy, tangy rice milk yogurt right in your own kitchen.
Understanding Rice Milk Yogurt Fermentation
Why Choose Rice Milk for Yogurt?
|
Our Picks for the Best Yogurt maker in 2026
As an Amazon Associate I earn from qualifying purchases.
|
||
| Num | Product | Action |
|---|---|---|
| 1 | Yogurt Maker with Two Containers, Yogurt Maker Machine with Adjustable Temperature & Time Control, Automatic Shut-Off & Constant Temper for Homemade Probiotic Yogurt, Promoting Gut Health |

|
| 2 | Yogurt Maker with Adjustable Temperature & Time Control, Probiotic Yogurt Maker Machine with 8 Glass Jars, Automatic Shut-Off for Homemade Probiotic Yogurt, Promoting Gut Health(48OZ) |
|
| 3 | Euro Cuisine YM80 Electric Yogurt Maker Machine- Promote Gut Health with Probiotic Rich Homemade Yogurt -Home Yogurt Incubator with Glass Jars, White |
|
| 4 | Euro Cuisine Yogurt Maker - YMX650 Automatic Digital Yogurt Maker Machine with Set Temperature - Includes 7-6 oz. Reusable Glass Jars and 7 Rotary Date Setting Lids for Instant Storage |
|
| 5 | GDOR Yogurt Maker with Adjustable Temp & Timer– Probiotic-Rich – Digital Greek Yogurt Machine with 8×6oz BPA-Free Glass Jars, Easy to Use for Home, Stainless Steel |
|
| 6 | Yogurt Maker Machine, 8 Glass Jars with Lids Reusable for Yoghurt, Oatmeal, Pudding, or Jello, Food-Grade Martial, One-touch Control, Homemade Yogurt |
|
| 7 | Easy Yogurt Maker for Perfect Homemade Yogurt, 1.7 QT Electric Fermenter for Greek Yogurt, Rice Wine, Natto, with Digital Control & Auto Keep Warm, BPA-Free Container |
|
| 8 | Yogurt Maker, Compact Greek Yogurt Maker Machine with Constant Temperature Control, Stainless Steel Container, 1 Quart for Home Organic Yogurt |
|
| 9 | Yogurt Dehydrator, Small-Batch Greek Yogurt Maker with Built-In Date Reminder Fresh, Simple & Just the Right Amount — Food-Grade BPA-Free Materials |
|
| 10 | Ultimate Probiotic Yogurt Maker with Adjustable Time & Temp Control - Make Trillions of Live Probiotics with Two 1-Quart Containers for Larger Batches - Greek Yogurt Maker - ULTIMATE LIFETIME WARRANTY |
|
Rice milk is a popular plant-based beverage, known for its light flavor and hypoallergenic properties, making it an excellent choice for individuals with dairy, soy, or nut allergies. While traditionally thinner than other plant milks, with the right techniques, it can be transformed into a delectable yogurt. Its subtle taste allows other flavors to shine through, making it a versatile base for various additions.
The Science of Fermentation: Starters and Temperature
Yogurt fermentation relies on beneficial bacteria, primarily lactic acid bacteria (LAB), which convert sugars in the milk into lactic acid. This process is responsible for yogurt’s characteristic tang and thickened texture. For rice milk, since it lacks lactose (the sugar in dairy milk), the starter culture needs to be carefully chosen to thrive on the sugars naturally present in rice. Maintaining a consistent temperature is paramount, as it provides the optimal environment for these bacterial cultures to proliferate and work their magic. Temperatures typically range from 100-115°F (38-46°C), creating an environment where the beneficial bacteria flourish while inhibiting undesirable microbes.
Essential Equipment for Making Rice Milk Yogurt
Key Tools You’ll Need
To successfully make rice milk yogurt at home, a few essential tools will make the process smooth and efficient:
- Saucepan: For heating the rice milk.
- Thermometer: Crucial for monitoring milk temperature accurately, ensuring it’s not too hot for the cultures or too cool for proper fermentation.
- Whisk or Spoon: For thoroughly mixing the starter culture into the rice milk.
- Clean Jars or Containers: Glass jars with airtight lids are ideal for incubation and storage. Sterilization is key to prevent contamination.
- Incubation Device: To maintain a consistent warm temperature during fermentation.
Exploring Yogurt Maker Options
While not strictly necessary, a yogurt maker simplifies the incubation process by providing a stable, controlled temperature.
- Basic Yogurt Makers: These are usually simple devices that maintain a steady temperature. They are straightforward to use and excellent for beginners.
- Electronic Yogurt Makers with Timers: Offering more control, these models often have digital displays, adjustable temperature settings, and automatic timers, allowing for precise fermentation. Some even have cooling functions.
- Alternatives: If you don’t own a yogurt maker, an oven with a pilot light on (providing gentle warmth), an insulated cooler with warm water bottles, or even a slow cooker on a very low “yogurt” setting can serve as effective incubators. The key is consistent warmth.
When choosing, consider:
- Capacity: Do you need a single large batch or multiple individual servings?
- Material: Glass jars are preferred for hygiene and inertness.
- Features: Timer, temperature control, and automatic shut-off can add convenience.
- Price: Basic models are affordable, while advanced ones offer more features at a higher cost.
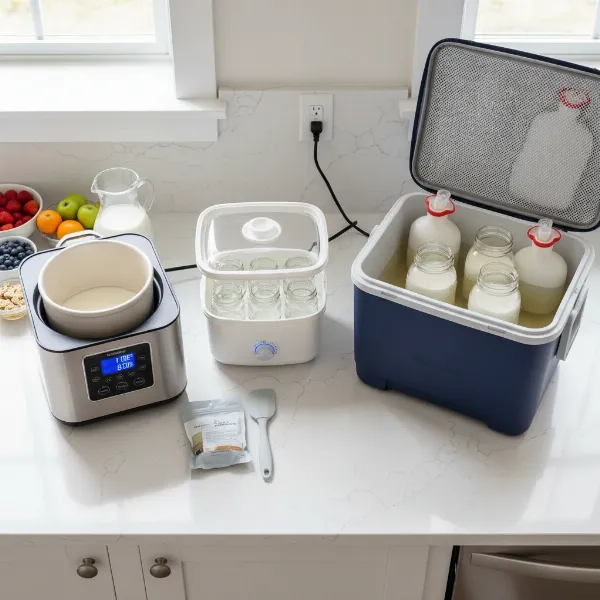 A collection of different home yogurt makers and alternative incubation devices for fermentation.
Ingredients for Delicious Rice Milk Yogurt
Selecting Your Rice Milk
The foundation of your yogurt is the rice milk itself. You can use:
- Store-bought Rice Milk: Opt for unsweetened varieties without added thickeners or stabilizers that might interfere with fermentation. Ensure it’s plain and preferably organic.
- Homemade Rice Milk: You can make rice milk from scratch by cooking rice until very soft, blending it with water, and then straining. This allows you to control the ingredients and consistency entirely.
Choosing a Starter Culture
For rice milk yogurt, a reliable starter culture is paramount. Options include:
- Vegan Yogurt Starter Culture: These are powdered cultures specifically designed for plant-based milks, containing the appropriate probiotic strains (e.g., Lactobacillus bulgaricus and Streptococcus thermophilus).
- Probiotic Capsules: High-quality probiotic capsules containing live and active cultures can be opened and added to the rice milk. Look for strains known to thrive in yogurt-like environments.
- Existing Plain Vegan Yogurt: A small amount of store-bought or homemade plain vegan yogurt with active cultures can also serve as a starter. Ensure it’s fresh and has a good consistency.
Optional Thickeners and Flavor Enhancers
Rice milk yogurt tends to be thinner than traditional dairy yogurt due to its lower protein and fat content. To achieve a thicker consistency, consider:
- Starch: A small amount of cornstarch, tapioca starch, or arrowroot powder can be whisked into the rice milk before heating.
- Agar-Agar: A plant-based gelatin alternative, agar-agar can provide a firmer set. It needs to be boiled with the rice milk to activate.
- Pectin: Fruit pectin can also be used as a thickener.
- Sweeteners: Maple syrup, agave nectar, or a touch of sugar can be added after fermentation to taste.
- Flavorings: Vanilla extract, fruit purees, or spices can transform your plain yogurt into a gourmet treat.
Step-by-Step Guide to Making Rice Milk Yogurt
Creating homemade rice milk yogurt is a rewarding process that requires attention to detail and patience.
Preparing Your Workspace and Ingredients
Before you begin, ensure all your equipment is thoroughly cleaned and sterilized. This is a critical step to prevent the growth of undesirable bacteria that could spoil your yogurt. Boil jars and lids or run them through a hot dishwasher cycle. Gather your rice milk, chosen starter culture, and any optional thickeners.
The Fermentation Process: Heating, Cooling, and Inoculating
- Heat the Rice Milk: Pour your rice milk into a clean saucepan. If using a starch thickener, whisk it in now. Slowly heat the rice milk to 190°F (88°C), stirring occasionally to prevent scorching. This pasteurization step helps eliminate any existing bacteria and changes the milk’s structure, allowing it to thicken better. If using agar-agar, follow package instructions for boiling.
- Cool Down: Remove the saucepan from the heat and allow the rice milk to cool. This is a crucial waiting period. You need the temperature to drop to between 100-115°F (38-46°C). Use your thermometer to check accurately. Cooling too quickly can be achieved by placing the saucepan in an ice bath, stirring constantly.
- Inoculate with Starter: Once the rice milk reaches the ideal temperature, gently whisk in your chosen starter culture until it is thoroughly combined. If using probiotic capsules, open them and sprinkle the powder into the milk. If using existing yogurt, ensure it’s at room temperature before adding.
Incubation: The Art of Patience
- Transfer to Containers: Carefully pour the inoculated rice milk into your sterilized jars or containers.
- Incubate: Place the covered jars into your yogurt maker or chosen incubation device. Maintain a consistent temperature of 100-115°F (38-46°C).
- Fermentation Time: Allow the yogurt to ferment for 4 to 24 hours. The longer the incubation, the tangier and often thicker the yogurt will become. Check consistency after 4-6 hours. If it’s still too thin, continue incubating, checking periodically.
“The key to successful fermentation is consistent temperature control and allowing sufficient time for the cultures to transform the milk. Patience is truly a virtue in yogurt making.”
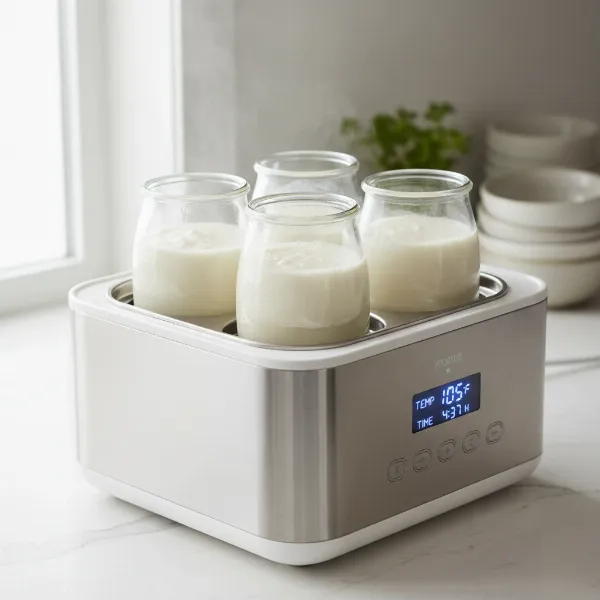 Glass jars filled with rice milk yogurt actively fermenting inside a warm incubator.
Chilling and Enjoying Your Homemade Yogurt
Once your rice milk yogurt has reached the desired tang and consistency, remove it from the incubator. Place the jars directly into the refrigerator. Chilling is essential as it halts the fermentation process, further thickens the yogurt, and improves its texture. Allow it to chill for at least 4 hours, or preferably overnight, before serving.
Troubleshooting Common Rice Milk Yogurt Issues
Why Is My Yogurt Too Runny?
Runny rice milk yogurt is a common concern. Several factors can contribute:
- Insufficient Thickeners: Rice milk is naturally thin. If you didn’t use a starch or agar-agar, or used too little, your yogurt will likely be thin.
- Weak Starter Culture: An old or inactive starter culture won’t ferment effectively. Ensure your cultures are fresh and potent.
- Incorrect Temperature: Too low a temperature slows fermentation, while too high can kill the cultures. Consistent warmth is vital.
- Short Incubation Time: Not enough time for the bacteria to work means less lactic acid production and less thickening.
- Poor Quality Rice Milk: Some store-bought rice milks contain ingredients that inhibit fermentation or are too watery.
What If My Yogurt Isn’t Tangy Enough?
If your yogurt lacks the desired tang, it likely needs more time to ferment. Lactic acid production increases with longer incubation. Try extending the incubation period by a few hours, checking for taste and consistency every 1-2 hours until you reach your preferred tanginess.
Preventing Contamination
Contamination can lead to off-flavors, strange textures, or even mold. To prevent it:
- Sterilize Everything: Always use clean and sterilized equipment.
- Use Fresh Ingredients: Ensure your rice milk and starter culture are fresh and within their expiry dates.
- Work Cleanly: Wash your hands thoroughly and work in a clean environment.
- Avoid Cross-Contamination: Use separate utensils for handling your starter and other ingredients.
Tips for Enhancing Your Rice Milk Yogurt
Achieving the Perfect Texture
Beyond initial thickeners, you can enhance texture post-fermentation:
- Refrigeration: A longer chill in the refrigerator will naturally thicken the yogurt further.
- Blending: A quick blend with an immersion blender can sometimes smooth out the texture and make it creamier.
- Additions: Consider blending in silken tofu or a small amount of cashew butter after fermentation for added richness and thickness.
Creative Flavor Combinations
Once your plain rice milk yogurt is ready, the possibilities for flavoring are endless:
- Fruits: Fresh berries, sliced bananas, diced mango, or apple compote.
- Sweeteners: Maple syrup, honey (if not strictly vegan), agave, or fruit preserves.
- Spices: A pinch of cinnamon, nutmeg, or cardamom for a warm flavor profile.
- Extracts: Vanilla, almond, or peppermint extract for a subtle aroma.
- Savory Options: While less common, rice milk yogurt can be used in savory contexts, like dressings, with herbs and spices.
Optimizing Fermentation Time
Experimentation is key to finding your ideal yogurt. Start with 6-8 hours of incubation and adjust from there. Note down the time, temperature, and starter used for each batch to refine your process. Humidity and ambient room temperature can also slightly influence fermentation, so be prepared to make minor adjustments.
Cleaning and Storing Your Yogurt Maker and Supplies
Post-Fermentation Cleanup
After each batch, thoroughly clean all equipment that came into contact with the yogurt.
- Yogurt Maker Base: Wipe down the base with a damp cloth; never submerge it in water.
- Jars and Lids: Wash with hot, soapy water, rinse well, and allow to air dry completely or dry with a clean cloth. For extra sanitization, re-sterilize them before the next use.
- Utensils: Wash immediately to prevent dried yogurt from sticking.
Extending Equipment Lifespan
Proper cleaning and storage are vital for the longevity of your yogurt maker and other tools. Store your yogurt maker in a dry place when not in use. Ensure all components are completely dry before storage to prevent mold or mildew growth. Regularly inspect your equipment for any signs of wear and tear.
Where to Source Your Yogurt Making Essentials
Finding reliable sources for your rice milk yogurt making supplies is important.
Recommended Retailers
- Grocery Stores: For unsweetened rice milk, fresh fruits, and sweeteners. Some health-focused grocery stores might also carry vegan starter cultures.
- Health Food Stores and Online Retailers: These are excellent sources for specialized vegan yogurt starter cultures, probiotic capsules, and various plant-based thickeners like agar-agar or pectin.
- Kitchenware Stores: For essential equipment like thermometers, quality saucepans, and glass jars. Online kitchen supply retailers offer a wide selection of Yogurt Makers, often with detailed reviews.
- Specialty Fermentation Shops: If available, these stores can provide expert advice and high-quality starter cultures tailored for plant-based yogurts.
Always read product reviews and check expiration dates, especially for starter cultures and probiotics, to ensure you’re getting effective ingredients.
Conclusion
Making rice milk yogurt at home is a rewarding culinary adventure that puts you in control of your ingredients and flavors. By understanding the principles of fermentation, selecting the right tools and cultures, and following a meticulous process, you can achieve delicious, dairy-free yogurt that caters perfectly to your dietary needs and taste preferences. Don’t be afraid to experiment with different rice milk brands, starter cultures, and incubation times to discover your perfect recipe. The journey of fermentation is one of discovery and delicious rewards, inviting you to create a staple that enhances your healthy lifestyle. What new flavor combinations will you discover in your next batch of homemade rice milk yogurt?
Frequently Asked Questions
What is the best temperature for fermenting rice milk yogurt?
The ideal temperature range for fermenting rice milk yogurt is typically between 100-115°F (38-46°C). This temperature range promotes the optimal activity of most lactic acid bacteria cultures used in yogurt making, ensuring proper fermentation and thickening. Maintaining a consistent temperature within this range is crucial for successful results.
How long does homemade rice milk yogurt last?
Homemade rice milk yogurt, when stored properly in an airtight container in the refrigerator, generally lasts for about 5 to 7 days. Its shelf life depends on the cleanliness during preparation and the effectiveness of the fermentation. Always check for any signs of spoilage, such as unusual smells, discoloration, or mold, before consuming.
Can I use store-bought rice milk for yogurt?
Yes, you can absolutely use store-bought rice milk to make yogurt. For the best results, choose an unsweetened, plain variety without added thickeners, gums, or excessive stabilizers, as these can sometimes interfere with the fermentation process. Organic options are often preferred to avoid unwanted additives.