Crafting homemade coconut yogurt that’s genuinely thick and creamy can feel like a culinary quest. Many aspiring home fermenters start with high hopes, only to be met with a runny, inconsistent result. If you’ve ever wondered how to achieve that perfectly spoonable, tangy dairy-free delight, you’re in the right place. This comprehensive guide, informed by years of experience in home fermentation, will demystify the process, offering expert tips, ingredient insights, and troubleshooting solutions to ensure your next batch of coconut yogurt sets beautifully every time. Get ready to transform your kitchen into a dairy-free yogurt oasis!
Understanding the Science: Why Coconut Yogurt Needs Help to Set
Unlike traditional dairy yogurt, which thickens naturally as milk proteins coagulate during fermentation, coconut milk lacks the same complex protein structure. Cow’s milk contains casein proteins that form a gel when lactic acid bacteria convert lactose into lactic acid. Coconut milk, primarily composed of fats and water, does not undergo this natural gelling process to the same extent. This fundamental difference is why achieving a thick, stable texture in coconut yogurt often requires a bit of scientific assistance, typically in the form of specific ingredients and precise fermentation conditions. The fat content in full-fat coconut milk contributes to richness and some body, but it’s usually not enough on its own to create a truly “set” yogurt.
Essential Ingredients for Perfect Coconut Yogurt
The foundation of exceptional homemade coconut yogurt lies in selecting the right ingredients. Each component plays a vital role in achieving that desired thick, creamy consistency.
1. Choosing the Right Coconut Milk
This is arguably the most critical step. Not all coconut milks are created equal when it comes to yogurt making.
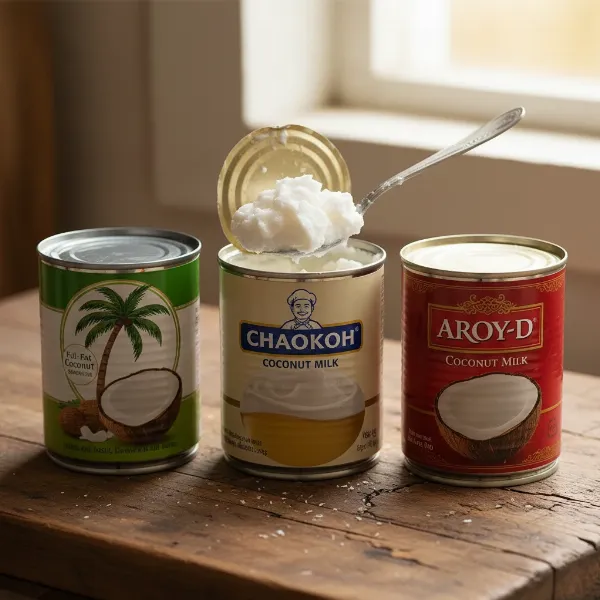
- Full-Fat Canned Coconut Milk is Key: Always opt for full-fat coconut milk in a can. Avoid “light” coconut milk or carton-based coconut “beverages,” as these have a much lower fat content and will inevitably result in runny yogurt. Look for brands with a high percentage of coconut extract, ideally at least 60% coconut solids or 17 grams of fat per 100ml.
- Chilling and Separating the Cream: Many successful recipes recommend chilling your cans of full-fat coconut milk in the refrigerator overnight. This allows the thick, solid coconut cream to separate from the watery liquid. Scoop out only the thick cream for your yogurt base, reserving the coconut water for other uses like smoothies. This greatly enhances the final thickness.
- Recommended Brands: Some popular brands known for their high fat content and minimal additives include Aroy-D, Whole Foods 365, and Thai Kitchen. While some brands contain guar gum (which can aid stability), it’s generally best to avoid those with carrageenan, as it can be problematic for some digestive systems.
|
Our Picks for the Best Yogurt maker in 2026
As an Amazon Associate I earn from qualifying purchases.
|
||
| Num | Product | Action |
|---|---|---|
| 1 | Ultimate Probiotic Yogurt Maker with Adjustable Time & Temp Control - Make Trillions of Live Probiotics with Two 1-Quart Containers for Larger Batches - Greek Yogurt Maker - ULTIMATE LIFETIME WARRANTY |

|
| 2 | Euro Cuisine Yogurt Maker - YMX650 Automatic Digital Yogurt Maker Machine with Set Temperature - Includes 7-6 oz. Reusable Glass Jars and 7 Rotary Date Setting Lids for Instant Storage |
|
| 3 | Yogurt Maker with Two Containers, Yogurt Maker Machine with Adjustable Temperature & Time Control, Automatic Shut-Off & Constant Temper for Homemade Probiotic Yogurt, Promoting Gut Health |
|
| 4 | GDOR Yogurt Maker with Adjustable Temp & Timer– Probiotic-Rich – Digital Greek Yogurt Machine with 8×6oz BPA-Free Glass Jars, Easy to Use for Home, Stainless Steel |
|
| 5 | Easy Yogurt Maker for Perfect Homemade Yogurt, 1.7 QT Electric Fermenter for Greek Yogurt, Rice Wine, Natto, with Digital Control & Auto Keep Warm, BPA-Free Container |
|
| 6 | Yogurt Maker, Compact Greek Yogurt Maker Machine with Constant Temperature Control, Stainless Steel Container, 1 Quart for Home Organic Yogurt |
|
| 7 | Euro Cuisine YM80 Electric Yogurt Maker Machine- Promote Gut Health with Probiotic Rich Homemade Yogurt -Home Yogurt Incubator with Glass Jars, White |
|
| 8 | Yogurt Maker Machine, 8 Glass Jars with Lids Reusable for Yoghurt, Oatmeal, Pudding, or Jello, Food-Grade Martial, One-touch Control, Homemade Yogurt |
|
| 9 | Yogurt Maker with Adjustable Temperature & Time Control, Probiotic Yogurt Maker Machine with 8 Glass Jars, Automatic Shut-Off for Homemade Probiotic Yogurt, Promoting Gut Health(48OZ) |
|
| 10 | Yogurt Dehydrator, Small-Batch Greek Yogurt Maker with Built-In Date Reminder Fresh, Simple & Just the Right Amount — Food-Grade BPA-Free Materials |
|
 Cans of full-fat coconut milk and a bowl showing separated thick coconut cream from watery liquid.
2. The Power of Thickeners: What to Use and How
Since coconut milk doesn’t naturally thicken like dairy, a supplemental thickener is often necessary.
- Cornstarch/Tapioca Starch/Arrowroot Powder: These natural starches are excellent vegan options.
- How to Use: Whisk 1-2 tablespoons of the chosen starch with a small amount of cold coconut milk until smooth to create a slurry. Add this slurry to the remaining coconut milk in a saucepan and gently heat, stirring constantly, until the mixture thickens slightly and reaches about 180°F (82°C). Do not boil. Allow the mixture to cool to the proper fermentation temperature before adding your starter.
- Gelatin (Non-Vegan): For those who don’t require a vegan product, unflavored gelatin is a highly effective thickener, yielding a very firm, Greek-yogurt-like consistency.
- How to Use: Bloom 1-2 teaspoons of gelatin in a small amount of cold coconut milk, then dissolve it by heating gently with some of the coconut milk until fully incorporated. Combine with the remaining coconut milk and cool to the correct temperature.
- Agar-Agar (Vegan Alternative): Derived from seaweed, agar-agar is another vegan thickener. It typically requires boiling to activate its gelling properties.
- How to Use: Follow package directions, but generally, you’ll simmer agar-agar flakes or powder with the coconut milk for several minutes before cooling. Note that you may need to use about half the amount of agar-agar compared to gelatin.
- Other Options: Some recipes suggest using psyllium husk or blending in fresh young Thai coconut meat for natural thickening.
3. Selecting Your Starter Culture
The “starter” introduces the beneficial bacteria that ferment the coconut milk into yogurt.
- Probiotic Capsules or Powder: Look for dairy-free probiotic capsules or powders with a high CFU (colony-forming unit) count, typically 30-50 billion. Ensure they contain live, active cultures and strains commonly found in yogurt, such as Lactobacillus acidophilus, Bifidobacterium bifidum, Lactobacillus rhamnosus, and Streptococcus thermophilus. Avoid those with added prebiotics or enzymes, which can sometimes interfere with fermentation.
- Store-Bought Coconut Yogurt with Live Cultures: A simpler option is to use 2-3 tablespoons of a good quality, unsweetened, plain store-bought coconut yogurt that explicitly states it contains “live active cultures.” This provides a ready-made starter.
- Powdered Yogurt Starter: Specialized dairy-free yogurt starter cultures are also available and often provide very consistent results.
4. Sweetener (Optional but Recommended)
Unlike dairy milk, which contains lactose (a natural sugar that bacteria feed on), coconut milk has very little natural sugar. Adding a small amount of sweetener provides “food” for your probiotic cultures, encouraging robust fermentation.
- Recommended Sweeteners: Maple syrup, cane sugar, or agave nectar work well. Add 1-2 tablespoons per can of coconut milk.
- Avoid Honey: Honey has natural antimicrobial properties that can inhibit bacterial growth, making it unsuitable for fermentation.
Step-by-Step Guide to Making Your Homemade Coconut Yogurt
With your ingredients ready, let’s dive into the process of creating your perfect batch of coconut yogurt.
1. Sterilize Your Equipment
Cleanliness is paramount in fermentation to prevent the growth of undesirable bacteria that could spoil your yogurt.
- Methods: Wash all jars, bowls, and utensils (spoons, whisks) in hot, soapy water. For glass jars, you can sterilize them by placing them in an oven preheated to 325°F (160°C) for 10-15 minutes until completely dry, or by boiling them in water for 10 minutes.
- Avoiding Metal: It’s often recommended to use wooden, silicone, or ceramic spoons and bowls, as some believe metal can interact negatively with the cultures.
2. Prepare the Coconut Milk Base
This stage focuses on getting your coconut milk ready for fermentation.
- Separating the Cream: If you chilled your coconut milk, carefully open the cans without shaking and scoop out only the thick, solid cream into your sterilized mixing bowl. Reserve the watery liquid.
- Combining with Thickeners:
- For Starches/Agar-Agar: If using cornstarch, tapioca starch, or arrowroot, prepare the slurry as described above, then combine it with the scooped coconut cream (and any remaining coconut water you choose to include for a thinner yogurt) in a saucepan. Heat gently, stirring, until it thickens slightly and reaches 180°F (82°C).
- For Gelatin: If using gelatin, bloom and dissolve it with a portion of the coconut milk/cream, then mix with the rest.
- Cooling to Optimal Temperature: Crucially, let the coconut milk mixture cool down to a warm, but not hot, temperature before adding your starter. The ideal range is 100-110°F (38-44°C). Use an instant-read thermometer for accuracy. If it’s too hot, you’ll kill the beneficial bacteria; if it’s too cold, they won’t activate properly. A good finger test is being able to hold your clean finger in the milk for 7-10 seconds comfortably.
3. Incorporate the Starter Culture and Sweetener
Once your base is at the perfect temperature, it’s time to introduce the cultures.
- Adding the Starter:
- Probiotic Capsules/Powder: Open the capsules and sprinkle the powder directly into the cooled coconut milk mixture. For powder, measure the recommended amount. Some find it helpful to mix the powder with 1-2 tablespoons of the cooled milk first to ensure it dissolves evenly before adding to the main batch.
- Store-Bought Yogurt: Whisk in the 2-3 tablespoons of plain coconut yogurt gently until fully combined.
- Add Sweetener: Stir in your chosen sweetener (maple syrup, cane sugar, or agave) now to provide food for the cultures.
- Ensure Even Distribution: Stir everything thoroughly with your clean wooden or silicone spoon to ensure the starter and sweetener are well distributed.
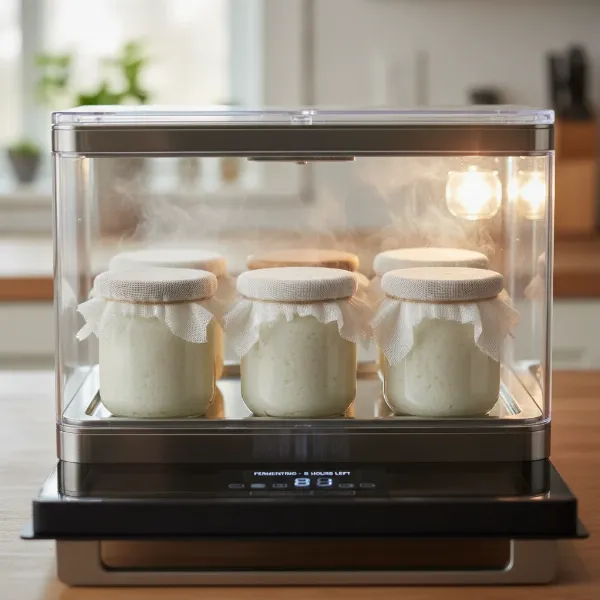
4. Fermentation: The Waiting Game
This is where the magic happens as the bacteria get to work.
- Transfer to Jars: Pour the inoculated coconut milk mixture into your sterilized glass jars. Cover them loosely with lids or a cheesecloth secured with a rubber band to allow for some airflow while protecting from contaminants.
- Incubation Methods:
- Yogurt Maker: Follow your appliance’s instructions, setting the temperature to around 104°F (40°C) for 10-12 hours.
- Instant Pot: Use the “YOGURT” setting, typically for 16-24 hours. Place jars on a trivet with a little water in the bottom of the pot.
- Oven (Light On): Place jars in your oven (turned OFF) with just the oven light on. The warmth from the bulb often provides a consistent temperature of around 100-110°F (38-43°C). Ferment for 10-12 hours, or up to 24 hours.
- Warm Kitchen Spot: Wrap your jars in a towel and place them in a consistently warm, draft-free area of your kitchen for 24-48 hours. This method is less precise but can work in warm climates.
- Duration and Tanginess: The longer your yogurt ferments within the optimal temperature range, the tangier it will become. Check periodically after 12 hours.
 Glass jars of coconut yogurt fermenting in a yogurt maker or a warm oven, showing the active culture process.
5. The Crucial Chill: Setting Your Yogurt
Fermentation creates the tang, but chilling is essential for the yogurt to achieve its final thick texture.
- Refrigeration Time: Once fermentation is complete and your yogurt has reached your desired tanginess, remove it from the warm environment. Gently stir it to reincorporate any whey that may have separated (this is normal for coconut yogurt). Then, cover the jars tightly and transfer them to the refrigerator for at least 6-24 hours. The yogurt will continue to thicken significantly as it chills.
- What to Expect: Your yogurt should be noticeably thicker and creamier after chilling. Some minor separation of whey is still possible, especially with additive-free brands; simply stir it back in.
Troubleshooting Common Coconut Yogurt Problems
Even with the best intentions, things can sometimes go awry. Here’s how to address common issues:
My Coconut Yogurt is Runny!
This is the most frequent complaint, but usually fixable.
- Re-check Coconut Milk Fat Content: Did you use full-fat canned coconut milk? Light or “drinking” varieties will not thicken.
- Did You Use Enough Thickener? If you omitted it or used too little, your yogurt will be thin. You might be able to gently reheat the batch, whisk in more starch/gelatin, cool, and re-culture.
- Is Your Starter Active? An old or weak starter won’t culture effectively. Ensure your probiotic capsules are fresh and contain live cultures, or use a reliable store-bought yogurt starter.
- Was the Fermentation Temperature Consistent? Too hot (above 115°F/46°C) kills cultures; too cold (below 100°F/38°C) makes them dormant. Inconsistent temperatures also hinder setting.
- Insufficient Fermentation/Chilling Time: Ensure adequate time for both processes. Yogurt will be thin when warm and needs significant chilling to set.
Off-Smell or Mold: When to Discard
If your yogurt smells distinctly “off,” rancid, or develops visible mold (especially pink or colored spots), it’s best to discard it immediately. This indicates contamination with undesirable bacteria.
- Importance of Sterilization: Thoroughly clean and sterilize all equipment for your next attempt.
- Check Ingredients: Ensure your coconut milk and starter are not expired.
Too Tangy or Not Tangy Enough
- Adjusting Fermentation Time: The longer the fermentation, the tangier the yogurt. For less tang, reduce the fermentation time. For more tang, extend it by a few hours. Keep in mind that longer fermentation also consumes more of the sugar, potentially making it less sweet.
Tips for the Best Homemade Coconut Yogurt
Elevate your coconut yogurt game with these expert recommendations:
- Experiment with Brands and Thickeners: Different brands of coconut milk and various thickeners yield slightly different textures. Don’t be afraid to try a few combinations to find your personal favorite.
- Flavoring After Fermentation: For the best results and to avoid interfering with the live cultures, always add flavorings like vanilla extract, fruit purees, or maple syrup after your yogurt has fermented and chilled.
- Reusing a Portion of Your Batch as a Starter: Once you have a successful batch, you can often save 2-3 tablespoons to culture your next batch. However, the cultures can weaken after 2-3 generations, so it’s wise to refresh with a new probiotic starter periodically.
- Storage and Shelf Life: Homemade coconut yogurt typically lasts 1-2 weeks in an airtight container in the refrigerator. Storing it in smaller jars can help unopened portions stay fresher longer.
Conclusion
Making thick, creamy coconut yogurt that truly sets is a rewarding culinary achievement that brings the joys of dairy-free, probiotic-rich goodness right into your home. By carefully selecting full-fat coconut milk, utilizing effective thickeners like cornstarch or agar-agar, and paying close attention to fermentation temperatures and timings, you can confidently create a product that rivals store-bought versions. Remember, patience and proper technique are your greatest allies in this process. So, what delicious toppings will you choose for your perfectly set homemade coconut yogurt?
Frequently Asked Questions
Can I make coconut yogurt without a thickener?
Yes, it is possible to make coconut yogurt without an added thickener, but the results will likely be thinner and more prone to separation. To achieve a thicker consistency without thickeners, you must use only the very thick, solid cream from thoroughly chilled cans of full-fat coconut milk and allow for adequate fermentation and chilling time.
How long does homemade coconut yogurt last?
Homemade coconut yogurt typically lasts for 1 to 2 weeks when stored in an airtight container in the refrigerator. For optimal freshness, it is recommended to store it in several smaller jars rather than one large one, as unopened portions tend to stay fresher for longer.
Can I use coconut cream instead of coconut milk?
In most homemade coconut yogurt recipes, full-fat canned coconut milk (with its separated cream) is preferred over standalone coconut cream. While coconut cream is very rich, some recipes suggest it might not ferment into a yogurt-like consistency as effectively as the separated cream from coconut milk, especially for recipes relying on minimal ingredients.
What if my yogurt separates?
It is completely normal for homemade coconut yogurt to separate, especially if it doesn’t contain commercial stabilizers like guar gum. You might see a layer of clear liquid (whey) on top or at the bottom. Simply stir the yogurt gently before serving to reincorporate the whey and achieve a smoother consistency.