Imagine a world where you craft creamy, delicious yogurt right in your kitchen, without relying on electricity. For over a decade, the evolution of homemade yogurt technology has moved beyond simple appliances to smart, multi-feature machines. Yet, amidst this advancement, non-electric yogurt makers, often called thermal cookers, offer a refreshing return to simplicity. These ingenious devices empower you to create wholesome, additive-free yogurt with minimal fuss, saving energy and giving you complete control over your ingredients. Let’s delve into the fascinating world of non-electric yogurt makers and discover how they can transform your kitchen experience.
Why Choose a Non-Electric Yogurt Maker?
Opting for a non-electric yogurt maker isn’t just about saving space on your countertop; it’s a lifestyle choice that brings numerous benefits to your home and health.
Energy Independence and Eco-Friendliness
|
Our Picks for the Best Yogurt maker in 2026
As an Amazon Associate I earn from qualifying purchases.
|
||
| Num | Product | Action |
|---|---|---|
| 1 | Yogurt Maker with Two Containers, Yogurt Maker Machine with Adjustable Temperature & Time Control, Automatic Shut-Off & Constant Temper for Homemade Probiotic Yogurt, Promoting Gut Health |

|
| 2 | Ultimate Probiotic Yogurt Maker with Adjustable Time & Temp Control - Make Trillions of Live Probiotics with Two 1-Quart Containers for Larger Batches - Greek Yogurt Maker - ULTIMATE LIFETIME WARRANTY |
|
| 3 | Yogurt Maker Machine, 8 Glass Jars with Lids Reusable for Yoghurt, Oatmeal, Pudding, or Jello, Food-Grade Martial, One-touch Control, Homemade Yogurt |
|
| 4 | GDOR Yogurt Maker with Adjustable Temp & Timer– Probiotic-Rich – Digital Greek Yogurt Machine with 8×6oz BPA-Free Glass Jars, Easy to Use for Home, Stainless Steel |
|
| 5 | Easy Yogurt Maker for Perfect Homemade Yogurt, 1.7 QT Electric Fermenter for Greek Yogurt, Rice Wine, Natto, with Digital Control & Auto Keep Warm, BPA-Free Container |
|
| 6 | Euro Cuisine Yogurt Maker - YMX650 Automatic Digital Yogurt Maker Machine with Set Temperature - Includes 7-6 oz. Reusable Glass Jars and 7 Rotary Date Setting Lids for Instant Storage |
|
| 7 | Yogurt Maker with Adjustable Temperature & Time Control, Probiotic Yogurt Maker Machine with 8 Glass Jars, Automatic Shut-Off for Homemade Probiotic Yogurt, Promoting Gut Health(48OZ) |
|
| 8 | Yogurt Maker, Compact Greek Yogurt Maker Machine with Constant Temperature Control, Stainless Steel Container, 1 Quart for Home Organic Yogurt |
|
| 9 | Euro Cuisine YM80 Electric Yogurt Maker Machine- Promote Gut Health with Probiotic Rich Homemade Yogurt -Home Yogurt Incubator with Glass Jars, White |
|
| 10 | Yogurt Dehydrator, Small-Batch Greek Yogurt Maker with Built-In Date Reminder Fresh, Simple & Just the Right Amount — Food-Grade BPA-Free Materials |
|
One of the most compelling reasons to choose a non-electric yogurt maker is its independence from power outlets. These devices require no electricity for the incubation phase, making them perfect for off-grid living, camping trips, or simply reducing your household’s energy consumption. This eco-friendly approach contributes to a greener kitchen and offers peace of mind during power outages, ensuring you can still enjoy fresh yogurt.
Simplicity and Reliability
Non-electric yogurt makers are celebrated for their straightforward design and operation. Without complex digital settings or multiple buttons, the process becomes incredibly intuitive. You simply heat your milk, add your starter, and let the insulated container do the rest. This simplicity translates into high reliability, as there are no electrical components to malfunction, ensuring a long lifespan for your appliance.
Cost Savings
While the initial investment in a non-electric yogurt maker is often lower than electric models, the savings extend far beyond the purchase price. Homemade yogurt is significantly more economical than store-bought varieties. By using fresh milk and a starter culture, you can produce large quantities of yogurt for a fraction of the cost, leading to substantial long-term savings for your household budget.
Unmatched Control Over Ingredients
Making yogurt at home gives you complete mastery over what goes into your food. You can choose organic milk, select your preferred starter cultures, and avoid unnecessary additives, sugars, or thickeners often found in commercial yogurts. This level of control is invaluable for those with dietary restrictions or anyone committed to a cleaner, healthier diet.
Understanding Non-Electric Yogurt Makers (Thermal Cookers)
At their core, non-electric yogurt makers are marvels of passive heating technology. They harness the principle of retained heat to create the perfect environment for yogurt fermentation.
How They Work
The magic of a non-electric yogurt maker lies in its exceptional insulation. You begin by heating milk to a specific temperature on your stovetop, then allow it to cool slightly before stirring in your live yogurt starter culture. Once combined, this mixture is transferred to the insulated non-electric yogurt maker. The device’s sealed, insulated walls (often double-walled or vacuum-sealed) then trap the heat, maintaining the ideal temperature range (typically between 106°F and 115°F or 41°C and 45°C) for the beneficial bacteria to ferment the milk over several hours. This sustained warmth allows the cultures to thrive, transforming milk into thick, tangy yogurt without any external power source during incubation.
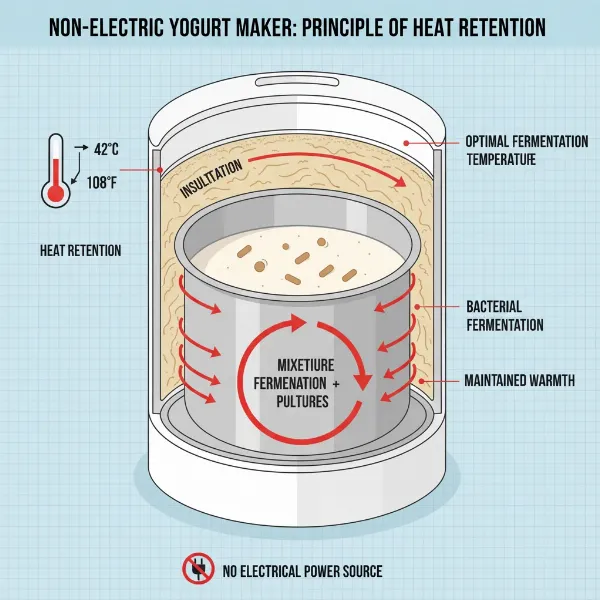 Diagram showing non-electric yogurt maker's insulation retaining heat for fermentation.
Types of Non-Electric Yogurt Makers
While the underlying principle is similar, non-electric yogurt makers come in various forms:
- Dedicated Insulated Containers: These are specifically designed for yogurt making, often resembling a large thermos. They typically feature an outer insulated casing and an inner container for the milk mixture. Brands like Yogotherm are well-known examples of this classic design, valued for their singular purpose and effective insulation.
- Thermal Cookers: These versatile appliances are designed for slow cooking a variety of dishes using retained heat, and they double beautifully as non-electric yogurt makers. They usually consist of an inner pot that is heated on a stove and then placed into a heavily insulated outer container. Thermal cookers, such as the Tayama TXM-50CF or Tiger Magic Cooker, can handle larger batches and offer broader culinary uses beyond yogurt.
- DIY Methods: For the truly resourceful, yogurt can be made using everyday household items. A pre-warmed thermos, a cooler with jars of warm water and wrapped towels, or even an oven with just the pilot light or a warm oven light on can serve as effective non-electric incubators. These methods underscore the fundamental requirement: consistent warmth.
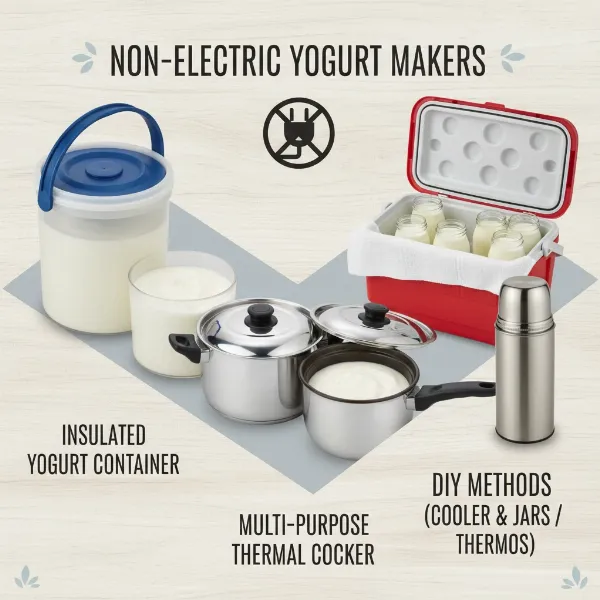 Comparison of dedicated, thermal cooker, and DIY non-electric yogurt making methods.
Key Factors to Consider When Buying a Non-Electric Yogurt Maker
Choosing the right non-electric yogurt maker involves evaluating several practical aspects to ensure it aligns with your yogurt-making habits and kitchen needs.
Insulation Type
The efficiency of a non-electric yogurt maker largely depends on its insulation.
- Vacuum Insulation: This is generally the most effective, creating a vacuum seal between two walls to prevent heat transfer. Vacuum-insulated models retain heat exceptionally well, losing only about 3-4 degrees Fahrenheit per hour, leading to more consistent results and longer incubation times if desired.
- Foam Insulation: While less efficient than vacuum insulation, foam-insulated models are often more affordable. They might lose heat at a slightly faster rate, around 6-8 degrees Fahrenheit per hour. If opting for a foam-insulated thermal cooker with multiple inner pots, filling any unused pots with boiling water can help maintain a more stable temperature.
Capacity and Size
Consider how much yogurt you consume and for how many people.
- Large Batch: Many thermal cookers and some dedicated non-electric makers are designed for single large batches, often accommodating a gallon of milk, perfect for families or frequent yogurt eaters. A fuller inner pot generally retains heat better.
- Individual Servings: Some systems come with multiple smaller jars, ideal for making different flavors simultaneously or for convenient grab-and-go portions.
Choose a size that fits your typical usage and storage space.
Material and Durability
The materials used impact both hygiene and longevity.
- Stainless Steel: A popular choice for inner pots and outer casings due to its durability, resistance to odors and stains, and ease of cleaning.
- BPA-Free Plastics: If an inner container is made of plastic, ensure it’s high-quality and BPA-free for food safety.
Since there are no electrical components, these makers are inherently more durable and less prone to breakdown than their electric counterparts.
Portability and Storage
If you envision taking your yogurt maker on trips or have limited kitchen space, consider its portability. Lighter, more compact designs are easier to store and transport. Many non-electric models are designed to be relatively small and unobtrusive.
Price and Value
Non-electric yogurt makers are typically more budget-friendly than electric ones. While established brands with vacuum insulation might cost a bit more, the long-term savings on store-bought yogurt make them a worthwhile investment. Evaluate the features against the price to find the best value for your needs.
Top Non-Electric Yogurt Makers on the Market
While specific models can fluctuate in availability, here are examples of popular non-electric yogurt makers and categories that consistently deliver excellent results.
Tayama TXM-50CF Energy-Saving Thermal Cooker
The Tayama TXM-50CF is a highly-regarded thermal cooker that performs exceptionally well for yogurt making.
- Pros: Known for its affordability and efficiency, it’s a great value option. It effectively retains heat, allowing for energy savings. Its substantial capacity (often around 5 liters) is suitable for families, and it’s easy to use and clean. Beyond yogurt, it’s versatile for stews, soups, and porridge.
- Cons: Some users have noted that labels on the outer pot can be difficult to remove. It typically uses foam insulation, which may not retain heat as long as vacuum-sealed alternatives, though still effective.
- Ideal User: Perfect for budget-conscious families who want a multi-purpose thermal cooker that can also consistently produce good yogurt.
Country Trading Co. Stainless Steel Yogurt Maker
This type of non-electric yogurt maker prioritizes simplicity and quality materials.
- Pros: Often made from high-quality stainless steel, ensuring durability, hygiene, and no plastic contact with your yogurt. It requires no programming or electricity, making it incredibly user-friendly and easy to store. Many models come with helpful resources like recipe books, expanding your yogurt-making repertoire. Offers full control over ingredients for organic, additive-free yogurt.
- Cons: Might be a more singular-purpose appliance compared to a thermal cooker.
- Ideal User: For those who value a pure, simple, and high-quality yogurt-making experience without any reliance on electricity or complex features.
Other Notable Mentions / DIY Alternatives
Beyond dedicated devices, many successful non-electric yogurt makers are found in clever home solutions:
- Yogotherm: An classic insulated container often passed down through generations, celebrated for its robust heat retention and simple design.
- Cooler Method: An insulated cooler can act as a fantastic incubator. Simply place your jarred milk and starter inside, surrounded by towels and a sealed jar of just-boiled water to maintain the temperature. This method works well for larger batches.
- Oven Light Method: The low heat generated by an incandescent oven light can provide enough warmth for fermentation. Place your milk mixture in a covered pot inside the oven with only the light on.
- Thermos/Vacuum Flask: A pre-warmed vacuum flask is essentially a single-serving non-electric yogurt maker. It’s ideal for small batches and highly portable.
Step-by-Step Guide to Making Yogurt in a Non-Electric Maker
Making yogurt without electricity is a simple, satisfying process. Here’s how to do it:
Preparing Your Milk
- Heat the Milk: Pour your desired amount of milk (whole milk often yields the creamiest results) into a saucepan. Heat it slowly over medium heat to 180-185°F (82°C). This step is crucial as it kills any competing bacteria and denatures milk proteins, resulting in a thicker, smoother yogurt. Stir frequently to prevent scorching.
- Cool the Milk: Remove the milk from the heat and allow it to cool down to the ideal inoculation temperature of 106-115°F (41-45°C). Use a reliable kitchen thermometer to monitor the temperature precisely. Cooling it too much will result in slow fermentation, while too hot will kill your starter cultures.
Adding the Starter Culture
- Select Your Starter: You can use a spoonful of plain, store-bought yogurt with live active cultures (check the label!) or a packet of powdered yogurt starter culture. If using store-bought yogurt, ensure it’s fresh for the most active cultures.
- Temper the Starter: Take a small amount of the cooled milk and whisk it thoroughly with your starter culture in a separate bowl until smooth. This helps prevent clumps when you add it to the main batch.
- Combine: Pour the tempered starter mixture back into the main pot of cooled milk. Stir gently but thoroughly to ensure the cultures are evenly distributed. Avoid over-stirring.
Incubation Process
- Transfer to the Maker: Carefully pour the inoculated milk into the inner container of your non-electric yogurt maker or thermal cooker. Secure the lid tightly.
- Place in Insulated Unit: Insert the inner container into the outer insulated casing, ensuring it’s properly sealed to maximize heat retention.
- Ferment: Allow the yogurt to incubate for 6 to 12 hours, or even longer depending on your preference. Shorter times result in milder yogurt, while longer fermentation (up to 24 hours for some recipes) yields a tangier, thicker product. Do not open the maker during this time, as it will release heat and disrupt the process.
- Check and Chill: After the desired incubation time, gently open the maker and check the yogurt’s consistency. It should be set. Transfer the inner container to the refrigerator and chill for at least 4 hours before serving. Chilling helps the yogurt set further and stops the fermentation process.
Tips for Perfect Homemade Non-Electric Yogurt
Achieving consistently delicious homemade yogurt with a non-electric maker is easy with a few expert tips.
- Maintaining Consistent Temperature: The most critical factor for successful fermentation is maintaining a stable temperature within the ideal range (106-115°F). Investing in a good quality food thermometer for the milk cooling stage is invaluable. Ensure your non-electric maker is pre-warmed if recommended by the manufacturer, and avoid opening it during incubation.
- Experimenting with Fermentation Times: Don’t be afraid to experiment! A shorter incubation (6-8 hours) will give you a milder, thinner yogurt, while longer times (10-12 hours or even up to 24 hours) will produce a tangier, thicker yogurt. Keep notes of your timings to replicate your favorite results.
- Making Thicker Yogurt (Straining for Greek Yogurt): For a thicker, Greek-style yogurt, simply strain your finished yogurt through a cheesecloth-lined colander set over a bowl in the refrigerator for a few hours. The longer you strain, the thicker it will become. The liquid collected is whey, which can be used in smoothies or baking.
- Troubleshooting Common Issues: If your yogurt is too runny, it might be due to insufficient incubation time, the milk cooling too quickly, or inactive starter cultures. If it’s too sour, it fermented for too long. Adjust these factors for your next batch. Remember, milk quality and brand can also affect the final texture.
Cleaning and Maintenance for Longevity
Proper care of your non-electric yogurt maker ensures its longevity and maintains hygienic conditions for future batches.
Regular Cleaning Practices
After each use, disassemble the inner container(s) and wash them thoroughly with warm, soapy water. Most inner components are dishwasher-safe, offering convenient cleaning. The outer insulated casing can usually be wiped clean with a damp cloth. Ensure all parts are completely dry before reassembling and storing to prevent mold or odors.
Avoiding Culture-Inhibiting Cleaners
When cleaning your thermal container, be cautious with strong antibacterial soaps. Some compounds can bind to plastic or glass surfaces, leaving residues that may inhibit the live cultures in future yogurt batches. A gentle, natural dish soap is usually sufficient. If you use a thermos, avoid harsh chemicals that might compromise its insulating properties.
Conclusion
Embracing a non-electric yogurt maker is a step towards a simpler, more sustainable, and delicious way of life. These thermal marvels offer incredible flexibility, cost savings, and the unparalleled satisfaction of creating wholesome food from scratch. From the robust Tayama thermal cooker to the elegant simplicity of a stainless steel dedicated maker, or even a clever DIY solution, there’s a non-electric option for every home. Enjoy the journey of crafting your perfect batch of homemade yogurt, tailored exactly to your taste. What delightful flavors will you create first?
Frequently Asked Questions
How long does yogurt take to make in a non-electric maker?
The fermentation time in a non-electric Yogurt Maker typically ranges from 6 to 12 hours, depending on your desired thickness and tanginess. Some recipes and cultures may allow for longer fermentation up to 24 hours, yielding a more intense flavor.
Can I use any milk for homemade yogurt?
Yes, you can use various types of dairy milk (whole, 2%, skim) or even plant-based milks like soy, coconut, or almond milk. Whole dairy milk generally produces the creamiest results, while plant-based milks may require specific cultures or thickeners to achieve the desired consistency.
What kind of starter do I need?
You need a yogurt starter that contains live active cultures. This can be a spoonful of plain, unsweetened store-bought yogurt with “live active cultures” listed in the ingredients, or a packet of freeze-dried yogurt starter culture, available from specialty stores or online.
How do I make Greek yogurt with a non-electric maker?
To make Greek yogurt, first, complete the regular yogurt-making process. Once your yogurt is set and chilled, strain it through a colander lined with cheesecloth or a clean tea towel. Place this over a bowl in the refrigerator for several hours until it reaches your desired thickness. The longer it strains, the thicker it becomes.
Is homemade yogurt really cheaper?
Yes, making yogurt at home is significantly cheaper than buying it from the store. You can produce a batch of homemade yogurt for a fraction of the cost of a comparable store-bought container, especially if you opt for organic or Greek varieties. The savings add up considerably over time.