Sourdough baking, with its incredible depth of flavor and satisfying chew, begins with a vibrant, active starter. Yet, cultivating this living culture can be a delicate dance with temperature, often leaving bakers frustrated with sluggish or inconsistent results, especially in cooler environments. Imagine having a tool that consistently provides the perfect warmth, taking the guesswork out of fermentation and setting you on the path to baking artisan-quality bread right in your kitchen. Your everyday yogurt maker can be that secret weapon, transforming your sourdough journey from challenging to effortlessly consistent.
Your Sourdough Journey: A Yogurt Maker Buying Guide for Bakers
The heart of a successful sourdough starter lies in maintaining a stable, warm environment where beneficial wild yeasts and lactic acid bacteria can thrive. Fluctuations in room temperature can significantly impact your starter’s activity, leading to slower fermentation, unpredictable rises, and even a less robust flavor profile. An ideal temperature range of 75-82°F (24-28°C) encourages the rapid growth and balanced activity of these microorganisms, crucial for a strong, healthy starter that delivers consistent results in your baking. This precise temperature control is where a yogurt maker truly shines, providing a nurturing home for your starter.
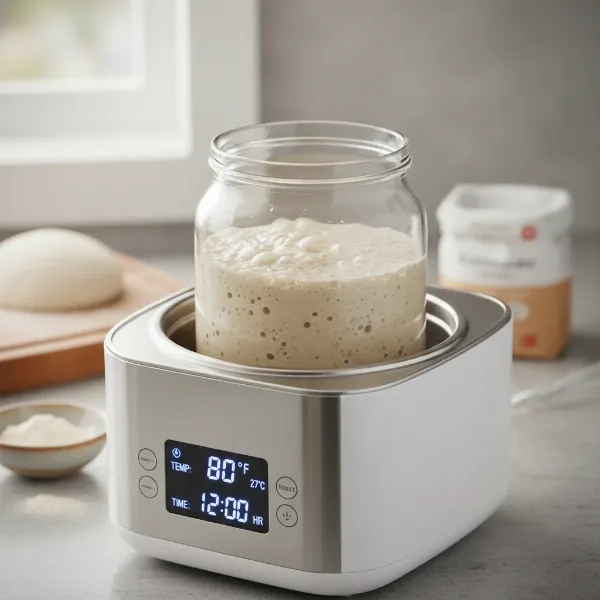 Active sourdough starter in glass jar inside a yogurt maker for optimal fermentation.
Common Yogurt Maker Types for Sourdough Enthusiasts
When selecting a yogurt maker for your sourdough starter, understanding the different types can help you choose the most effective tool for your needs.
- Basic Analog Models: These typically operate at a fixed temperature, often around 104°F (40°C), which is ideal for making yogurt. While some sourdough recipes can tolerate this higher temperature for short periods, it might be too warm for prolonged starter development. If you use a basic model, ensure its fixed temperature aligns with or is close to the desired sourdough range (75-82°F) or use a water bath method to buffer the heat. These are often simple and budget-friendly.
- Digital with Temperature Control: These are the most versatile and recommended options for sourdough. They allow you to set the precise temperature, often within a range that perfectly accommodates sourdough’s requirements (e.g., 75-82°F). This feature eliminates guesswork and provides optimal conditions for both creating and maintaining your starter.
- Multi-Cookers with Yogurt Function: Appliances like Instant Pots often include a “yogurt” setting. This function typically maintains a low, consistent temperature suitable for fermentation, making them an excellent multi-purpose tool for sourdough, especially if you already own one.
|
Our Picks for the Best Yogurt maker in 2026
As an Amazon Associate I earn from qualifying purchases.
|
||
| Num | Product | Action |
|---|---|---|
| 1 | Easy Yogurt Maker for Perfect Homemade Yogurt, 1.7 QT Electric Fermenter for Greek Yogurt, Rice Wine, Natto, with Digital Control & Auto Keep Warm, BPA-Free Container |

|
| 2 | Euro Cuisine YM80 Electric Yogurt Maker Machine- Promote Gut Health with Probiotic Rich Homemade Yogurt -Home Yogurt Incubator with Glass Jars, White |
|
| 3 | Yogurt Maker, Compact Greek Yogurt Maker Machine with Constant Temperature Control, Stainless Steel Container, 1 Quart for Home Organic Yogurt |
|
| 4 | Euro Cuisine Yogurt Maker - YMX650 Automatic Digital Yogurt Maker Machine with Set Temperature - Includes 7-6 oz. Reusable Glass Jars and 7 Rotary Date Setting Lids for Instant Storage |
|
| 5 | GDOR Yogurt Maker with Adjustable Temp & Timer– Probiotic-Rich – Digital Greek Yogurt Machine with 8×6oz BPA-Free Glass Jars, Easy to Use for Home, Stainless Steel |
|
| 6 | Ultimate Probiotic Yogurt Maker with Adjustable Time & Temp Control - Make Trillions of Live Probiotics with Two 1-Quart Containers for Larger Batches - Greek Yogurt Maker - ULTIMATE LIFETIME WARRANTY |
|
| 7 | Yogurt Maker Machine, 8 Glass Jars with Lids Reusable for Yoghurt, Oatmeal, Pudding, or Jello, Food-Grade Martial, One-touch Control, Homemade Yogurt |
|
| 8 | Yogurt Maker with Adjustable Temperature & Time Control, Probiotic Yogurt Maker Machine with 8 Glass Jars, Automatic Shut-Off for Homemade Probiotic Yogurt, Promoting Gut Health(48OZ) |
|
| 9 | Yogurt Maker with Two Containers, Yogurt Maker Machine with Adjustable Temperature & Time Control, Automatic Shut-Off & Constant Temper for Homemade Probiotic Yogurt, Promoting Gut Health |
|
| 10 | Yogurt Dehydrator, Small-Batch Greek Yogurt Maker with Built-In Date Reminder Fresh, Simple & Just the Right Amount — Food-Grade BPA-Free Materials |
|
Key Considerations When Choosing a Yogurt Maker for Sourdough
To ensure your yogurt maker is a perfect partner for your sourdough endeavors, keep these critical factors in mind:
- Temperature Control: This is paramount. Look for models that offer adjustable temperature settings, allowing you to precisely dial in the ideal 75-82°F (24-28°C) range. If a model has a fixed temperature, verify it falls within a usable range for sourdough.
- Capacity: Consider the size of your sourdough jar. Ensure the yogurt maker can comfortably accommodate your jar, ideally with some space for air circulation or for a water bath if using that method. Some yogurt makers come with individual jars; check if a single, larger jar can fit inside.
- Material: While the yogurt maker itself can be plastic or stainless steel, your sourdough starter should be housed in a clean glass jar. Glass is non-reactive and easy to sterilize, providing a safe environment for your culture.
- Ease of Cleaning: Spills happen, especially with an active starter. A yogurt maker with easily wipeable surfaces and removable parts will make cleanup simple and maintain hygiene.
- Brand Reputation: While many brands offer reliable products, researching user reviews can provide insights into a specific model’s temperature consistency and overall durability.
“A consistent warm environment is not just a convenience; it’s the foundation for a robust and reliable sourdough starter. A well-chosen yogurt maker delivers exactly that, transforming a finicky process into a predictable joy.” – Anna Rodriguez, Master Baker and Fermentation Expert
How to Use Your Yogurt Maker for Sourdough Starter Effectively
Using a yogurt maker for your sourdough starter is straightforward, ensuring a stable environment for your culture to flourish.
Setting Up Your Starter:
Begin with a clean glass jar, a digital scale for precision, and a thermometer to monitor internal temperatures.
- Ingredients: You’ll need high-quality flour (rye or unbleached all-purpose flour are common choices for their nutrient content) and non-chlorinated water. Chlorine can inhibit yeast activity, so filtered or boiled and cooled tap water is best.
- Initial Mixing: In your clean jar, combine equal parts by weight of flour and water (e.g., 50g flour to 50g water). Mix thoroughly until no dry flour remains and the mixture forms a thick, uniform paste.
- Placement: Loosely cover your jar with a lid or breathable material (like a coffee filter secured with a rubber band). Place the jar directly into your yogurt maker. If your yogurt maker uses a water bath, ensure the water level reaches about halfway up your starter jar.
Temperature Setting:
Set your yogurt maker to the desired temperature, ideally between 75-82°F (24-28°C). If your maker has a fixed temperature higher than this, monitor your starter closely and consider shorter fermentation cycles or using the water bath method to mitigate excessive heat.
Feeding Schedule:
The feeding schedule is crucial for nurturing your starter.
- Initial Days (Creation/Activation): For a new starter, feed it once every 24 hours. As it gains strength, you might transition to feeding every 12 hours.
- Maintenance: Once established, a starter kept at room temperature (or in the yogurt maker) typically needs feeding every 12-24 hours. If refrigerated, it requires feeding once a week.
To feed, remove all but a small amount of starter (e.g., 25-50g), then add fresh equal parts of flour and water by weight. Stir well and return to the yogurt maker.
Observation:
An active starter will show visible signs of life:
- Bubbles: Small and large bubbles throughout the mixture.
- Rise and Fall: Mark the initial level with a rubber band; an active starter will rise significantly (often doubling in size) and then slowly fall before its next feeding.
- Aroma: It should develop a pleasant, tangy, slightly yeasty aroma, not a foul or overly sour smell.
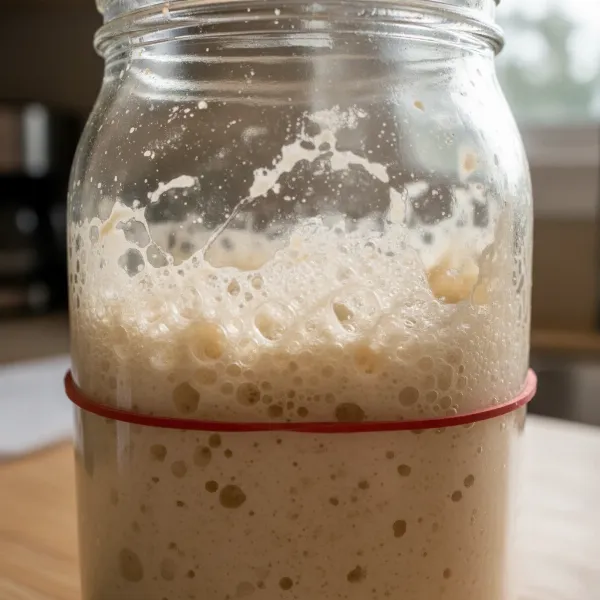 Close-up of a bubbly, risen sourdough starter in a glass jar, demonstrating readiness for baking.
Advanced Tips for a Superior Sourdough Starter
Elevate your sourdough game with these expert tips, leveraging your yogurt maker’s consistent environment.
- Adjusting Fermentation Time: A longer fermentation period in the yogurt maker can lead to a more complex, tangy flavor in your starter and, consequently, your bread. Shorter fermentations result in a milder, less sour loaf. Experiment to find your preferred balance.
- Experimenting with Flours: While all-purpose flour works, introducing rye flour or whole wheat flour to your feeding regimen can boost activity and add unique flavor notes due to their higher nutrient content. Many bakers use a blend.
- Troubleshooting Common Issues:
- Lack of Activity: Ensure your yogurt maker is maintaining the correct temperature. Try switching to a more “hungry” flour like rye, ensure your water is non-chlorinated, and be patient.
- Hooch: A dark liquid on top of your starter indicates it’s hungry. This is normal but means it needs feeding more frequently or with a larger ratio of flour to water.
- Consistency: Your starter should resemble a thick pancake batter. Adjust water or flour slightly to achieve this consistency, as it impacts fermentation.
Cleaning and Storing Your Sourdough-Friendly Yogurt Maker
Maintaining hygiene is crucial, especially when working with live cultures. Proper cleaning ensures your yogurt maker remains effective for both sourdough and its intended purpose.
- Regular Cleaning: After each use, wipe down the interior and exterior of your yogurt maker with a damp cloth. If any starter overflows, clean it immediately to prevent residue buildup and potential mold growth.
- Jar Hygiene: Always use clean, sterilized glass jars for your sourdough starter. Wash jars thoroughly with hot, soapy water, or run them through a dishwasher. Ensuring your jars are pristine prevents the introduction of unwanted bacteria that could compete with your starter’s beneficial microbes.
- Storage: When not in use, store your yogurt maker in a dry, clean place. If you use it primarily for sourdough, consider dedicating specific jars to your starter to avoid cross-contamination with other fermented foods.
Where to Find a Reliable Yogurt Maker for Your Sourdough Adventures
Investing in the right yogurt maker can significantly impact your sourdough success. You can find suitable models at major online retailers, dedicated kitchenware stores, and even some specialty appliance shops. Look for models explicitly stating temperature control features or those with a “DIY” setting that allows you to set precise temperatures. Reading customer reviews, particularly those mentioning its use for fermenting other items, can provide valuable insights into its temperature stability and overall performance. Prioritize models that offer good capacity for your starter jar and robust temperature settings to ensure a happy, active sourdough culture.
Conclusion
Embracing your yogurt maker as an integral tool in your sourdough baking arsenal is a game-changer. By providing the consistent, warm environment that wild yeasts and beneficial bacteria crave, you eliminate one of the most common hurdles in maintaining an active, robust sourdough starter. From initial creation to daily maintenance and even proofing, the precise temperature control offered by a good yogurt maker ensures your starter remains strong, reliable, and ready to transform simple flour and water into incredible bread. So, why not unlock the full potential of your kitchen appliances and elevate your sourdough journey today? What delicious sourdough creations will you bake first with your perfectly managed starter?
Frequently Asked Questions
What is the ideal temperature for sourdough starter?
The ideal temperature range for a sourdough starter to thrive is typically between 75-82°F (24-28°C). This range promotes optimal activity for both the wild yeasts and lactic acid bacteria responsible for your starter’s leavening power and characteristic flavor, leading to consistent and predictable fermentation.
Can any yogurt maker be used for sourdough?
While most yogurt makers can provide warmth, those with adjustable temperature controls are ideal for sourdough, allowing you to set the precise 75-82°F (24-28°C) range. Fixed-temperature models can work, but you’ll need to verify their temperature output and potentially use a water bath to prevent overheating your starter.
How often should I feed my sourdough starter in a yogurt maker?
When kept in the warm environment of a Yogurt Maker, an active sourdough starter typically needs to be fed every 12 to 24 hours. The exact frequency depends on its activity level and the specific temperature, with warmer conditions usually requiring more frequent feedings. Observe your starter for signs of hunger, like a flattened top or a distinct “hooch” layer.
What kind of flour is best for sourdough starter?
Unbleached all-purpose flour is a common and effective choice for sourdough starter. However, many bakers also find success and increased activity with rye flour or whole wheat flour, as their higher nutrient content can stimulate yeast and bacterial growth. A blend of these flours can also be used to achieve specific flavors and activity levels.
How do I know my sourdough starter is ready to bake with?
Your sourdough starter is ready to bake when it consistently doubles (or even triples) in size within 4-8 hours after feeding, has a bubbly, airy texture throughout, and smells pleasantly tangy and yeasty. A good test is the “float test”: drop a small spoonful into water; if it floats, it’s active enough to leaven bread.