Making homemade yogurt is a rewarding experience, offering fresh, probiotic-rich goodness. However, the excitement can quickly turn to disappointment when you find your meticulously prepared batch hasn’t set, leaving you with a thin, watery liquid instead of creamy yogurt. Don’t despair! This common issue has many potential causes, and fortunately, most runny yogurt batches can be salvaged or, at the very least, understood to prevent future mishaps. This comprehensive guide will walk you through diagnosing why your yogurt didn’t set, how to fix it, and best practices to ensure consistently thick, delicious yogurt every time.
Understanding Why Your Homemade Yogurt Didn’t Set
Achieving that perfect, spoonable consistency in homemade yogurt relies on a delicate balance of conditions. When this balance is disrupted, the result is often a runny batch. Understanding the underlying reasons is the first step toward troubleshooting and prevention.
Common Culprits Behind Runny Yogurt
Several factors can contribute to yogurt failing to set. Identifying which one applies to your situation is key.
- Temperature Troubles: The most frequent cause of unset yogurt is incorrect incubation temperature. If the temperature is too low (below 100°F or 38°C), the beneficial bacteria in your starter culture become sluggish and cannot ferment the milk effectively. Conversely, if the temperature is too high (above 115°F or 46°C), the bacteria can be killed, halting the fermentation process entirely. The ideal range for most yogurt cultures is between 104-115°F (40-46°C), with many experts recommending 108-110°F (42-43°C) for optimal results.
- Starter Culture Quality and Quantity: Your starter culture is the heart of your yogurt. If it’s old, inactive, or of poor quality, it won’t have enough viable bacteria to properly ferment the milk. Using too little starter for the amount of milk can also lead to an unset batch, as the bacteria are outnumbered and take too long to multiply sufficiently.
- Milk Type and Preparation: The milk itself plays a crucial role. Ultra-pasteurized (UHT) milk can sometimes struggle to set as firmly due to changes in its protein structure during processing. Using low-fat milk can also result in a thinner yogurt compared to whole milk because it contains less fat and protein. Furthermore, milk that isn’t heated to a high enough temperature (160-180°F or 71-82°C for 20-30 minutes) before cooling can fail to break down milk proteins sufficiently, hindering coagulation.
- Incubation Time and Environment: Yogurt needs adequate time to ferment. If you shorten the incubation period, the bacteria may not have had enough time to thicken the milk. Additionally, disturbing the yogurt by jostling or stirring it during the critical initial hours of fermentation can interrupt the delicate protein matrix formation, leading to a thin consistency.
- Contamination Concerns: While less common, contamination from undesirable bacteria or yeasts can interfere with your starter culture’s activity, preventing proper setting and potentially giving your yogurt an off-flavor. Ensuring all equipment is scrupulously clean is essential.
|
Our Picks for the Best Yogurt maker in 2026
As an Amazon Associate I earn from qualifying purchases.
|
||
| Num | Product | Action |
|---|---|---|
| 1 | Ultimate Probiotic Yogurt Maker with Adjustable Time & Temp Control - Make Trillions of Live Probiotics with Two 1-Quart Containers for Larger Batches - Greek Yogurt Maker - ULTIMATE LIFETIME WARRANTY |

|
| 2 | Yogurt Maker with Adjustable Temperature & Time Control, Probiotic Yogurt Maker Machine with 8 Glass Jars, Automatic Shut-Off for Homemade Probiotic Yogurt, Promoting Gut Health(48OZ) |
|
| 3 | Euro Cuisine Yogurt Maker - YMX650 Automatic Digital Yogurt Maker Machine with Set Temperature - Includes 7-6 oz. Reusable Glass Jars and 7 Rotary Date Setting Lids for Instant Storage |
|
| 4 | Yogurt Maker, Compact Greek Yogurt Maker Machine with Constant Temperature Control, Stainless Steel Container, 1 Quart for Home Organic Yogurt |
|
| 5 | Yogurt Maker with Two Containers, Yogurt Maker Machine with Adjustable Temperature & Time Control, Automatic Shut-Off & Constant Temper for Homemade Probiotic Yogurt, Promoting Gut Health |
|
| 6 | Euro Cuisine YM80 Electric Yogurt Maker Machine- Promote Gut Health with Probiotic Rich Homemade Yogurt -Home Yogurt Incubator with Glass Jars, White |
|
| 7 | Yogurt Dehydrator, Small-Batch Greek Yogurt Maker with Built-In Date Reminder Fresh, Simple & Just the Right Amount — Food-Grade BPA-Free Materials |
|
| 8 | Yogurt Maker Machine, 8 Glass Jars with Lids Reusable for Yoghurt, Oatmeal, Pudding, or Jello, Food-Grade Martial, One-touch Control, Homemade Yogurt |
|
| 9 | GDOR Yogurt Maker with Adjustable Temp & Timer– Probiotic-Rich – Digital Greek Yogurt Machine with 8×6oz BPA-Free Glass Jars, Easy to Use for Home, Stainless Steel |
|
| 10 | Easy Yogurt Maker for Perfect Homemade Yogurt, 1.7 QT Electric Fermenter for Greek Yogurt, Rice Wine, Natto, with Digital Control & Auto Keep Warm, BPA-Free Container |
|
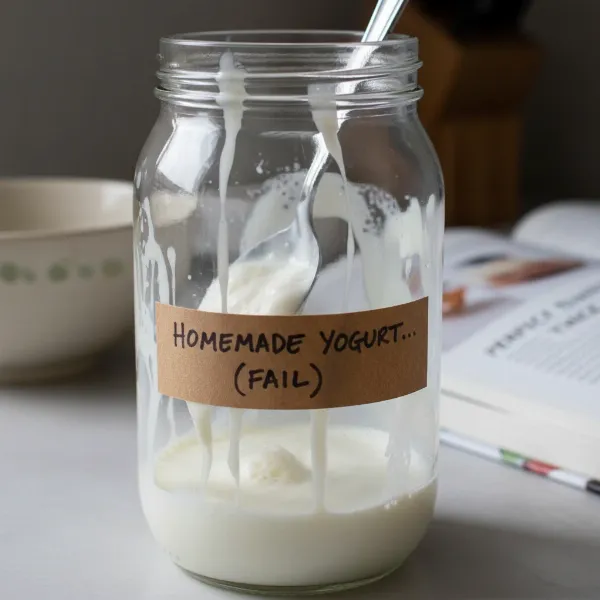 Close-up of runny homemade yogurt in a glass jar, illustrating common fermentation failures
The Science Behind Yogurt Setting
Yogurt sets through a process called fermentation, driven by lactic acid bacteria introduced via the starter culture. These bacteria consume the lactose (milk sugar) and produce lactic acid. As the acidity of the milk increases, the milk proteins (casein) coagulate and form a gel-like structure, trapping the liquid and creating the thick texture characteristic of yogurt. Optimal conditions—specifically the correct temperature and sufficient incubation time—are necessary for these bacteria to thrive and perform their job effectively. Without these conditions, the protein structure won’t form, and your yogurt will remain runny.
Step-by-Step Troubleshooting for Unset Yogurt
Discovering unset yogurt can be frustrating, but many batches can still be salvaged. Here’s how to approach your runny creation.
Assessing Your “Failed” Batch
Before attempting any fixes, it’s important to evaluate your yogurt.
- Smell and Taste Test: Carefully smell your unset yogurt. It should have a clean, slightly tangy, or milky aroma. If it smells “off,” sour (beyond normal yogurt tang), moldy, or otherwise unpleasant, it’s best to discard it to err on the side of caution. If it smells clean and tastes like thin, tangy milk, it’s likely safe to proceed with troubleshooting.
- Consistency Check: Is it completely liquid like milk, or is there a slight thickening, perhaps a bit stretchy or gelatinous? This can give you clues about the extent of fermentation that occurred.
Re-incubating Your Yogurt (When and How)
If your unset yogurt smells and tastes fine, and is still warm, you often have a good chance to re-incubate it. This is particularly effective if the primary issue was insufficient incubation time or a slightly low temperature.
- Adding More (Fresh) Starter: If your initial starter was weak or insufficient, adding a fresh, potent starter can kickstart the process. Gently warm the unset yogurt (if it has cooled down) to the optimal incubation temperature (100-110°F or 38-43°C). Then, gently stir in a small amount (e.g., 1-2 tablespoons per quart/liter) of new, active starter culture. Avoid aggressive mixing, as this can further disrupt protein formation.
- Adjusting Incubation Temperature and Time: Place the re-inoculated yogurt back into your yogurt maker or incubation setup. Ensure the temperature is consistently within the ideal range (100-110°F or 38-43°C). Incubate for an additional several hours, checking for firmness after 3-4 hours and continuing until it reaches your desired consistency. Be patient, as it might take longer than the initial incubation.
When Re-incubation Isn’t an Option: Salvaging Runny Yogurt
Sometimes, re-incubation might not work or isn’t feasible. But even a completely runny batch can often be repurposed creatively.
- Straining for Thicker Yogurt: If your yogurt is simply too thin for your preference but has a good flavor, you can strain it. Pour the runny yogurt into a cheesecloth-lined colander set over a bowl. Allow it to drain in the refrigerator for 30-60 minutes, or longer for a thicker, Greek-style yogurt consistency. Be aware that very thin yogurt may pass through the strainer, so a finely woven cheesecloth or a dedicated yogurt strainer is best.
- Using it in Recipes (Smoothies, Baking, etc.): Runny yogurt that tastes good is essentially a tangy, probiotic liquid. It can be an excellent addition to smoothies, adding creaminess and a nutritional boost. Use it as a substitute for buttermilk or milk in baking recipes like pancakes, muffins, or quick breads.
- Creative Culinary Uses: If the texture is truly unappealing but the flavor is good, you can explore other options. Some suggest boiling a failed batch to see if it separates into curds and whey, which can then be strained to make a fresh ricotta-like cheese.
Preventing Future Yogurt Failures: Best Practices
Consistency in yogurt making comes from understanding and controlling the key variables. By adopting these best practices, you can dramatically improve your success rate.
Essential Tips for Consistent, Thick Yogurt
Making perfect yogurt isn’t just about following a recipe; it’s about mastering the process.
- Choosing the Right Milk: For thicker yogurt, opt for whole milk. If you prefer skim or low-fat, consider adding 1/4 to 1/2 cup of dry milk powder per quart/liter of liquid milk to boost protein content and enhance thickness. Avoid ultra-pasteurized (UHT) milk if possible, as it can sometimes yield runnier results.
- Optimizing Heating and Cooling Processes: Heat your milk slowly to 180-195°F (82-90°C) and maintain that temperature for 10-20 minutes. This step denatures the milk proteins, allowing them to form a stronger gel network. After heating, cool the milk quickly to 100-110°F (38-43°C) before adding your starter. Cooling it too slowly can create an environment for unwanted bacteria, while adding starter to milk that’s too hot will kill your cultures.
- Selecting and Maintaining a Potent Starter: Always use a fresh, active starter culture. If using store-bought yogurt as a starter, choose one with live and active cultures and without added thickeners or gelatin. For best results, use a starter that is no more than a week old. If you’re using a powdered starter, ensure it hasn’t expired and has been stored correctly.
- Mastering Incubation Temperature and Time: Consistency is vital. Use a reliable thermometer to monitor your milk’s temperature before adding the starter. During incubation, maintain a steady temperature between 104-115°F (40-46°C). Avoid disturbing the yogurt during incubation. The typical incubation time ranges from 6-12 hours, but this can vary based on your starter and desired tanginess/thickness. Don’t be afraid to incubate longer if your yogurt isn’t setting—up to 24 hours is sometimes necessary.
- Ensuring Utensil and Environment Cleanliness: Always use thoroughly cleaned and sanitized equipment. Any lingering bacteria or contaminants can compete with your starter culture, hindering fermentation and potentially leading to undesirable flavors or failure to set.
 A bowl of perfectly thick, creamy homemade yogurt with a spoon, ready to eat
Recommended Yogurt Making Equipment
While you can make yogurt with basic kitchen tools, certain equipment can simplify the process and improve consistency.
- Yogurt Makers vs. DIY Methods: A dedicated yogurt maker provides a consistent, controlled temperature environment, taking the guesswork out of incubation. However, DIY methods using an oven with the light on, an Instant Pot’s yogurt setting, or a cooler with hot water can also be highly effective if monitored properly.
- Thermometers and Timers: A reliable kitchen thermometer (digital is best) is indispensable for ensuring your milk is at the correct temperature for adding starter. A timer will help you keep track of incubation duration, preventing both under- and over-fermentation.
Conclusion
A batch of runny homemade yogurt isn’t the end of the world; it’s often a learning opportunity. By understanding the critical roles of temperature, starter culture, milk preparation, and incubation, you can effectively troubleshoot current batches and refine your technique for future success. Whether you re-incubate, strain, or creatively repurpose your unset yogurt, remember that every experience builds your expertise. With a little patience and attention to detail, you’ll be consistently enjoying perfectly thick, tangy homemade yogurt. What’s your secret to ensuring your yogurt always sets perfectly?
Frequently Asked Questions
Why is my yogurt lumpy?
Lumpy yogurt can be caused by uneven heating or cooling of the milk, a lumpy starter that wasn’t whisked smooth, or excessive stirring during fermentation. Ensure your starter is well-mixed before adding it to the milk, and gently whisk your finished yogurt after refrigeration for a smoother texture.
Can I use expired milk for yogurt?
It’s generally not recommended to use expired milk for making yogurt. While fermentation can somewhat preserve milk, using milk past its prime can lead to off-flavors, an unset batch, or potentially introduce harmful bacteria, compromising the safety and quality of your homemade yogurt.
How long should yogurt incubate?
The ideal incubation time typically ranges from 6 to 12 hours. Shorter times yield milder, thinner yogurt, while longer periods (up to 24 hours) result in tangier, thicker yogurt. The exact time depends on your starter, milk type, and desired consistency and flavor.
What is the best temperature for making yogurt?
The best temperature range for incubating yogurt is generally between 100°F and 115°F (38°C to 46°C). Many experts agree that an optimal temperature is around 108°F to 110°F (42°C to 43°C), which encourages vigorous bacterial activity for consistent setting.
Can I use store-bought yogurt as a starter?
Yes, you can use store-bought yogurt as a starter, provided it contains “live and active cultures” and is plain, unsweetened, and unflavored. Choose a brand with a good consistency, as added thickeners can sometimes lead to less predictable results in your homemade batch.
What if my yogurt is too sour?
Yogurt that is too sour typically indicates over-fermentation, meaning it incubated for too long. To prevent this, reduce your incubation time in future batches. You can also try cooling the milk to a slightly lower temperature before adding the starter, which slows down fermentation.