Imagine a bowl of rich, creamy Greek yogurt, perfectly tart, and made right in your own kitchen. While store-bought options are convenient, nothing quite compares to the fresh taste and customizable goodness of homemade. Thanks to modern yogurt makers, achieving this culinary delight is simpler than ever, transforming a complex process into an enjoyable home project.
This comprehensive guide will demystify the art of making Greek yogurt using a machine. We’ll walk you through selecting the ideal ingredients, understanding the role of your yogurt maker, and a detailed, step-by-step process from heating milk to the final, crucial straining. Get ready to elevate your breakfast, snacks, and cooking with delicious, wholesome homemade Greek yogurt.
The Magic Behind Greek Yogurt: What Makes It Unique?
Greek yogurt stands apart from its regular counterpart due to its distinctive thick, creamy texture and often tangier flavor. This difference isn’t magic, but rather a result of a simple yet crucial extra step: straining. After milk is fermented with live bacterial cultures, creating standard yogurt, the mixture is strained to remove excess liquid, known as whey. This process concentrates the milk solids, resulting in a product that is not only thicker but also higher in protein and lower in lactose.
Making your own Greek yogurt at home empowers you with control over ingredients, allowing you to avoid added sugars, artificial flavors, and preservatives often found in commercial products. It’s a truly rewarding experience, offering a fresh and beneficial food for your family.
Essential Ingredients for Perfect Greek Yogurt
The foundation of exceptional Greek yogurt lies in high-quality ingredients. With just two main components, you can create a culinary masterpiece.
Milk: Your Foundation
The type of milk you choose significantly impacts the final texture and richness of your Greek yogurt.
- Whole Milk: Often considered the gold standard for homemade yogurt, whole milk yields the thickest, creamiest, and most indulgent Greek yogurt. Its higher fat content contributes to a luxurious mouthfeel.
- 2% Milk: A great option for those seeking a balance between creaminess and a lighter profile. It still produces a satisfyingly thick Greek yogurt after straining.
- Skim Milk: While possible, skim milk will result in a significantly thinner Greek yogurt, even after straining, due to its minimal fat content.
- Ultra-Pasteurized (UHT) Milk: This milk has been heated to very high temperatures, which can alter its proteins and sometimes lead to a slightly less firm set. If using UHT milk, you might not need to heat it to a high temperature initially, only warming it to the incubation temperature.
- Pasteurized Milk: This requires heating to 160-180°F (71-82°C) to denature proteins and ensure a firm set, then cooling before adding the starter. This is generally the recommended type for best results.
|
Our Picks for the Best Yogurt maker in 2026
As an Amazon Associate I earn from qualifying purchases.
|
||
| Num | Product | Action |
|---|---|---|
| 1 | GDOR Yogurt Maker with Adjustable Temp & Timer– Probiotic-Rich – Digital Greek Yogurt Machine with 8×6oz BPA-Free Glass Jars, Easy to Use for Home, Stainless Steel |

|
| 2 | Yogurt Maker, Compact Greek Yogurt Maker Machine with Constant Temperature Control, Stainless Steel Container, 1 Quart for Home Organic Yogurt |
|
| 3 | Yogurt Maker Machine, 8 Glass Jars with Lids Reusable for Yoghurt, Oatmeal, Pudding, or Jello, Food-Grade Martial, One-touch Control, Homemade Yogurt |
|
| 4 | Yogurt Maker with Adjustable Temperature & Time Control, Probiotic Yogurt Maker Machine with 8 Glass Jars, Automatic Shut-Off for Homemade Probiotic Yogurt, Promoting Gut Health(48OZ) |
|
| 5 | Euro Cuisine Yogurt Maker - YMX650 Automatic Digital Yogurt Maker Machine with Set Temperature - Includes 7-6 oz. Reusable Glass Jars and 7 Rotary Date Setting Lids for Instant Storage |
|
| 6 | Yogurt Dehydrator, Small-Batch Greek Yogurt Maker with Built-In Date Reminder Fresh, Simple & Just the Right Amount — Food-Grade BPA-Free Materials |
|
| 7 | Yogurt Maker with Two Containers, Yogurt Maker Machine with Adjustable Temperature & Time Control, Automatic Shut-Off & Constant Temper for Homemade Probiotic Yogurt, Promoting Gut Health |
|
| 8 | Ultimate Probiotic Yogurt Maker with Adjustable Time & Temp Control - Make Trillions of Live Probiotics with Two 1-Quart Containers for Larger Batches - Greek Yogurt Maker - ULTIMATE LIFETIME WARRANTY |
|
| 9 | Easy Yogurt Maker for Perfect Homemade Yogurt, 1.7 QT Electric Fermenter for Greek Yogurt, Rice Wine, Natto, with Digital Control & Auto Keep Warm, BPA-Free Container |
|
| 10 | Euro Cuisine YM80 Electric Yogurt Maker Machine- Promote Gut Health with Probiotic Rich Homemade Yogurt -Home Yogurt Incubator with Glass Jars, White |
|
For a truly decadent result, many enthusiasts recommend starting with good quality, fresh whole milk.
Starter Culture: The Live Active Power
The starter culture is the living component that transforms milk into yogurt. It contains beneficial bacteria (probiotics) that ferment the milk sugars (lactose), producing lactic acid, which thickens the milk and gives yogurt its characteristic tang.
- Yogurt Starter Packets: These are convenient, pre-measured packets of freeze-dried bacterial cultures. They often contain specific strains designed for consistent results and can be purchased online or at health food stores.
- Store-Bought Plain Yogurt with Live Active Cultures: This is a popular and accessible option. Look for plain, unflavored yogurt with “live and active cultures” listed on the label. Greek yogurt or regular plain yogurt can be used. Ensure it’s fresh and not past its expiration date, as bacterial viability decreases over time. Avoid yogurts with added thickeners or sweeteners.
Regardless of your choice, using a fresh and potent starter is key to successful fermentation. Some home yogurt makers even save a few tablespoons from a previous batch to culture their next one, creating a continuous cycle of fresh yogurt.
Choosing the Right Yogurt Maker for Greek Yogurt
A yogurt maker provides the consistent, warm environment necessary for the beneficial bacteria in your starter culture to thrive and ferment the milk effectively. While some methods allow for making yogurt without a dedicated machine, a yogurt maker simplifies the process and ensures reliable results.
Types of Yogurt Makers
Understanding the different types available can help you select the best fit for your needs:
- Basic Electric Yogurt Makers: These typically consist of a base unit with a heating element and several individual glass jars. They maintain a steady, pre-set temperature, usually around 100-115°F (38-46°C). They are straightforward to use and excellent for beginners.
- Digital Yogurt Makers with Timer & Temperature Control: Offering more flexibility, these machines allow you to precisely adjust the incubation temperature and set a timer, often with an automatic shut-off feature. This control is beneficial for experimenting with different starter cultures or achieving specific levels of tartness.
- Multi-Cookers (like Instant Pot): Many modern multi-cookers come with a “yogurt” function. These versatile appliances can heat milk to the required temperature and then maintain the incubation temperature for fermentation. They often have larger capacities, making them suitable for bigger batches.
- Dedicated Greek Yogurt Strainers: It’s important to note that a “Greek yogurt maker” often refers to a straining device rather than a fermentation machine. These are typically fine-mesh strainers, sometimes with a weighted press, designed to separate whey from already-made yogurt, turning it into Greek yogurt. Some brands offer sets that include both a fermenting unit and a straining attachment.
Key Features to Look For
When purchasing a yogurt maker, consider these features:
- Temperature Control: For optimal results, precise temperature control is crucial. Look for machines that maintain a stable temperature between 100-115°F (38-46°C).
- Timer with Auto Shut-Off: This feature prevents over-fermentation, which can lead to excessively tart or separated yogurt.
- Capacity: Determine how much yogurt you want to make at once. Machines vary from those with several small individual jars to larger single containers.
- Material: Glass jars are often preferred for hygiene and inertness, while stainless steel components are durable and easy to clean.
- Ease of Cleaning: Removable parts and dishwasher-safe components make cleanup a breeze.
 A modern electric yogurt maker with multiple glass jars filled with milk, ready for fermentation.
Step-by-Step Guide: Making Greek Yogurt with a Machine
Crafting homemade Greek yogurt is a straightforward process, broken down into a few key stages. Follow these steps for consistently delicious results.
Step 1: Prepare Your Milk
The initial heating and cooling of the milk are critical for creating the ideal environment for your starter culture.
- Heating Pasteurized Milk: If using regular pasteurized milk, gently heat it in a saucepan over medium heat to 160-180°F (71-82°C). This step denatures milk proteins, which helps the yogurt set firmly, and eliminates any unwanted bacteria. Stir occasionally to prevent scorching.
- Cooling the Milk: Remove the milk from heat and allow it to cool to the ideal incubation temperature of 100-115°F (38-46°C). This cooling phase is vital; milk that is too hot will kill the beneficial bacteria in your starter, while milk that is too cool will result in weak or no fermentation. Use a clean food thermometer to monitor the temperature accurately. You can speed up cooling by placing the saucepan in an ice bath.
- For Ultra-Pasteurized Milk: Some UHT milks may not require heating to 180°F. Simply warm it to the incubation temperature of 100-115°F (38-46°C) before adding the starter. Always check your yogurt maker’s instructions or specific UHT milk recommendations.
Step 2: Introduce the Starter Culture
Once your milk has cooled to the correct temperature, it’s time to add your starter.
- Tempering the Starter: Take a small amount (about ½ cup) of the warmed milk and whisk it thoroughly with your yogurt starter (either the packet or a few tablespoons of plain yogurt). This helps to dissolve the powdered starter evenly or break up the store-bought yogurt, preventing clumps.
- Combine and Whisk: Pour this tempered starter mixture back into the main batch of milk. Whisk gently but thoroughly for about 1-2 minutes to ensure the starter cultures are evenly distributed throughout the milk. Avoid over-whisking, which can introduce too much air.
Step 3: Ferment in Your Yogurt Maker
Now, your milk and starter mixture is ready for incubation.
- Pour into Containers: Carefully pour the milk mixture into the clean jars or container provided with your yogurt maker. Fill them to the recommended level, usually leaving a small headspace.
- Set Your Machine: Place the filled containers into your yogurt maker and cover it with its lid. If your machine has temperature and time settings, set the temperature to 100-115°F (38-46°C) and the incubation time.
- Incubation Time: Most homemade yogurt ferments between 4 to 12 hours. A shorter fermentation (4-6 hours) typically yields a milder, sweeter yogurt, while a longer fermentation (8-12 hours, sometimes up to 24 hours for very tart yogurt or specific cultures) produces a tangier, firmer result. Experiment to find your preferred taste and texture. Avoid disturbing the machine during fermentation.
- Check for Set: After the minimum fermentation time, gently tilt a jar to see if the yogurt has set. It should appear firm and pull away slightly from the side of the jar.
Step 4: The Greek Yogurt Transformation: Straining
This is the defining step that turns regular yogurt into thick, creamy Greek yogurt.
- Why Strain? Straining removes excess whey, concentrating the yogurt’s solids. This increases its protein content, reduces lactose (making it easier for some to digest), and creates that signature thick texture.
- Equipment: You’ll need a large bowl, a fine-mesh sieve or colander, and either several layers of cheesecloth, a large coffee filter, or a dedicated Greek yogurt strainer. Line your sieve with the chosen material.
- The Process: Once your yogurt is fermented and cooled slightly, gently spoon it into the prepared strainer. Place the bowl with the strainer in the refrigerator. The straining process can take anywhere from 2 to 6 hours, or even longer, depending on your desired thickness. The longer it strains, the thicker your Greek yogurt will become.
- Using the Separated Whey: Don’t discard the whey! It’s a nutrient-rich liquid packed with probiotics and proteins. Use it in smoothies, baked goods, soups, to ferment vegetables, or even as a fertilizer for plants.
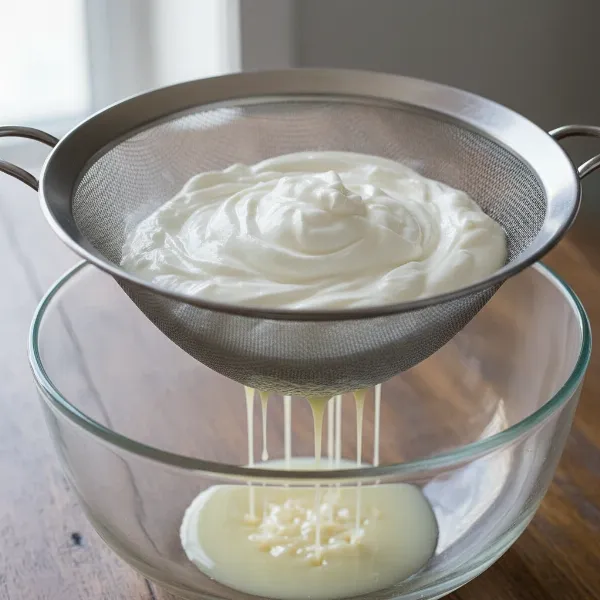 A close-up of thick homemade yogurt being strained in a fine-mesh sieve over a bowl, separating whey.
Step 5: Cool, Store, and Enjoy!
After straining, your Greek yogurt is almost ready to enjoy.
- Final Chill: Transfer your newly thickened Greek yogurt from the strainer to an airtight container. Refrigerate it for at least 1-2 hours to allow it to firm up further and cool completely.
- Storage: Homemade Greek yogurt can be stored in an airtight container in the refrigerator for up to 7-10 days.
Troubleshooting Common Homemade Yogurt Issues
Even experienced home cooks encounter hiccups. Here are solutions to common problems:
- Yogurt is Too Thin:
- Not enough fermentation time: Allow it to incubate longer.
- Temperature issues: Ensure your machine holds a consistent temperature between 100-115°F (38-46°C).
- Weak starter: Use a fresh starter culture.
- Low-fat milk: Higher fat milk naturally produces thicker yogurt.
- Yogurt is Lumpy or Grainy:
- Too high temperature: The milk might have been too hot when the starter was added, or the yogurt maker ran too hot.
- Over-fermentation: Fermenting for too long can sometimes cause separation and a grainy texture.
- Yogurt is Too Tart:
- Over-fermentation: Shorter incubation times result in milder yogurt. Reduce your fermentation time next batch.
- Starter culture: Some starter cultures naturally produce a tarter flavor.
- Yogurt Has Separated (Whey on Top): This is normal, especially for homemade yogurt. Gently stir it back in. For Greek yogurt, this separation is precisely what you want during the straining phase.
Tips for the Best Homemade Greek Yogurt
Achieving consistently perfect Greek yogurt at home is a combination of good technique and a few insider tips:
- Use High-Quality Whole Milk: The richer the milk, the creamier and thicker your final Greek yogurt will be. Whole milk provides the best texture and flavor.
- Fresh, Potent Starter: Always use a starter culture that is fresh and active. If using store-bought yogurt, ensure it’s within its “best by” date and contains live cultures. A weak starter leads to weak yogurt.
- Experiment with Fermentation Times: Don’t be afraid to adjust the incubation period. If you prefer a milder yogurt, ferment for less time. For a tangier flavor, extend the incubation. Keep notes to remember what you prefer!
- Flavoring After Straining: Add sweeteners (honey, maple syrup), fruits, or vanilla extract after your Greek yogurt has been made and strained. Adding them before can interfere with the fermentation process.
- Don’t Discard the Whey: The byproduct, whey, is incredibly versatile and nutritious. As Chef Maria Kotsifaki, a traditional Greek cuisine expert, often says, “The whey is liquid gold! It’s a testament to the healthy, natural process and should be embraced in your cooking, not wasted.” Incorporate it into smoothies, use it to soak grains, or add it to soups.
Conclusion
Making homemade Greek yogurt with a machine is a truly rewarding experience that puts control over your diet and taste preferences squarely in your hands. From the simple act of combining milk and starter to the satisfying transformation into a thick, protein-rich delicacy, each step contributes to a product far superior to most store-bought options.
With a reliable yogurt maker and a little practice, you’ll soon be crafting creamy, tangy Greek yogurt that perfectly suits your palate. Embrace the process, experiment with flavors, and enjoy the health benefits of this versatile food. Why not embark on your homemade Greek yogurt journey today and discover a new kitchen staple?
Frequently Asked Questions
Can I use any type of milk to make Greek yogurt?
While you can use most dairy milks (whole, 2%, skim), whole milk is generally recommended for the thickest and creamiest Greek yogurt. Skim milk will yield a much thinner product even after straining.
How long does homemade Greek yogurt last?
Homemade Greek yogurt, stored in an airtight container in the refrigerator, typically lasts for about 7 to 10 days. Always check for any off smells or discoloration before consuming.
What can I do with the leftover whey from straining Greek yogurt?
The leftover whey is rich in nutrients and can be used in many ways: add it to smoothies, use it as a liquid in baking (breads, pancakes), ferment vegetables, or even use it to water plants.
Why is my homemade Greek yogurt not thickening properly after straining?
If your yogurt isn’t thickening, it might be due to insufficient straining time, too low-fat milk, or the initial yogurt itself wasn’t firm enough (possibly due to a weak starter or incorrect fermentation temperature).
Is making Greek yogurt at home more cost-effective than buying it?
Yes, in most cases, making Greek yogurt at home is significantly more cost-effective, especially if you consume it regularly. The initial investment in a yogurt maker is quickly recouped through savings on store-bought versions.