Stepping into the world of homemade yogurt is a journey toward fresher, healthier, and more customizable dairy delights. While many brands offer dedicated yogurt makers, Russell Hobbs takes a multi-functional approach, integrating yogurt-making capabilities into versatile kitchen appliances like their bread makers and multi-cookers. If you’re considering a Russell Hobbs appliance with this feature, understanding how it performs this specific task is key to achieving that perfect creamy consistency every time.
Understanding the Russell Hobbs Approach to Yogurt Making
Unlike single-purpose machines, Russell Hobbs often incorporates the yogurt function as one of many programs within larger kitchen appliances. This design philosophy aims to maximize utility and save counter space, offering a comprehensive solution for various culinary needs.
More Than Just a Yogurt Maker: Integrated Functionality
|
Our Picks for the Best Yogurt maker in 2026
As an Amazon Associate I earn from qualifying purchases.
|
||
| Num | Product | Action |
|---|---|---|
| 1 | Euro Cuisine Yogurt Maker - YMX650 Automatic Digital Yogurt Maker Machine with Set Temperature - Includes 7-6 oz. Reusable Glass Jars and 7 Rotary Date Setting Lids for Instant Storage |

|
| 2 | Yogurt Maker with Adjustable Temperature & Time Control, Probiotic Yogurt Maker Machine with 8 Glass Jars, Automatic Shut-Off for Homemade Probiotic Yogurt, Promoting Gut Health(48OZ) |
|
| 3 | Yogurt Dehydrator, Small-Batch Greek Yogurt Maker with Built-In Date Reminder Fresh, Simple & Just the Right Amount — Food-Grade BPA-Free Materials |
|
| 4 | Euro Cuisine YM80 Electric Yogurt Maker Machine- Promote Gut Health with Probiotic Rich Homemade Yogurt -Home Yogurt Incubator with Glass Jars, White |
|
| 5 | Yogurt Maker with Two Containers, Yogurt Maker Machine with Adjustable Temperature & Time Control, Automatic Shut-Off & Constant Temper for Homemade Probiotic Yogurt, Promoting Gut Health |
|
| 6 | Easy Yogurt Maker for Perfect Homemade Yogurt, 1.7 QT Electric Fermenter for Greek Yogurt, Rice Wine, Natto, with Digital Control & Auto Keep Warm, BPA-Free Container |
|
| 7 | Yogurt Maker Machine, 8 Glass Jars with Lids Reusable for Yoghurt, Oatmeal, Pudding, or Jello, Food-Grade Martial, One-touch Control, Homemade Yogurt |
|
| 8 | Ultimate Probiotic Yogurt Maker with Adjustable Time & Temp Control - Make Trillions of Live Probiotics with Two 1-Quart Containers for Larger Batches - Greek Yogurt Maker - ULTIMATE LIFETIME WARRANTY |
|
| 9 | Yogurt Maker, Compact Greek Yogurt Maker Machine with Constant Temperature Control, Stainless Steel Container, 1 Quart for Home Organic Yogurt |
|
| 10 | GDOR Yogurt Maker with Adjustable Temp & Timer– Probiotic-Rich – Digital Greek Yogurt Machine with 8×6oz BPA-Free Glass Jars, Easy to Use for Home, Stainless Steel |
|
Russell Hobbs appliances that feature a yogurt function are typically workhorses in the kitchen, designed to do much more than just ferment milk. For instance, models like the Russell Hobbs Breadmaker with Yogurt Function (RHBM1500) include 12 pre-programmed settings that allow you to bake various breads, make jam, cake, popcorn, and even different types of dough. Similarly, the DualChef 21 Function Multi Cooker (RHMC60) offers an impressive array of capabilities, combining the features of an air fryer and a pressure cooker to prepare everything from stews and chips to pizza and, of course, homemade yogurt. This integrated design means that your investment goes further, providing a single appliance for diverse cooking tasks.
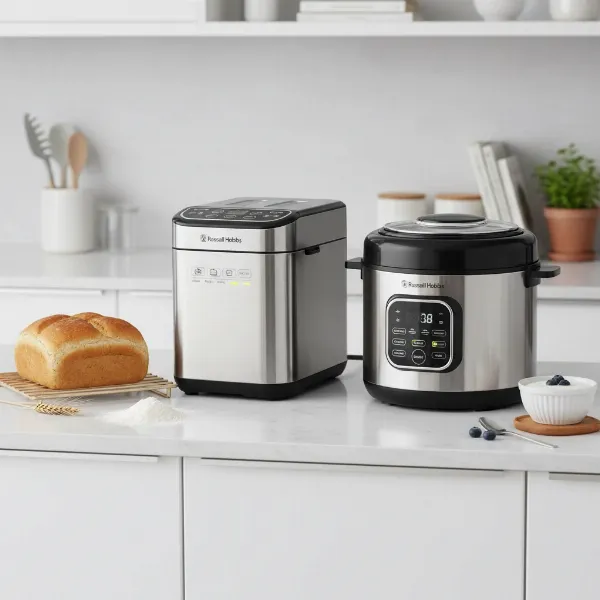 Russell Hobbs multi-cooker and breadmaker showing multiple functions, including yogurt making.
Key Features of Russell Hobbs Appliances with Yogurt Function
When evaluating the yogurt-making performance of these multi-functional machines, several features stand out as crucial for success.
Digital Displays and Pre-programmed Menus
Russell Hobbs appliances are generally designed for user-friendliness, often featuring clear digital displays and intuitive pre-programmed menus. For yogurt making, this typically translates to a dedicated “yogurt” setting that simplifies the process. Once you select the program, the appliance manages the crucial temperature control necessary for fermentation, removing much of the guesswork.
Capacity and Container Flexibility
The capacity for yogurt making in Russell Hobbs appliances usually refers to the main cooking pot. For example, a bread maker’s pan or a multi-cooker’s inner pot will serve as the fermentation vessel. While some dedicated yogurt makers come with individual glass jars, with Russell Hobbs multi-cookers, you’ll likely be fermenting a larger batch in a single container. You can then portion out the finished yogurt into your own smaller containers for storage. This large-batch capability is ideal for families or individuals who consume a lot of yogurt.
Temperature Control and Fermentation Time
Precise temperature control is paramount for successful yogurt fermentation. Russell Hobbs appliances with a yogurt function are designed to maintain the optimal warmth required for live bacterial cultures to thrive and transform milk into yogurt. Most multi-cookers with a yogurt setting will automatically hold the milk at the ideal temperature (typically around 110-115°F or 43-46°C) for the fermentation period. Users typically have the flexibility to adjust the fermentation time, ranging from 8 hours for a milder yogurt to 16 hours or even more for a tangier, thicker result.
Durability and Materials
Russell Hobbs products often feature durable construction. For instance, the bread makers typically come with a dishwasher-safe non-stick pan, which is beneficial for both baking and preparing other foods, including yogurt. The inner pots of multi-cookers are usually made of stainless steel, a robust and easy-to-clean material. These choices of materials contribute to the longevity and ease of maintenance of the appliances.
Pros and Cons of Making Yogurt with Russell Hobbs Appliances
Opting for a Russell Hobbs appliance with a yogurt function presents a unique set of advantages and some considerations.
Advantages
- Exceptional Versatility: The primary benefit is the multi-functionality. Instead of cluttering your kitchen with several single-use gadgets, a Russell Hobbs bread maker or multi-cooker tackles various culinary tasks, including homemade yogurt.
- Streamlined Convenience: With pre-set programs, these appliances simplify the yogurt-making process. The “set it and forget it” nature of the yogurt function means less hands-on time compared to traditional stovetop methods.
- Cost-Effectiveness: Investing in one appliance that performs multiple functions can be more economical than purchasing a separate bread maker, a pressure cooker, an air fryer, and a dedicated yogurt maker.
- Control Over Ingredients: Making yogurt at home allows you to choose high-quality milk and starter cultures, avoiding unwanted additives, preservatives, and excessive sugars often found in store-bought options. This translates to a healthier, fresher product tailored to your dietary preferences.
Disadvantages
- Learning Curve for Multi-Functional Aspects: While individual functions are straightforward, mastering all 12 or 21 programs on a single appliance can take time.
- Potential for Flavor Transfer: If the appliance’s inner pot is not thoroughly cleaned after cooking strong-smelling foods (like certain stews or curries in a multi-cooker), there’s a slight risk of subtle flavor transfer to your yogurt. Always ensure a meticulous cleaning regimen.
- No Dedicated Yogurt Jars Included: Unlike some standalone yogurt makers, Russell Hobbs multi-functional units don’t typically come with individual serving jars. You’ll need to transfer your finished yogurt into your own containers.
“The beauty of a multi-functional appliance like the Russell Hobbs DualChef is its ability to seamlessly transition from cooking a hearty meal to fermenting a batch of delicious homemade yogurt, all with the press of a button. It’s a game-changer for busy households.” – Chef Elena Rodriguez, Culinary Technology Expert
How to Make Yogurt Using Your Russell Hobbs Appliance
Making yogurt in your Russell Hobbs multi-functional appliance follows a simple, yet specific, process to ensure creamy, delicious results.
Preparation is Key
Before you begin, ensure your appliance’s inner pot and any utensils that will come into contact with the milk and starter are thoroughly cleaned and sterilized. The essential ingredients are milk (whole milk often yields the creamiest results) and a live yogurt starter (a few tablespoons of plain, store-bought yogurt with live active cultures, or a powdered starter).
Step-by-Step Process
- Heat the Milk: Pour the milk into the appliance’s inner pot. Select the “yogurt” function, and if available, choose the “boil” or “heat” setting. This pasteurizes the milk, eliminating unwanted bacteria and preparing it for fermentation. The appliance will typically heat the milk to around 180°F (82°C).
- Cool the Milk: Once the heating cycle is complete, carefully remove the inner pot and allow the milk to cool down. This is a critical step; the ideal temperature for adding the starter is between 110-115°F (43-46°C). Using a food thermometer is highly recommended.
- Add the Starter: Once the milk has cooled to the target temperature, whisk in your live yogurt starter until thoroughly combined and smooth.
- Ferment the Yogurt: Place the inner pot back into the Russell Hobbs appliance, secure the lid, and select the “yogurt” function again. Set your desired fermentation time – typically 8 hours for a mild flavor and thinner consistency, up to 12-16 hours for a tangier, thicker yogurt.
- Chill and Enjoy: Once the fermentation cycle is complete, the appliance will signal. Remove the inner pot and let the yogurt cool down before transferring it to airtight containers and refrigerating for at least 4 hours. Chilling helps the yogurt set further and develops its flavor.
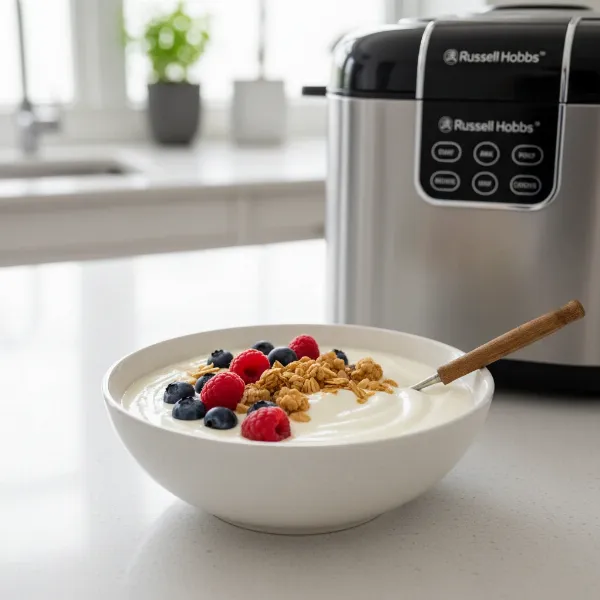 Creamy homemade yogurt in a bowl, made using a Russell Hobbs multi-cooker.
Tips for Perfect Homemade Yogurt
- Experiment with Time: Adjust the fermentation time to find your preferred level of tanginess and thickness. Longer fermentation equals tangier and thicker yogurt.
- Enhance Flavors: After chilling, customize your homemade yogurt with fresh fruit, honey, granola, vanilla extract, or jams.
- Troubleshooting: If your yogurt is too runny, it might be due to insufficient heating, incorrect starter temperature, or too short a fermentation time. Ensure your starter contains live active cultures.
- For Greek Yogurt: To achieve thick Greek-style yogurt, simply strain your finished homemade yogurt through a cheesecloth-lined colander in the refrigerator for several hours until the desired consistency is reached.
Who is a Russell Hobbs Appliance with Yogurt Function For?
A Russell Hobbs appliance featuring a yogurt function is an excellent choice for several types of home cooks:
- The Space-Conscious Cook: If your kitchen counter space is limited, a multi-functional appliance is a smart investment, combining several devices into one.
- The Health-Conscious Individual/Family: Those who prioritize fresh, additive-free foods and want full control over their yogurt’s ingredients will appreciate the ability to make it at home.
- The Experimental Home Chef: If you enjoy making various dishes and exploring different culinary techniques, the versatility of these appliances will be a significant draw.
- The Budget-Minded Shopper: Over time, the cost savings from not buying store-bought yogurt, combined with the multiple functionalities, make these appliances a wise long-term investment.
Conclusion
The Russell Hobbs approach to yogurt making—integrating it into robust multi-functional appliances—offers a compelling solution for the modern kitchen. While not a dedicated, standalone Yogurt Maker, models like the Breadmaker with Yogurt Function or the DualChef Multi Cooker provide a convenient, reliable, and space-saving way to enjoy fresh, homemade yogurt. By leveraging their pre-programmed settings and precise temperature control, you can effortlessly create creamy, nutritious yogurt tailored to your taste, all while enjoying the myriad other capabilities these versatile appliances bring to your culinary adventures.
Are you ready to unlock the secret to perfect homemade yogurt with a single, smart appliance?
Frequently Asked Questions
Can I make Greek yogurt in a Russell Hobbs appliance?
Yes, you can easily make Greek yogurt. Simply follow the standard process to make regular homemade yogurt, then strain the finished yogurt through a cheesecloth-lined colander in the refrigerator for a few hours until it reaches your desired thick, Greek-style consistency.
What kind of starter yogurt should I use?
For your first batch, use 2-4 tablespoons of plain, unsweetened store-bought yogurt that clearly states “contains live active cultures” on the label. Afterward, you can use a portion of your homemade yogurt as a starter for subsequent batches.
How long does it take to make yogurt?
The fermentation process typically takes between 8 to 16 hours, depending on your desired tanginess and thickness. A shorter time results in milder, thinner yogurt, while a longer duration yields a tangier, thicker product.
Is it easy to clean the Russell Hobbs appliance after making yogurt?
Yes, Russell Hobbs appliances are generally designed for easy cleaning. The inner pots are often non-stick or stainless steel and are typically dishwasher-safe or easily washed by hand, making post-yogurt cleanup simple and quick.