The quest for wholesome, delicious food often clashes with rising grocery bills. If you’re a yogurt enthusiast, you know that the cost of your favorite creamy snack can quickly add up, especially for organic, Greek, or specialty varieties. But what if you could enjoy fresh, customizable yogurt every day without breaking the bank? Making yogurt at home with a dedicated yogurt maker is not just a culinary adventure; it’s a smart financial strategy for 2026 and beyond, allowing you to control ingredients, reduce waste, and save a significant amount of money. This comprehensive guide will walk you through everything you need to know to harness the power of homemade yogurt for your health and your wallet.
Your Essential Yogurt Maker Buying Guide
Choosing the right yogurt maker is the first step towards consistent savings and delicious results. With an array of options on the market, understanding the different types and features will help you invest wisely. This section breaks down everything you need to consider, from basic functionality to advanced capabilities, ensuring your homemade yogurt journey is a success.
Popular Types of Yogurt Makers
Yogurt makers come in various designs, each offering distinct advantages and disadvantages. Understanding these differences will help you align your choice with your budget, lifestyle, and desired level of involvement.
Simple models often consist of a heating base and a large container or individual jars, maintaining a consistent warm temperature for culture activation. More advanced electronic versions provide precise temperature control and timers, catering to different types of cultures and thicker consistencies. Those without timers require manual monitoring, while timed models offer set-and-forget convenience.
- Manual/Basic Models: These typically involve heating milk on the stovetop and then transferring it to a simple, insulated unit to maintain warmth. They are the most budget-friendly upfront but offer minimal control over the fermentation process. Pros: Low cost, simple operation. Cons: Less precise temperature control, more hands-on.
- Electric Models with Timers: These are a popular choice, featuring an electric heating element and a built-in timer. You set the fermentation time, and the machine handles the temperature, often shutting off automatically. Pros: Convenience, consistent results, hands-off operation. Cons: Higher initial cost than basic models.
- Electric Models with Temperature Control: Offering the ultimate in precision, these machines allow you to set specific temperatures, ideal for experimenting with different types of starter cultures or creating unique yogurt styles (e.g., Bulgarian, thermophilic). Pros: Versatility, excellent control, customizable results. Cons: Highest price point, might be more complex for beginners.
- Multi-Cookers with Yogurt Function: Appliances like Instant Pots often include a “yogurt” setting. These are great if you already own one or desire a multi-functional device, but may be less dedicated to optimal yogurt making. Pros: Multi-purpose, saves counter space. Cons: Less specialized, may not offer the same precision as dedicated units.
|
Our Picks for the Best Yogurt maker in 2026
As an Amazon Associate I earn from qualifying purchases.
|
||
| Num | Product | Action |
|---|---|---|
| 1 | Ultimate Probiotic Yogurt Maker with Adjustable Time & Temp Control - Make Trillions of Live Probiotics with Two 1-Quart Containers for Larger Batches - Greek Yogurt Maker - ULTIMATE LIFETIME WARRANTY |

|
| 2 | Euro Cuisine YM80 Electric Yogurt Maker Machine- Promote Gut Health with Probiotic Rich Homemade Yogurt -Home Yogurt Incubator with Glass Jars, White |
|
| 3 | Yogurt Maker with Adjustable Temperature & Time Control, Probiotic Yogurt Maker Machine with 8 Glass Jars, Automatic Shut-Off for Homemade Probiotic Yogurt, Promoting Gut Health(48OZ) |
|
| 4 | GDOR Yogurt Maker with Adjustable Temp & Timer– Probiotic-Rich – Digital Greek Yogurt Machine with 8×6oz BPA-Free Glass Jars, Easy to Use for Home, Stainless Steel |
|
| 5 | Yogurt Maker, Compact Greek Yogurt Maker Machine with Constant Temperature Control, Stainless Steel Container, 1 Quart for Home Organic Yogurt |
|
| 6 | Euro Cuisine Yogurt Maker - YMX650 Automatic Digital Yogurt Maker Machine with Set Temperature - Includes 7-6 oz. Reusable Glass Jars and 7 Rotary Date Setting Lids for Instant Storage |
|
| 7 | Yogurt Maker with Two Containers, Yogurt Maker Machine with Adjustable Temperature & Time Control, Automatic Shut-Off & Constant Temper for Homemade Probiotic Yogurt, Promoting Gut Health |
|
| 8 | Easy Yogurt Maker for Perfect Homemade Yogurt, 1.7 QT Electric Fermenter for Greek Yogurt, Rice Wine, Natto, with Digital Control & Auto Keep Warm, BPA-Free Container |
|
| 9 | Yogurt Dehydrator, Small-Batch Greek Yogurt Maker with Built-In Date Reminder Fresh, Simple & Just the Right Amount — Food-Grade BPA-Free Materials |
|
| 10 | Yogurt Maker Machine, 8 Glass Jars with Lids Reusable for Yoghurt, Oatmeal, Pudding, or Jello, Food-Grade Martial, One-touch Control, Homemade Yogurt |
|
Important Criteria When Choosing Your Yogurt Maker
Beyond the basic type, several factors influence a yogurt maker’s suitability for your needs. Carefully considering these criteria ensures you pick a device that will serve you well for years to come, maximizing your savings and enjoyment.
When selecting a yogurt maker, prioritize features that match your household size and frequency of use. Consider the materials for both health and durability, and look for convenient functions that simplify the process. A trusted brand often indicates reliability, while balancing cost with value is always key.
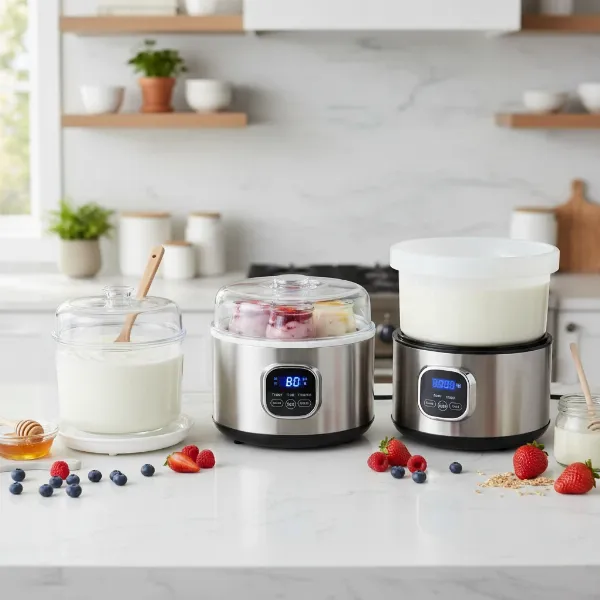 Variety of yogurt makers on a kitchen counter, showcasing different capacities and types.
- Capacity: This is crucial for matching your yogurt maker to your consumption habits.
- For individuals or couples: A smaller unit producing 1-2 quarts (1-2 liters) is usually sufficient. Many come with individual 6-8 oz jars.
- For families or frequent consumption: A larger capacity model, often producing 2-4 quarts (2-4 liters) in a single batch, will be more efficient.
- Material: The materials used for the yogurt container and individual jars impact both health safety and durability.
- Glass: Widely preferred for its non-reactive nature, ease of cleaning, and the fact that it doesn’t retain odors or stains. It’s generally considered the safest and most durable option.
- Ceramic: Similar benefits to glass – non-reactive and aesthetically pleasing. Often used in larger batch containers.
- BPA-Free Plastic: A common material for individual serving cups. Ensure it is explicitly stated as BPA-free for health considerations. While convenient and lightweight, plastic can scratch over time and potentially harbor bacteria if not cleaned meticulously.
- Features: Modern yogurt makers offer various features that enhance convenience and control.
- Timer: Essential for precise fermentation. Allows for consistent results and prevents over-incubation.
- Temperature Control: Ideal for different starter cultures (mesophilic vs. thermophilic) or for making specific types of yogurt like Greek or skyr.
- Automatic Shut-Off: A safety feature and a convenience that prevents over-fermentation if you’re not around to turn it off manually.
- Individual Jars vs. Bulk Container: Decide if you prefer pre-portioned servings or a large batch to scoop from. Some models offer both flexibility.
- Brand Reputation: Investing in a reputable brand often translates to better product quality, reliability, and customer support. Look for brands known for kitchen appliances or specific yogurt maker expertise. Popular choices in 2026 continue to include Euro Cuisine, Cuisinart, Dash, and multi-cookers like Instant Pot for their versatility.
- Price: Yogurt makers range from very affordable basic models ($20-$40) to more advanced units with extensive features ($50-$100+).
- Consider your budget but also the long-term value. A slightly more expensive model with better features and durability might offer greater savings and satisfaction over time.
Comparison Table of Popular Yogurt Makers
To help you visualize your options, here’s a comparative overview of some popular yogurt makers you might encounter in 2026. This table highlights key specifications that influence both performance and value.
| Model Feature | Basic Electric (e.g., Proctor Silex) | Mid-Range Electric (e.g., Euro Cuisine YM80) | Advanced Electric (e.g., Cuisinart CYM-100) | Multi-Cooker with Yogurt Function (e.g., Instant Pot Duo) |
|---|---|---|---|---|
| Capacity | 1 quart (1L) or 6x 6oz jars | 1.5-2 quarts (1.5-2L) or 7x 6oz jars | 1.5 quarts (1.5L) or 6-8x 6oz jars | 3, 6, or 8 quarts (can vary) |
| Material | Plastic jars | Glass jars | Glass jars | Stainless steel inner pot, plastic lid |
| Timer | No/Basic auto-off | Yes (up to 15 hours) | Yes (up to 24 hours) | Yes (up to 99 hours) |
| Temp Control | Fixed temperature | Fixed temperature | Yes (adjustable) | Yes (adjustable, typically “normal” & “boil”) |
| Auto Shut-Off | Often manual | Yes | Yes | Yes |
| Price Range | Low ($20-$35) | Mid ($40-$60) | High ($70-$100+) | Mid-High ($80-$150+) |
| User Rating | Good for beginners, basic needs | Very popular, reliable | Excellent for control, versatile | Great for multi-purpose use |
Detailed Review of Top 3 Yogurt Makers
Choosing the best yogurt maker often depends on your specific priorities. Here, we delve into three highly-rated options, each excelling in different aspects, to help you find your perfect match for consistent, money-saving yogurt production.
Whether you prioritize ease of use, precise control, or multi-functionality, there’s a yogurt maker designed for you. These top picks represent different tiers of features and price points, ensuring that you can find a device that perfectly aligns with your yogurt-making aspirations and budget.
- Euro Cuisine YM80 Yogurt Maker: This model remains a perennial favorite for its simplicity and reliability. It typically comes with seven 6-ounce glass jars, perfect for individual servings, and a built-in timer. The YM80 maintains a consistent incubation temperature, ensuring uniform results with minimal fuss. Its compact design makes it suitable for most kitchens, and the glass jars are both healthy and easy to clean. Pros: Consistent performance, convenient individual servings, durable glass jars, affordable. Cons: Fixed temperature (no adjustment for different cultures), no automatic shut-off (timer alerts, but doesn’t power down). Best for: Beginners and those who want reliable, consistent batches of traditional yogurt without advanced settings.
- Cuisinart CYM-100 Electronic Yogurt Maker: For those who desire more control over their yogurt, the Cuisinart CYM-100 is an excellent choice. It features precise temperature control settings, allowing you to experiment with various starter cultures and achieve different consistencies, from thin and tangy to thick and creamy. It often includes a large 50-ounce (1.5-liter) batch container and an integrated cooling system that automatically chills the yogurt after fermentation, preventing over-processing. Pros: Adjustable temperature, integrated cooling, large batch capacity, high-quality build. Cons: Higher price point, might be more features than a casual user needs. Best for: Enthusiasts who want precise control, larger batches, and the ability to experiment with different yogurt styles.
- Instant Pot (with Yogurt Function): While not a dedicated yogurt maker, many Instant Pot models (e.g., Duo, Ultra) offer a highly effective yogurt function, making them an excellent value for those seeking a multi-functional kitchen appliance. The Instant Pot can handle the entire process from boiling the milk to incubating, all in one pot. Its large capacity is perfect for making bulk batches. Pros: Versatility (pressure cooker, slow cooker, etc.), large capacity, convenient one-pot method. Cons: Takes up more counter space than a dedicated yogurt maker, less aesthetically pleasing for “serving,” requires manual transfer to storage containers. Best for: Users who already own or plan to buy a multi-cooker and want to utilize its full potential, or those needing very large batches.
How to Use a Yogurt Maker Correctly
Mastering your yogurt maker is straightforward, but success hinges on following a few key steps. By preparing your ingredients and tools properly and understanding the fermentation process, you’ll consistently create delicious, cost-saving yogurt.
Using a yogurt maker effectively involves clean preparation, precise temperature management for the milk, and careful inoculation with a quality starter culture. The incubation period is crucial, allowing the bacteria to transform milk into creamy yogurt, followed by proper chilling to set the final texture.
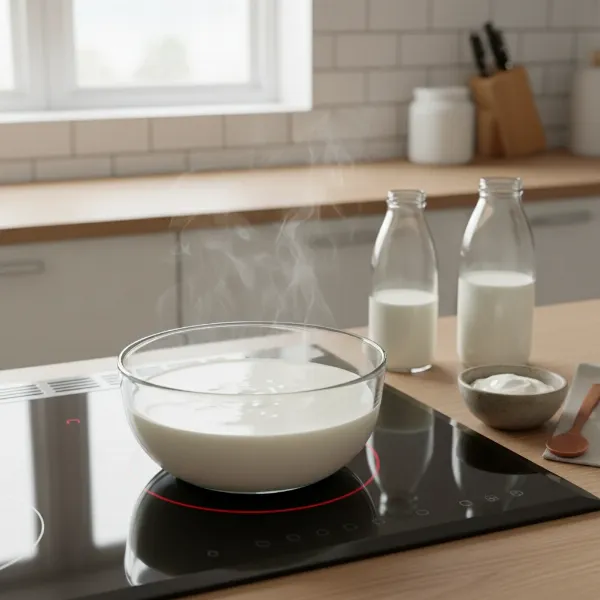 Step-by-step process of making homemade yogurt, showing milk, starter, and yogurt maker.
- Prepare Your Ingredients and Tools:
- Milk: Use fresh milk. Whole milk yields the creamiest yogurt, but 2%, 1%, or skim milk also work. Ultra-pasteurized (UHT) milk is often not recommended as it can affect texture. Organic milk may produce thicker yogurt due to different processing.
- Starter Culture: This is key! You can use:
- A few tablespoons of plain, unflavored store-bought yogurt with live active cultures (check the label!).
- Freeze-dried yogurt starter packets (available online or in health food stores), which offer consistent results and allow for many generations of yogurt making.
- Equipment: Ensure your yogurt maker jars/container and any utensils (spoons, thermometer) are spotlessly clean and sterilized to prevent contamination.
- Heat the Milk:
- Pour the milk into a saucepan (or directly into the Instant Pot’s inner pot if using).
- Slowly heat the milk to 180°F (82°C). This step denatures the milk proteins, resulting in a thicker yogurt. Stir occasionally to prevent scorching. Use a food thermometer to monitor the temperature accurately.
- Cool the Milk:
- Remove the milk from the heat and let it cool down to 105-115°F (40-46°C). This is the ideal temperature range for your starter cultures to thrive. Cooling it too fast can be done by placing the saucepan in an ice bath.
- Add the Starter Culture:
- Once the milk has cooled to the target temperature, gently whisk in your starter culture. Ensure it’s fully incorporated. Avoid adding starter to hot milk, as it will kill the beneficial bacteria.
- Incubate in the Yogurt Maker:
- Pour the inoculated milk into your yogurt maker’s jars or main container.
- Place them inside the yogurt maker and set the timer. Most yogurts incubate for 6-12 hours. A longer incubation time typically results in a tangier, thicker yogurt.
- Chill:
- Once the incubation is complete, turn off your yogurt maker.
- Remove the yogurt and immediately transfer it to the refrigerator. Chilling for at least 4 hours (preferably overnight) allows the yogurt to set fully and develop its final texture.
Tips for Making Better Yogurt
Elevating your homemade yogurt from good to outstanding is all about fine-tuning the process. Small adjustments can significantly impact flavor, texture, and overall quality, ensuring every batch is a delightful, money-saving treat.
Achieving perfect homemade yogurt often comes down to precise temperature, quality ingredients, and a bit of patience. Experiment with incubation times for desired tanginess, and don’t hesitate to infuse flavors or strain for a richer consistency.
- Adjust Incubation Time for Flavor and Thickness:
- Shorter times (6-8 hours): Milder, slightly thinner yogurt.
- Longer times (10-12+ hours): Tangier, thicker yogurt. Experiment to find your preferred balance. Some cultures can go up to 24 hours for maximum tang and probiotic density.
- Use Quality Ingredients: Starting with good quality milk (e.g., local, organic) and a fresh, potent starter culture will always yield superior results.
- Maintain Consistent Temperature: Fluctuations in temperature during incubation can hinder bacterial growth and result in thin, inconsistent yogurt. Ensure your yogurt maker is placed in a stable environment.
- Avoid Disturbing During Incubation: Resist the urge to peek or move the yogurt maker during fermentation. Disturbing the cultures can prevent the yogurt from setting properly.
- Strain for Greek Yogurt: If you prefer thick, creamy Greek yogurt, simply strain your finished regular yogurt through a cheesecloth-lined colander for a few hours in the refrigerator. The longer you strain, the thicker it gets. The liquid whey can be used in smoothies or baking.
- Experiment with Flavors: After chilling, stir in honey, maple syrup, fruit purees, vanilla extract, or spices like cinnamon. This allows for endless customization without the added sugar and artificial ingredients found in many store-bought flavored yogurts.
- Troubleshooting Common Issues:
- Runny Yogurt: Often due to insufficient incubation time, low incubation temperature, or inactive starter culture. Ensure your milk cooled to the correct temperature before adding starter.
- Grainy Texture: Can happen if the milk was heated too quickly, or if the starter culture was added when the milk was too hot.
- Too Tangy: Reduce incubation time for future batches.
Cleaning and Maintaining Your Yogurt Maker
Proper cleaning and maintenance are essential for extending the life of your yogurt maker and ensuring hygienic, delicious batches every time. A little care goes a long way in protecting your investment and maintaining food safety.
Regularly cleaning your yogurt maker, particularly all parts that come into contact with food, prevents bacterial buildup and ensures optimal performance. Adhering to manufacturer guidelines for cleaning and storage will keep your appliance in top condition for years, supporting your money-saving homemade yogurt habit.
- After Each Use:
- Unplug the unit and allow it to cool completely.
- Wash the jars/containers, lids, and any removable parts with warm, soapy water. For glass, a dishwasher is usually fine.
- Wipe down the heating base with a damp cloth. Never submerge the electrical base in water.
- Ensure all parts are thoroughly dry before reassembling or storing to prevent mold or mildew.
- Deep Cleaning (Periodically):
- If you notice any residue or stubborn spots, a solution of warm water and a small amount of white vinegar can help.
- Check for any vents or crevices that might accumulate dust and clean them carefully.
- Storage:
- Store your yogurt maker in a clean, dry place.
- Keep it covered or in its original box to prevent dust accumulation.
- Avoid placing heavy objects on top of it.
- Starter Culture Management: If you’re using a spoonful of previous yogurt as a starter, ensure it’s from a fresh batch (within 3-5 days) to maintain active cultures. Over time, cultures can weaken, necessitating a fresh commercial starter.
Where to Buy a Reliable Yogurt Maker?
Finding a trustworthy source for your yogurt maker is as important as choosing the right model. Reliable retailers ensure you receive a genuine product, good customer service, and often, better warranty support, maximizing your investment.
When purchasing a yogurt maker, opt for established retailers known for kitchen appliances, both online and in brick-and-mortar stores. Always verify the seller’s reputation, read reviews, and understand return policies, especially when shopping online, to safeguard your purchase.
- Major Online Retailers: Websites like Amazon, Walmart.com, and Target.com offer a vast selection of yogurt makers from various brands. They often provide competitive pricing, user reviews, and convenient shipping options. Be sure to check seller ratings and return policies.
- Specialty Kitchen & Appliance Stores: Stores such as Williams Sonoma, Crate & Barrel, or local appliance shops may have a more curated selection and knowledgeable staff who can offer personalized advice. While prices might be slightly higher, the in-person experience and expert guidance can be invaluable.
- Department Stores: Large department stores often have a home and kitchen section where you can find popular yogurt maker brands.
- Brand Websites: Purchasing directly from the manufacturer’s website (e.g., Euro Cuisine, Cuisinart) can sometimes offer exclusive deals or direct customer support.
Tips for Buying Online:
- Read Reviews: Pay close attention to recent user reviews for insights into product performance, durability, and customer service experiences.
- Check Warranty: Understand the manufacturer’s warranty and the retailer’s return policy before purchasing.
- Compare Prices: Use price comparison tools to ensure you’re getting the best deal.
- Look for Sales: Keep an eye out for seasonal sales, holiday discounts, or special promotions in 2026, which can offer significant savings on your purchase.
Conclusion
Embracing homemade yogurt is a rewarding journey that offers substantial financial benefits, especially in 2026’s evolving economic landscape. By investing in a quality yogurt maker and mastering a few simple techniques, you gain control over your diet, enjoy superior taste, and unlock significant savings compared to continually purchasing store-bought varieties. This guide has equipped you with the knowledge to choose the perfect yogurt maker, understand its operation, and troubleshoot common issues, making your transition to homemade yogurt effortless and enjoyable.
From understanding the different types of yogurt makers to the nuances of incubation and flavor customization, you now have a comprehensive roadmap to delicious, cost-effective yogurt. Isn’t it time to take control of your pantry and start saving money, one creamy batch at a time?
Frequently Asked Questions
Is it really cheaper to make yogurt at home in 2026?
Yes, absolutely. While there’s an initial investment in a yogurt maker (typically $20-$100), the ongoing cost of milk and a starter culture is significantly lower than buying pre-made yogurt. Depending on your consumption, you can often recoup the cost of the machine within a few months, leading to substantial savings annually.
What kind of milk is best for making homemade yogurt?
Whole milk is generally recommended for the creamiest texture and richest flavor due to its fat content. However, 2%, 1%, or even skim milk can also be used successfully, though the resulting yogurt will be thinner. Avoid ultra-pasteurized (UHT) milk if possible, as its proteins are often over-denatured, leading to a runnier final product.
How long does homemade yogurt last in the refrigerator?
Properly stored homemade yogurt, in an airtight container in the refrigerator, typically lasts for 1 to 2 weeks. The live active cultures help preserve it. Always check for any off-smells or mold before consuming, just like with store-bought yogurt.
Can I use a slow cooker to make yogurt?
Yes, many slow cookers (especially newer models with a “warm” or very low setting) can be adapted to make yogurt. The key is to maintain a consistent temperature between 105-115°F (40-46°C) for the incubation period. Some multi-cookers, like the Instant Pot, even have a dedicated yogurt function, making the process much simpler.
How do I make Greek yogurt at home?
To make Greek yogurt, simply make a batch of regular homemade yogurt as described. Once it’s chilled and set, line a colander with cheesecloth (or a coffee filter) and place it over a bowl. Pour the yogurt into the colander and let it drain in the refrigerator for several hours or overnight. The longer it drains, the thicker the Greek yogurt will be.