The joy of crafting your own creamy, probiotic-rich yogurt at home is unmatched, offering a delightful alternative to store-bought options. But with the satisfaction of homemade goods comes a common question: how long does homemade yogurt truly last, and what are the crucial safety tips to ensure every spoonful is as wholesome as intended? Unlike commercial yogurts that often contain preservatives, your homemade creation is a living food, and its shelf life hinges on proper handling and storage. This article will delve into the expected lifespan of your homemade yogurt, how to identify signs of spoilage, and the best practices to keep it fresh and safe for consumption.
The Lifespan of Homemade Yogurt: What to Expect
Understanding the typical duration your homemade yogurt remains safe and delicious is key to enjoying your efforts and preventing food waste. With proper care, you can confidently consume your yogurt for a reasonable period.
General Guidelines for Homemade Yogurt Shelf Life
|
Our Picks for the Best Yogurt maker in 2026
As an Amazon Associate I earn from qualifying purchases.
|
||
| Num | Product | Action |
|---|---|---|
| 1 | Euro Cuisine Yogurt Maker - YMX650 Automatic Digital Yogurt Maker Machine with Set Temperature - Includes 7-6 oz. Reusable Glass Jars and 7 Rotary Date Setting Lids for Instant Storage |

|
| 2 | Yogurt Maker, Compact Greek Yogurt Maker Machine with Constant Temperature Control, Stainless Steel Container, 1 Quart for Home Organic Yogurt |
|
| 3 | Ultimate Probiotic Yogurt Maker with Adjustable Time & Temp Control - Make Trillions of Live Probiotics with Two 1-Quart Containers for Larger Batches - Greek Yogurt Maker - ULTIMATE LIFETIME WARRANTY |
|
| 4 | Yogurt Maker Machine, 8 Glass Jars with Lids Reusable for Yoghurt, Oatmeal, Pudding, or Jello, Food-Grade Martial, One-touch Control, Homemade Yogurt |
|
| 5 | Yogurt Maker with Two Containers, Yogurt Maker Machine with Adjustable Temperature & Time Control, Automatic Shut-Off & Constant Temper for Homemade Probiotic Yogurt, Promoting Gut Health |
|
| 6 | Euro Cuisine YM80 Electric Yogurt Maker Machine- Promote Gut Health with Probiotic Rich Homemade Yogurt -Home Yogurt Incubator with Glass Jars, White |
|
| 7 | Easy Yogurt Maker for Perfect Homemade Yogurt, 1.7 QT Electric Fermenter for Greek Yogurt, Rice Wine, Natto, with Digital Control & Auto Keep Warm, BPA-Free Container |
|
| 8 | GDOR Yogurt Maker with Adjustable Temp & Timer– Probiotic-Rich – Digital Greek Yogurt Machine with 8×6oz BPA-Free Glass Jars, Easy to Use for Home, Stainless Steel |
|
| 9 | Yogurt Maker with Adjustable Temperature & Time Control, Probiotic Yogurt Maker Machine with 8 Glass Jars, Automatic Shut-Off for Homemade Probiotic Yogurt, Promoting Gut Health(48OZ) |
|
| 10 | Yogurt Dehydrator, Small-Batch Greek Yogurt Maker with Built-In Date Reminder Fresh, Simple & Just the Right Amount — Food-Grade BPA-Free Materials |
|
In most cases, homemade yogurt is generally good for eating for up to two weeks when stored correctly in the refrigerator. This window is a common recommendation, though some sources suggest it can last “weeks,” always emphasizing proper storage. For those who use a portion of their previous batch as a starter for a new one, it’s often recommended to use that “seed yogurt” within seven days to ensure the cultures are still potent and active for successful fermentation. The absence of commercial preservatives means homemade yogurt has a naturally shorter shelf life compared to many store-bought varieties, making vigilance important.
Factors Influencing Homemade Yogurt’s Freshness
Several elements play a significant role in determining how long your homemade yogurt maintains its quality and safety:
- Initial Ingredients Quality: The freshness and quality of your milk and starter culture are foundational. Starting with fresh ingredients provides the best base for a long-lasting product.
- Hygiene and Sterilization: Ensuring all your equipment, including pots, jars, and utensils, is thoroughly clean and sterilized before use is paramount. Any lingering bacteria can introduce contaminants and shorten shelf life.
- Storage Temperature: Consistent refrigeration below 40°F (4°C) is vital. Fluctuations in temperature can accelerate spoilage.
- Airtight Containers: Storing yogurt in clean, airtight containers prevents it from absorbing odors from other foods in the refrigerator and minimizes exposure to air, which can encourage bacterial growth.
- Cross-Contamination: Always use a clean spoon each time you scoop yogurt from the container. Double-dipping or using unwashed utensils can introduce foreign bacteria, significantly reducing its shelf life.
- Add-ins: Introducing fresh fruits, nuts, granola, or sweeteners directly into the main batch of yogurt before storage can drastically shorten its shelf life. These ingredients can introduce moisture and other microbes, making the yogurt spoil faster. It’s best to add these embellishments just before you’re ready to eat.
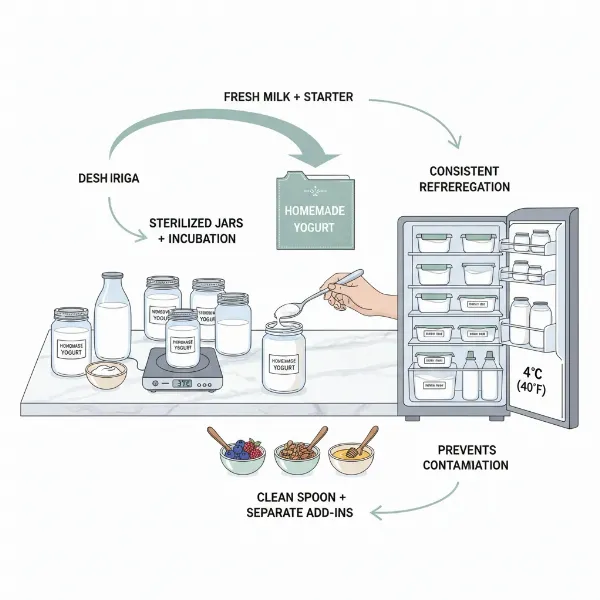 Illustration showing key factors affecting homemade yogurt freshness and shelf life in a kitchen setting.
Spotting Spoilage: When to Discard Your Homemade Yogurt
While homemade yogurt typically lasts for a couple of weeks, it’s essential to recognize the signs that it has gone bad. Trusting your senses—sight, smell, and taste—is your best defense against consuming spoiled food.
Visual Cues of Spoiled Yogurt
Before you even get close enough to smell it, your eyes can often tell you if something is amiss with your homemade yogurt:
- Mold Growth: Any fuzzy, discolored spots—be they green, black, pink, or white—are a clear indication of mold. Discard the entire batch immediately if you see mold, as spores can spread beyond the visible areas.
- Unusual Color Changes: While some slight yellowing is normal, dramatic changes to pink, green, dark yellow, or grey streaks, especially if accompanied by other signs, mean the yogurt has likely spoiled.
- Excessive Liquid Separation with Discoloration: A clear liquid layer (whey) on top is perfectly normal and can be stirred back in or drained. However, if this liquid is discolored, cloudy, or has mold growing in it, the yogurt should be discarded.
Olfactory and Taste Indicators
Beyond what you see, your nose and taste buds are powerful tools in detecting spoilage:
- Strong, Unpleasant, or “Off” Smell: Fresh homemade yogurt should have a clean, mildly sour, or tangy aroma. If it smells strongly yeasty, rancid, putrid, or has any other “off” odor that is distinctly different from its usual tangy scent, it’s best to throw it out.
- Bitter, Unusually Pungent, or Metallic Taste: While homemade yogurt will naturally become more sour over time, a genuinely spoiled batch will taste unpleasantly bitter, unusually pungent, or even metallic. This goes beyond the expected tanginess and indicates harmful bacterial growth.
- Texture Changes: Fresh yogurt should be smooth and consistent, though some natural thickening or thinning can occur. If your yogurt becomes excessively slimy, overly lumpy, or grainy in a way that is distinctly different from its initial texture, it might be spoiled.
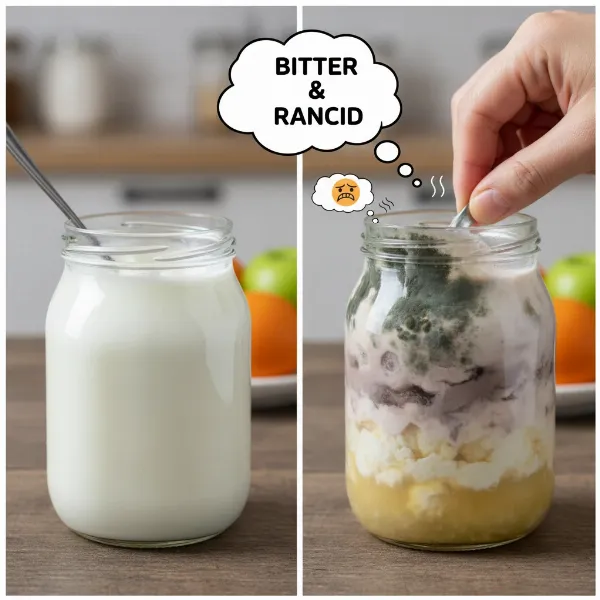 Visual and sensory indicators of spoiled homemade yogurt, showing mold, discoloration, and unpleasant smell.
Best Practices for Storing Homemade Yogurt Safely
Proper storage is the cornerstone of extending the life of your homemade yogurt and ensuring its safety. By following these simple guidelines, you can maximize freshness.
Optimal Refrigerator Placement
The temperature inside your refrigerator isn’t uniform. To give your homemade yogurt the best chance at longevity, store it in the coldest parts of your fridge, which are typically:
- The Back: The back of the refrigerator maintains a more consistent and colder temperature than the front.
- Highest Shelves: These shelves are often the coldest, making them ideal for dairy products.
- Avoid the Door: The refrigerator door is the warmest part of the fridge and experiences the most temperature fluctuations due to frequent opening and closing. Storing yogurt here can significantly reduce its shelf life.
Container Choice and Preparation
The vessel you choose for storage also impacts how long your yogurt lasts:
- Clean, Airtight Containers: Always use containers that are impeccably clean and can be sealed airtight. Glass jars with tight-fitting lids are an excellent choice as they are non-reactive and easy to sterilize. Food-grade plastic containers are also suitable if they seal well.
- Minimize Air Exposure: Fill your containers as much as possible to reduce the amount of air trapped inside, as air can promote oxidation and bacterial growth.
Handling and Serving Tips
Once your yogurt is stored, how you handle it daily makes a difference:
- Always Use a Clean Spoon: This cannot be stressed enough. Each time you dip into your yogurt, use a fresh, clean spoon to prevent introducing new bacteria from your mouth or other foods.
- Portion Out Servings: If you’ve made a large batch, consider transferring smaller, individual portions to separate containers for daily use. This limits exposure of the main batch to air and potential contaminants each time you want a serving.
- Only Add Flavors/Mix-ins Right Before Eating: As mentioned, adding fresh fruit, granola, or other ingredients to the entire batch beforehand can invite spoilage. Keep your base yogurt plain and add your desired flavors to individual servings just before consumption.
Maximizing Freshness: Tips to Extend Homemade Yogurt Shelf Life
While the general guideline is two weeks, there are additional steps you can take during preparation and storage to ensure your homemade yogurt remains at its peak quality for as long as possible.
Initial Preparation for Longevity
The foundation for long-lasting yogurt is laid even before it goes into the fridge:
- Start with High-Quality, Fresh Milk and Active Starter: The fresher and more robust your initial ingredients, the more resilient your yogurt will be. Ensure your starter culture is active and viable.
- Ensure All Equipment is Thoroughly Cleaned and Sanitized: This step is critical. Sterilize all jars, spoons, and anything that will come into contact with your milk and yogurt. This minimizes the risk of introducing unwanted bacteria that could accelerate spoilage.
Smart Storage Habits
Beyond placement, good storage habits contribute significantly:
- Rapid Cooling After Culturing: Once your yogurt has finished culturing, cool it down quickly and thoroughly in the refrigerator. This slows down the activity of the lactic acid bacteria, which continue to ferment slowly even in cold temperatures.
- Consistent Refrigeration: Avoid leaving your yogurt out at room temperature for extended periods. The longer it stays out, the faster it will spoil.
Batch Management
Consider your consumption patterns when making yogurt:
- Make Smaller Batches if Consumption is Slow: If you find yourself not finishing a large batch within the two-week timeframe, consider making smaller quantities more frequently.
- Consider Freezing Small Portions for Longer Storage: While freezing can alter the texture of yogurt (making it more grainy or icy upon thawing), it’s an excellent option for long-term storage, especially if you plan to use it in smoothies, baked goods, or cooking. Freeze in ice cube trays or small airtight containers for convenience.
Frequently Asked Questions About Homemade Yogurt Safety
Can homemade yogurt go bad before 2 weeks?
Yes, homemade yogurt can spoil before the two-week mark if proper hygiene is not maintained during preparation, if it’s stored at inconsistent or warm temperatures, or if it has been cross-contaminated. Always rely on your senses of sight, smell, and taste to determine freshness, regardless of how long it has been stored.
Is it normal for homemade yogurt to get more sour over time?
Absolutely. Lactic acid bacteria, which are responsible for turning milk into yogurt, continue to slowly ferment the lactose in the milk even when refrigerated. This ongoing process leads to an increase in lactic acid, resulting in a progressively tangier or more sour flavor over time. Increased sourness alone does not indicate spoilage, unless accompanied by other signs like mold or an “off” smell.
What if there’s liquid on top of my yogurt?
The clear liquid that separates and collects on top of your homemade yogurt is called whey, and its presence is completely normal. This phenomenon, known as syneresis, happens when the milk proteins contract, expelling the liquid. Whey is nutritious and can either be stirred back into the yogurt for a thinner consistency or strained off to create a thicker, Greek-style yogurt. It only becomes a concern if it’s discolored, smells bad, or has mold.
Can I freeze homemade yogurt?
Yes, you can freeze homemade yogurt for longer storage, typically for up to a few months. However, be aware that freezing can change the texture of the yogurt, making it more crystalline or grainy upon thawing due to the water content. For this reason, frozen and thawed yogurt is often best used in recipes where texture isn’t paramount, such as smoothies, baked goods, or dips, rather than eaten plain.
Homemade yogurt offers a wealth of benefits, from tailored flavors to beneficial probiotics. By understanding its typical shelf life, diligently observing signs of spoilage, and implementing rigorous storage and handling practices, you can confidently enjoy your fresh, delicious batches for up to two weeks. Always prioritize cleanliness and consistent refrigeration, and remember that your senses are your best guide to food safety.
What are your favorite ways to ensure your homemade yogurt stays fresh and safe for longer?