Delving into the world of homemade fermented foods is a rewarding journey, and few preparations offer as many benefits as kefir. This tangy, probiotic-rich beverage is a cornerstone of gut health, teeming with beneficial bacteria and yeasts that support digestion and overall well-being. While traditionally made at room temperature, environmental fluctuations can lead to inconsistent results, making the process feel more like an art than a science. Fortunately, the advent of temperature-controlled fermenters, often in the form of advanced yogurt makers, has transformed kefir production into a precise and consistently successful endeavor. With a dedicated appliance, you can effortlessly achieve the perfect tang, thickness, and probiotic potency in every batch, eliminating guesswork and embracing the joy of predictable, delicious homemade kefir.
The Essential Guide to Choosing Your Kefir Maker
Achieving consistent, high-quality kefir hinges on maintaining a stable fermentation temperature. This is where temperature-controlled fermenters become invaluable, offering precision that traditional counter-top methods often lack. Understanding the different types available and their key features will help you select the best tool for your kefir-making journey.
Types of Temperature-Controlled Fermenters
The market offers several options for precise fermentation, each with its own advantages:
- Yogurt Makers with Adjustable Settings: These are perhaps the most common and versatile option. Many modern yogurt makers come equipped with digital controls that allow you to set specific temperatures, often ranging from 77°F to 149°F (25°C to 65°C), and adjust fermentation times. This wide range makes them suitable for both yogurt and kefir. Some models utilize a water bath system, which ensures even heat distribution around the fermentation jars.
- Dedicated Kefir Fermenters: While less common, some appliances are specifically designed for kefir. These often feature optimized temperature ranges for kefir grains and user-friendly interfaces tailored to the process.
- DIY Incubation Chambers with Controllers: For the truly adventurous or those with unique requirements, a custom incubation chamber paired with an external temperature controller can offer ultimate flexibility. These setups can cool and heat, adapting to various ambient temperatures, though they require more assembly and technical know-how.
|
Our Picks for the Best Yogurt maker in 2026
As an Amazon Associate I earn from qualifying purchases.
|
||
| Num | Product | Action |
|---|---|---|
| 1 | Yogurt Maker with Two Containers, Yogurt Maker Machine with Adjustable Temperature & Time Control, Automatic Shut-Off & Constant Temper for Homemade Probiotic Yogurt, Promoting Gut Health |

|
| 2 | Euro Cuisine YM80 Electric Yogurt Maker Machine- Promote Gut Health with Probiotic Rich Homemade Yogurt -Home Yogurt Incubator with Glass Jars, White |
|
| 3 | Ultimate Probiotic Yogurt Maker with Adjustable Time & Temp Control - Make Trillions of Live Probiotics with Two 1-Quart Containers for Larger Batches - Greek Yogurt Maker - ULTIMATE LIFETIME WARRANTY |
|
| 4 | Yogurt Maker Machine, 8 Glass Jars with Lids Reusable for Yoghurt, Oatmeal, Pudding, or Jello, Food-Grade Martial, One-touch Control, Homemade Yogurt |
|
| 5 | Yogurt Maker with Adjustable Temperature & Time Control, Probiotic Yogurt Maker Machine with 8 Glass Jars, Automatic Shut-Off for Homemade Probiotic Yogurt, Promoting Gut Health(48OZ) |
|
| 6 | Euro Cuisine Yogurt Maker - YMX650 Automatic Digital Yogurt Maker Machine with Set Temperature - Includes 7-6 oz. Reusable Glass Jars and 7 Rotary Date Setting Lids for Instant Storage |
|
| 7 | Yogurt Dehydrator, Small-Batch Greek Yogurt Maker with Built-In Date Reminder Fresh, Simple & Just the Right Amount — Food-Grade BPA-Free Materials |
|
| 8 | Easy Yogurt Maker for Perfect Homemade Yogurt, 1.7 QT Electric Fermenter for Greek Yogurt, Rice Wine, Natto, with Digital Control & Auto Keep Warm, BPA-Free Container |
|
| 9 | GDOR Yogurt Maker with Adjustable Temp & Timer– Probiotic-Rich – Digital Greek Yogurt Machine with 8×6oz BPA-Free Glass Jars, Easy to Use for Home, Stainless Steel |
|
| 10 | Yogurt Maker, Compact Greek Yogurt Maker Machine with Constant Temperature Control, Stainless Steel Container, 1 Quart for Home Organic Yogurt |
|
Key Features to Look for in a Kefir Maker
When investing in a temperature-controlled maker for kefir, consider these important features:
- Precise Temperature Range: The most crucial feature is the ability to set and maintain temperatures within the optimal range for milk kefir, which is typically between 68°F and 77°F (20°C and 25°C). Some grains can ferment up to 82°F (28°C) or slightly lower to 65°F (18°C), but consistency is best achieved within the narrower optimal range [cite: 5, 1 in previous search].
- Adjustable Timer and Automatic Shut-off: A programmable timer allows you to set the fermentation duration, preventing over-fermentation. An automatic shut-off function provides peace of mind, ensuring the process stops precisely when desired. Some units offer timers up to 48 or even 99 hours [cite: 4, 1 in previous search].
- Capacity: Decide whether you prefer making individual portions or large batches. Makers come with multiple small glass jars (e.g., seven 6-ounce jars) or one large container (e.g., 2-liter or 1-quart options) [cite: 2, 3, 5 in previous search].
- Material Quality: Opt for units with containers made from glass, BPA-free plastic, or stainless steel to ensure food safety and durability. Avoid direct contact with metal for the kefir grains themselves, using plastic or wooden utensils instead.
- Ease of Cleaning: Look for models with dishwasher-safe components, such as jars and lids, to simplify post-fermentation cleanup.
- User Reviews and Brand Reputation: Researching feedback from other users can provide insights into a maker’s reliability, consistency, and overall user experience.
Top Temperature-Controlled Makers for Kefir
While many brands offer excellent options, some stand out for their features relevant to kefir making:
| Maker Model | Key Features | Temperature Range | Capacity | Notes |
|---|---|---|---|---|
| Liferun Smart Yogurt Maker | Digital control for time (0-99 hrs) & temperature, 360° even heating | 77°F-149°F (25°C-65°C) | (Varies by model) | Offers precise control, good for varying fermentation needs [cite: 1 in previous search]. |
| Euro Cuisine Automatic Digital | Maintains temperature for up to 15 hours, includes 7 individual glass jars | Preset/maintains | 42 oz (seven 6-oz jars) | User-friendly, consistent results in single-serve portions [cite: 2, 5 in previous search]. |
| JoyMech Yogurt Maker | 3D constant temperature control, sleek design, BPA-free container | Constant (unspecified range) | 25-30 fl oz | Simple operation, provides even fermentation [cite: 1 in previous search]. |
| Ultimate Probiotic Yogurt Maker | Stainless steel design, water basin for even heat distribution, versatile jars | Constant (unspecified range) | Two 1-quart or eight 6-ounce jars | Larger capacity, ensures uniform heat around containers [cite: 3 in previous search]. |
“The ability to precisely control fermentation temperature is a game-changer for homemade kefir. It removes the guesswork and ensures a consistent product every time, regardless of your kitchen’s ambient conditions.” – Dr. Sarah Miller, Fermentation Scientist
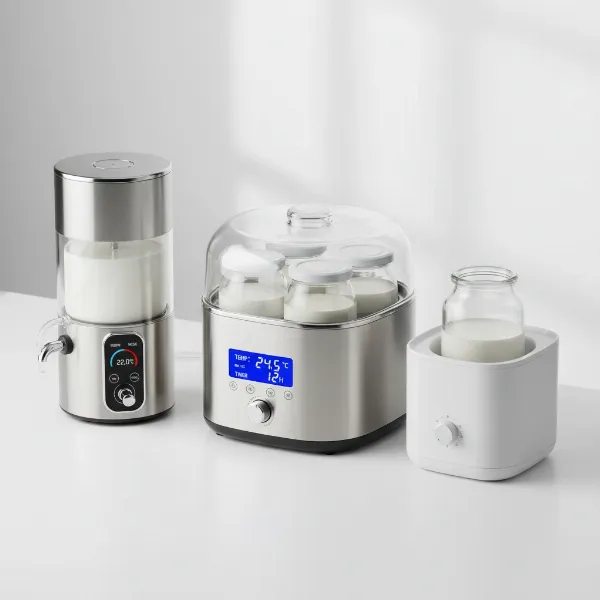 A selection of temperature-controlled kefir and yogurt makers with digital displays.
Step-by-Step: Crafting Perfect Kefir with Temperature Control
Making kefir in a temperature-controlled maker streamlines the process, ensuring optimal conditions for your grains to thrive and produce a delicious, potent fermented drink.
Gathering Your Kefir-Making Essentials
Before you begin, assemble these items:
- Milk: High-quality, whole animal milk (cow, goat, or sheep) is generally recommended. The quality of milk significantly impacts the kefir.
- Live Milk Kefir Grains: These are a symbiotic culture of bacteria and yeasts (SCOBY) and are essential for fermenting milk into kefir. Ensure they are active and healthy.
- Temperature-Controlled Maker: Your chosen yogurt maker or dedicated fermenter.
- Glass Jars: Clean, sanitized glass jars for fermenting and storing. Avoid using metal containers for fermentation as they can react with the grains.
- Plastic or Wooden Spoon: For stirring; again, avoid metal contact with the grains.
- Fine-Mesh Strainer: A plastic or nylon strainer is best for separating the grains from the finished kefir.
- Breathable Cover: A coffee filter, cloth, or muslin secured with a rubber band to allow airflow while keeping contaminants out.
The Fermentation Process: Precision for Perfection
Follow these steps for a successful batch of temperature-controlled kefir:
- Sanitation is Key: Always sterilize all your equipment (jars, spoons, strainers) before starting. This prevents unwanted bacteria from contaminating your kefir grains and ensures a healthy fermentation.
- Combine Ingredients: Gently place your milk kefir grains into a clean glass jar. Add your chosen milk, leaving some headspace at the top. A common ratio is 1 tablespoon of kefir grains per 1 liter (approximately 4 cups) of milk [cite: 2 in previous search]. For warmer climates or faster fermentation, you might use a smaller grain-to-milk ratio (e.g., 1:20 to 1:60), while colder climates might benefit from a higher ratio (1:7 to 1:15) [cite: 5, 1 in previous search].
- Set the Temperature: Place your jar (with a breathable cover) into your temperature-controlled maker. Set the temperature to the ideal range of 68-77°F (20-25°C) [cite: 1, 3 in previous search]. This stable warmth encourages the lactic acid bacteria and yeast to work efficiently, producing a balanced flavor and texture.
- Set the Timer: Program your maker’s timer for 12 to 24 hours. The exact duration will depend on your desired taste and consistency, as well as the activity of your grains. For a milder, thinner kefir, aim for a shorter fermentation (e.g., 12-18 hours). For a tangier, thicker product, extend the time (e.g., 24-48 hours) [cite: 2 in previous search].
- Monitor and Observe: While your temperature-controlled maker handles the heat, it’s good practice to visually check your kefir periodically. You’ll notice the milk beginning to thicken, and it might develop a slightly cheesy or tangy aroma. For devices without an auto shut-off, ensure you turn off the heat once the desired fermentation is reached.
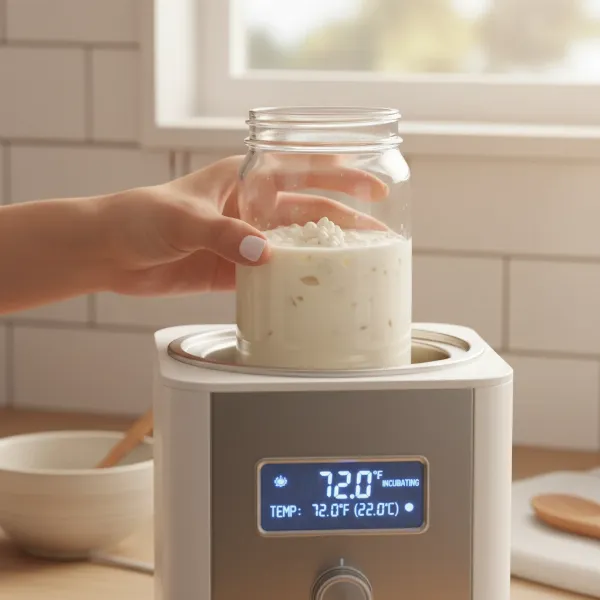 Hands placing a glass jar of milk and kefir grains into a temperature-controlled fermenter.
Knowing When Your Kefir is Ready
Determining when your kefir is perfectly fermented involves a combination of sensory cues:
- Texture: The milk should have thickened, becoming slightly viscous, similar to buttermilk or thin yogurt.
- Aroma: It will have a fresh, tangy, and slightly yeasty smell, not overtly sour or unpleasant.
- Taste: A mild, refreshing tang is characteristic of ready kefir. If it’s too sour, it may have fermented too long.
- Separation: A thin layer of whey (clearish-yellow liquid) may appear at the bottom, and some curds might separate. This is normal, but excessive separation (thick curds and a large amount of whey) indicates over-fermentation.
Once ready, gently stir the kefir with a plastic or wooden spoon, then pour it through a fine-mesh plastic strainer into a clean jar to separate the grains. Store the finished kefir in the refrigerator to halt fermentation.
Tips for Optimal Kefir Fermentation
Beyond the basic steps, a few expert tips can help you fine-tune your kefir-making process and troubleshoot common issues, ensuring consistently delicious results.
Adjusting for Taste and Consistency
The beauty of homemade kefir lies in its customizability. Your temperature-controlled maker gives you excellent control over these variables:
- Fermentation Time: Longer fermentation times (e.g., 24-48 hours) typically result in a tangier, thicker kefir with a lower lactose content. Shorter times (12-18 hours) yield a milder, thinner product [cite: 2 in previous search]. Experiment to find your preferred balance.
- Temperature: A slightly higher temperature within the optimal range (e.g., 75°F/24°C) will accelerate fermentation and produce a tangier kefir. A slightly lower temperature (e.g., 68°F/20°C) will slow it down, resulting in a milder flavor.
- Grain-to-Milk Ratio: Increasing the amount of kefir grains relative to milk will speed up fermentation, leading to a faster-thickening and tangier kefir. Decreasing the grain ratio will slow it down.
- Type of Milk: Whole milk tends to produce a thicker, creamier kefir than skim or low-fat milk due to its fat content.
Common Kefir Challenges and How to Solve Them
Even with precise temperature control, challenges can arise. Here’s how to address them:
- Kefir is Too Sour or Separated Excessively: This usually means it has over-fermented. Reduce the fermentation time for your next batch or lower the temperature setting of your maker slightly. You can also increase your milk-to-grain ratio [cite: 4 in previous search].
- Kefir is Too Mild or Thin: If your kefir isn’t thickening or developing enough tang, it might be under-fermented. Increase the fermentation time or raise the temperature within the optimal range. You could also decrease the milk-to-grain ratio to give the grains more “food” per unit of milk.
- Sluggish Grains: If your grains seem inactive, ensure they are being fed regularly (every 24-48 hours). Make sure the temperature is consistent and within the ideal range. Always avoid contact with metal utensils or containers, as this can harm the grains.
- Unpleasant Odor or Appearance (e.g., fuzzy, discolored): This indicates spoilage. If your grains appear fuzzy, green, black, or orange, they are likely contaminated and should be discarded immediately [cite: 2 in previous search]. Start with fresh, healthy grains.
- Yeasty Flavor: If your kefir tastes overly yeasty, it suggests fermentation conditions are favoring yeast over bacteria. You can try increasing the amount of milk, reducing the amount of grain, or lowering the temperature slightly to rebalance [cite: 2 in previous search].
Secondary Fermentation for Flavor
Once you’ve strained your plain kefir, you can introduce a secondary fermentation to infuse it with additional flavors and potentially reduce residual lactose.
- Add Flavorings: Pour your strained kefir into a sealed jar or bottle. Add natural flavorings such as fruit (fresh or frozen berries, citrus peel), vanilla extract, cinnamon, or ginger.
- Ferment Again: Seal the container and leave it at room temperature for another 12-24 hours. The sugars from the added ingredients will undergo further fermentation, enhancing flavor and creating a slight fizz.
- Refrigerate: After the secondary ferment, strain out any solid flavorings (if desired) and refrigerate your flavored kefir.
Maintaining Your Kefir Grains and Equipment
Proper care for your kefir grains and fermentation equipment is crucial for long-term success and healthy, delicious kefir production.
Caring for Your Live Kefir Grains
Milk kefir grains are living organisms that require ongoing attention:
- Regular Feeding: The most important rule is to feed your grains fresh milk every 24-48 hours. This continuous cycle keeps them active and healthy.
- Resting Grains: If you need a break from daily kefir making, you can “rest” your grains. Place them in a fresh batch of milk, cover tightly, and store them in the refrigerator. The cold temperature will slow down their activity, allowing them to remain viable for up to a week or two. When you’re ready to resume, simply reactivate them by fermenting a few regular batches at the optimal temperature.
- Avoid Metal: As mentioned, prolonged contact with metal can harm kefir grains. Use glass, plastic, or wooden utensils and containers for all steps of the process.
- Grain Growth: Over time, your kefir grains will multiply. You can either share them with friends, eat the excess, or compost them.
Cleaning Your Temperature-Controlled Maker
Maintaining the cleanliness of your temperature-controlled fermenter ensures hygiene and extends its lifespan:
- Wipe Down: Regularly wipe the exterior and interior of the maker with a damp cloth to remove any spills or condensation.
- Wash Containers: The fermentation jars and lids should be thoroughly washed after each use. Many are dishwasher-safe, but always check the manufacturer’s instructions.
- Deep Clean: Periodically perform a deeper clean of the unit according to the manufacturer’s recommendations.
Where to Buy Quality Kefir Makers
Investing in a reliable temperature-controlled kefir maker is a step towards consistent homemade kefir. You can find these appliances at various retailers:
- Online Marketplaces: Major online retailers offer a wide selection of yogurt makers with adjustable temperature settings and dedicated fermenters. Read customer reviews to gauge product performance and reliability.
- Specialized Fermentation Shops: Some stores specializing in home brewing or fermentation supplies may offer a curated selection of temperature-controlled units.
- Department and Home Goods Stores: Many large retail chains carry various kitchen appliances, including yogurt makers.
When purchasing, consider products with a good warranty and responsive customer support, especially for more technologically advanced units.
Conclusion
Embracing a temperature-controlled maker for your kefir production transforms the art of fermentation into a science, offering unparalleled consistency and ease. By maintaining ideal temperatures between 68-77°F (20-25°C) and leveraging programmable timers, you can effortlessly cultivate perfectly tangy, probiotic-rich kefir tailored to your preferences. This precision not only ensures delicious results but also fosters healthier, more vigorous kefir grains, making your homemade batches more potent and beneficial. With the right equipment and a few simple steps, you’re empowered to create exceptional kefir, consistently nourishing your gut and delighting your palate. Why not take control of your kefir making today and discover the joy of perfect fermentation?
Frequently Asked Questions
What is the ideal temperature range for making milk kefir?
The optimal temperature range for fermenting milk kefir is generally between 68°F and 77°F (20°C to 25°C) for a balanced flavor and texture. Temperatures outside this range can lead to slower fermentation or an overly sour product.
How long does it take to ferment kefir in a temperature-controlled maker?
Fermentation time typically ranges from 12 to 24 hours in a temperature-controlled maker. The exact duration depends on your desired tanginess and thickness, as well as the activity of your specific kefir grains.
Can I use a regular yogurt maker to make kefir?
Yes, many modern Yogurt Makers with adjustable temperature settings can be effectively used to make kefir. Look for models that allow you to set temperatures within the 68-77°F (20-25°C) range.
How do I know if my kefir is over-fermented?
Over-fermented kefir will taste excessively sour or vinegary, and you might notice a significant separation into thick curds and a large amount of watery whey. To prevent this, reduce your fermentation time or lower the temperature for subsequent batches.
What should I do if my kefir grains become sluggish?
If your kefir grains are sluggish, ensure they are being fed fresh milk regularly (every 24-48 hours). Verify your maker is maintaining the optimal temperature range. Avoiding contact with metal and using high-quality milk can also help revive them.