In a world increasingly focused on gut health, homemade 24-hour fermented yogurt stands out as a powerful dietary ally. Moving beyond conventional yogurts, this extended fermentation process transforms ordinary milk into a probiotic powerhouse, virtually free of lactose and packed with beneficial bacteria. If you’re seeking to enrich your diet, support digestion, or simply enjoy a genuinely wholesome dairy product, mastering 24-hour fermented yogurt at home is an incredibly rewarding endeavor. This comprehensive guide will walk you through every step, ensuring you can consistently create deliciously tangy and supremely healthy yogurt right in your own kitchen.
Why 24-Hour Fermented Yogurt? Unlocking Its Potent Health Benefits
The magic of 24-hour fermentation lies in its ability to amplify the natural benefits of yogurt. While regular yogurt offers health advantages, the prolonged fermentation period takes these to an entirely new level, especially for those with specific dietary needs or gut health goals.
The Science Behind Extended Fermentation
|
Our Picks for the Best Yogurt maker in 2026
As an Amazon Associate I earn from qualifying purchases.
|
||
| Num | Product | Action |
|---|---|---|
| 1 | Easy Yogurt Maker for Perfect Homemade Yogurt, 1.7 QT Electric Fermenter for Greek Yogurt, Rice Wine, Natto, with Digital Control & Auto Keep Warm, BPA-Free Container |

|
| 2 | Ultimate Probiotic Yogurt Maker with Adjustable Time & Temp Control - Make Trillions of Live Probiotics with Two 1-Quart Containers for Larger Batches - Greek Yogurt Maker - ULTIMATE LIFETIME WARRANTY |
|
| 3 | Yogurt Dehydrator, Small-Batch Greek Yogurt Maker with Built-In Date Reminder Fresh, Simple & Just the Right Amount — Food-Grade BPA-Free Materials |
|
| 4 | Euro Cuisine Yogurt Maker - YMX650 Automatic Digital Yogurt Maker Machine with Set Temperature - Includes 7-6 oz. Reusable Glass Jars and 7 Rotary Date Setting Lids for Instant Storage |
|
| 5 | Yogurt Maker with Adjustable Temperature & Time Control, Probiotic Yogurt Maker Machine with 8 Glass Jars, Automatic Shut-Off for Homemade Probiotic Yogurt, Promoting Gut Health(48OZ) |
|
| 6 | Yogurt Maker with Two Containers, Yogurt Maker Machine with Adjustable Temperature & Time Control, Automatic Shut-Off & Constant Temper for Homemade Probiotic Yogurt, Promoting Gut Health |
|
| 7 | Yogurt Maker, Compact Greek Yogurt Maker Machine with Constant Temperature Control, Stainless Steel Container, 1 Quart for Home Organic Yogurt |
|
| 8 | Yogurt Maker Machine, 8 Glass Jars with Lids Reusable for Yoghurt, Oatmeal, Pudding, or Jello, Food-Grade Martial, One-touch Control, Homemade Yogurt |
|
| 9 | GDOR Yogurt Maker with Adjustable Temp & Timer– Probiotic-Rich – Digital Greek Yogurt Machine with 8×6oz BPA-Free Glass Jars, Easy to Use for Home, Stainless Steel |
|
| 10 | Euro Cuisine YM80 Electric Yogurt Maker Machine- Promote Gut Health with Probiotic Rich Homemade Yogurt -Home Yogurt Incubator with Glass Jars, White |
|
During the traditional yogurt-making process, beneficial bacteria (starter cultures) consume the lactose (milk sugar) in milk, converting it into lactic acid. This acid is what thickens the milk and gives yogurt its characteristic tangy flavor. With a 24-hour fermentation, these industrious bacteria work for much longer. This extended period ensures that nearly all of the lactose is broken down, making the yogurt much easier to digest for individuals who are lactose intolerant or following restrictive diets like the Specific Carbohydrate Diet (SCD) or GAPS diet, which aim to reduce sugar intake. Beyond lactose reduction, the longer fermentation significantly increases the concentration of probiotics, providing a much higher dose of gut-friendly microorganisms compared to typical store-bought yogurts.
“The extended fermentation of 24 hours not only results in a low-lactose product but also a product teeming with vast quantities of beneficial bacteria, far exceeding most commercial options.”
Gut Health Powerhouse: Digestion, Immunity, and Beyond
The profoundly high probiotic count in 24-hour fermented yogurt offers substantial benefits for your gut microbiome. A thriving gut environment is crucial for overall well-being, influencing everything from digestion to immune function. Regular consumption of this super-charged yogurt can aid in establishing a balanced gut flora, which in turn can help alleviate common digestive issues such as bloating, constipation, and diarrhea. Moreover, a healthy gut is intimately linked to a robust immune system. The beneficial microbes support immune cells and help ward off pathogens. Emerging research also suggests links between gut health and mental well-being, blood sugar regulation, and even heart health, making this homemade yogurt a truly holistic health food.
 Illustration of a healthy human gut with beneficial bacteria, representing improved digestion and immunity.
Essential Tools and Ingredients for Your Yogurt Journey
Making 24-hour fermented yogurt at home requires a few key ingredients and pieces of equipment. The right choices here will significantly impact the success and quality of your final product.
Choosing Your Milk: The Foundation of Great Yogurt
The type of milk you choose is fundamental. For the best results and highest nutritional value, opt for whole, organic, grass-fed milk. The higher fat content of whole milk contributes to a thicker, creamier yogurt. Avoid ultra-pasteurized (UHT) milk, as the intense heating process can alter milk proteins, making it difficult for the yogurt to set properly. Raw milk can also be used, but it still requires heating to a specific temperature to ensure a safe and consistent ferment. While cow’s milk is traditional, those with dairy sensitivities can experiment with goat’s milk or even plant-based milks, though the texture and fermentation process may vary.
Selecting the Right Starter Culture: Your Probiotic Key
The starter culture is what kickstarts the fermentation process. You have a few excellent options:
- Commercial Yogurt Starter: These come in powdered form and contain specific strains of beneficial bacteria (often Lactobacillus bulgaricus, Streptococcus thermophilus, and sometimes Lactobacillus acidophilus). Look for brands specifically designed for 24-hour fermentation or SCD/GAPS diets, as some may explicitly exclude Bifidus strains which are sometimes avoided on these diets.
- Plain, Unsweetened Store-Bought Yogurt: Choose a brand with live and active cultures listed prominently on the label. Ensure it contains no added sugars, thickeners, or artificial ingredients. Good examples often include plain Greek yogurt from reputable brands. This method allows you to use a small amount of existing yogurt to culture a new batch.
- Heirloom Cultures: These are unique strains that can be re-cultured indefinitely, allowing you to make endless batches from a single starter. They often offer distinct flavors and textures.
Always check the ingredient list of your chosen starter carefully to ensure it meets your dietary requirements.
Necessary Equipment: From Basic to Advanced
While you can technically make yogurt with minimal equipment, specialized tools ensure consistent temperature and better results.
- Yogurt Maker: The most straightforward option, designed to maintain a precise, consistent temperature for extended periods. Models vary in capacity and features (e.g., timer, multiple jars).
- Instant Pot with Yogurt Function: A versatile kitchen appliance that offers a dedicated yogurt setting, simplifying the heating, cooling, and fermentation steps.
- Oven (with pilot light or low setting): For a more manual approach, some ovens can maintain a low enough temperature. A reliable oven thermometer is crucial to monitor the temperature accurately.
- Dehydrator: Some dehydrators have temperature settings suitable for yogurt fermentation.
- Thermometer: An absolute must for accurate temperature control during milk heating and cooling, such as a candy thermometer or digital probe thermometer.
- Glass Jars or Containers: For fermenting and storing your yogurt. Sterilization is key.
- Whisk: For thoroughly mixing in the starter culture.
- Large Pot: For heating the milk.
- Fine-mesh Sieve or Cheesecloth (Optional): For straining whey if you desire a thicker Greek-style yogurt.
Step-by-Step Guide: Making Your Own 24-Hour Fermented Yogurt
Once you have your ingredients and equipment ready, the process itself is straightforward, though precision and patience are vital for optimal results.
Preparation is Key: Sterilization and Setup
Begin by sterilizing all equipment that will come into contact with your milk and yogurt. This includes your pot, whisk, thermometer, and fermentation jars. You can do this by boiling them in water for 10 minutes, running them through a dishwasher on a sanitize cycle, or submerging them in a sterilizing solution. This step is critical to prevent unwanted bacteria from contaminating your yogurt and ensuring a pure culture.
The Milk Heating & Cooling Process
- Heat the Milk: Pour your chosen milk into a large, clean pot. Slowly heat the milk to 180°F (82°C) or even 190°F (88°C), stirring occasionally to prevent scorching. Holding the milk at this temperature for a few minutes helps denature the milk proteins, resulting in a thicker yogurt, and kills any competing bacteria. If using UHT milk, some recipes suggest you can skip this step, but heating often still yields a better texture.
- Cool the Milk: Remove the pot from the heat. Allow the milk to cool down to the optimal inoculation temperature, which is typically between 100°F and 115°F (38°C to 46°C). Cooling too quickly can cause a film on top; cooling too slowly can also be an issue. To speed up cooling, you can place the pot in an ice bath in your sink, stirring the milk gently until it reaches the target temperature. It is crucial not to add the starter culture when the milk is too hot, as this will kill the beneficial bacteria.
Inoculating Your Milk with Culture
Once the milk has cooled to the correct temperature, it’s time to add your starter culture.
- Prepare the Starter: If using a powdered starter, follow the package instructions. Often, you’ll mix a small amount of the cooled milk (about 1/2 cup) with the starter in a separate bowl to create a smooth paste, ensuring there are no lumps. If using store-bought yogurt, use 2-3 tablespoons per quart of milk, also mixing it with a small amount of cooled milk first.
- Combine: Gently whisk the prepared starter mixture into the larger batch of cooled milk. Stir thoroughly to ensure the culture is evenly distributed throughout the milk.
The 24-Hour Fermentation: Temperature Control is Crucial
Pour the inoculated milk into your sterilized fermentation jars or the insert of your yogurt maker/Instant Pot.
- Set Up: Place the containers into your yogurt maker, Instant Pot (on the yogurt setting), dehydrator, or carefully into your oven (if using this method, ensure constant temperature monitoring).
- Maintain Temperature: Set the temperature to a consistent 100-113°F (38-45°C). Maintaining this temperature precisely for the entire 24-hour period is the most critical factor for successful 24-hour yogurt. Fluctuations can lead to thin yogurt or unwanted bacterial growth.
- Ferment: Allow the milk to ferment undisturbed for 24 hours. Avoid opening the lid or moving the containers during this time.
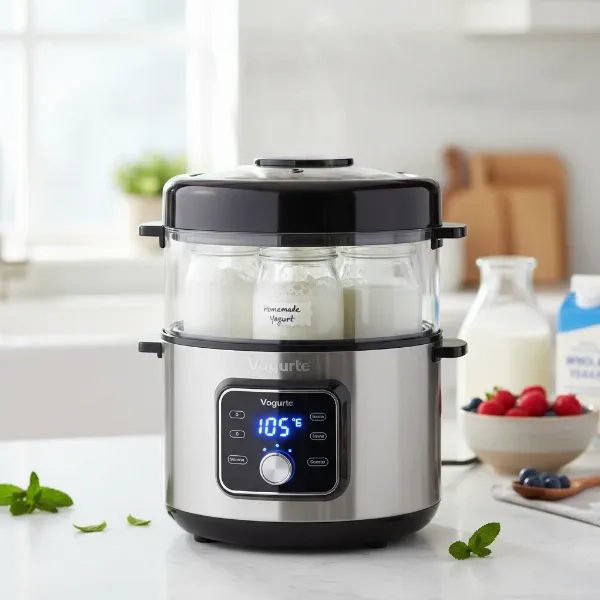 Modern yogurt maker maintaining consistent temperature with glass jars of milk fermenting inside for 24 hours.
Cooling and Straining for Perfection
After 24 hours, your yogurt will be ready, but it needs a final step to achieve its perfect consistency and to stop the fermentation process.
- Chill: Carefully remove the yogurt from the incubator. Place the jars or container directly into the refrigerator and chill for at least 6 hours, or ideally overnight. This allows the yogurt to set further and thicken.
- Strain (Optional): If you prefer a thicker, Greek-style yogurt, you can strain it after chilling. Line a fine-mesh sieve with cheesecloth and place it over a bowl. Pour the yogurt into the lined sieve and let it drain in the refrigerator for several hours or overnight. The liquid that drains off is whey, rich in nutrients, and can be saved for other uses (e.g., smoothies, baking).
Tips for Success and Troubleshooting Common Issues
While making 24-hour fermented yogurt is relatively simple, a few tips can ensure consistent success, and knowing how to troubleshoot can save a batch.
Achieving the Perfect Texture and Taste
- Milk Quality: High-quality, full-fat milk almost always results in a creamier, richer yogurt. Organic and grass-fed varieties often provide superior flavor.
- Consistent Temperature: Invest in a reliable yogurt maker or thermometer. Temperature fluctuations are the enemy of good yogurt. Too low, and it won’t ferment properly; too high, and it can kill the cultures or result in an overly tart, grainy product.
- Fresh Starter: Always use a fresh, active starter culture. If using a previous batch of homemade yogurt, ensure it’s less than a week old and was well-fermented.
- Avoid Over-Stirring: Once the culture is mixed in, try to handle the milk gently and avoid excessive agitation during fermentation and chilling, which can break the delicate curd.
When Things Go Wrong: Common Problems and Solutions
- Thin/Runny Yogurt:
- Cause: Temperature too low/high, inactive starter, milk not heated properly (especially UHT milk), or insufficient fermentation time.
- Solution: Ensure accurate temperature control. Try a new, fresh starter. Re-heat milk to 180°F (82°C) and cool properly. Ensure the full 24 hours of fermentation.
- Grainy or Lumpy Yogurt:
- Cause: Milk heated too quickly, milk not cooled sufficiently before adding starter, or fermentation temperature too high.
- Solution: Heat milk slowly and stir. Cool milk completely to the target temperature. Verify your incubator’s temperature.
- Excessively Tart Yogurt:
- Cause: Fermented for too long or at too high a temperature.
- Solution: Adjust fermentation time slightly down (e.g., 22 hours) or lower the temperature by a degree or two on your next batch.
- Separation/Too Much Whey:
- Cause: Often a natural occurrence, especially with longer fermentation.
- Solution: Simply stir it back in, or strain it for a thicker yogurt. This is often a sign of healthy fermentation.
Enjoying Your Homemade 24-Hour Fermented Yogurt
Once your 24-hour fermented yogurt is chilled and set, a world of delicious and healthy possibilities opens up.
Serving Suggestions and Flavor Enhancements
The natural tang of 24-hour fermented yogurt is a blank canvas for culinary creativity.
- Breakfast Staple: Enjoy it plain, or swirl in fresh berries, a drizzle of raw honey or maple syrup (after fermentation), chopped nuts, or a sprinkle of cinnamon.
- Smoothies: Blend into your favorite fruit smoothies for an extra probiotic boost and creamy texture.
- Savory Dishes: Use it as a base for healthy dips (like tzatziki), salad dressings, or as a cooling counterpoint to spicy meals. It can also be a fantastic marinade for meats, tenderizing them beautifully.
- Desserts: Incorporate it into parfaits with granola, fruit compotes, or use it as a healthier alternative in baking.
Storage and Shelf Life
Your homemade 24-hour fermented yogurt can be stored in airtight containers in the refrigerator for up to two weeks. The live cultures continue to slowly work, so the yogurt may become slightly tangier over time. If you notice any unusual smells, colors, or mold, it’s best to discard the batch. To ensure a continuous supply, remember to reserve a few tablespoons from your fresh batch to use as a starter for your next one within the first week of making it.
Conclusion
Making 24-hour fermented yogurt at home is more than just a culinary skill; it’s an investment in your health and well-being. By taking control of the fermentation process, you create a food that is uniquely tailored to support your gut, boost your immunity, and delight your taste buds. With its low lactose content and exceptional probiotic density, this homemade yogurt is a true superfood, empowering you to nourish your body with every delicious spoonful. Are you ready to embrace the art of long-fermented yogurt and transform your health from the inside out?
Frequently Asked Questions
Is 24-hour fermented yogurt truly lactose-free?
While “lactose-free” implies zero lactose, 24-hour fermented yogurt is considered virtually lactose-free. The extended fermentation time allows the beneficial bacteria to consume almost all of the lactose present in the milk, often reducing it to undetectable levels. This makes it highly digestible and suitable for most individuals with lactose intolerance.
Can I use any store-bought yogurt as a starter for 24-hour yogurt?
No, not just any. You must select a plain, unsweetened, full-fat yogurt that explicitly lists “live and active cultures” as ingredients. Avoid yogurts with added sugars, starches, thickeners, or artificial flavors, as these can interfere with the fermentation process and may not contain the robust cultures needed for a 24-hour ferment.
What is the ideal temperature range for 24-hour yogurt fermentation?
The optimal temperature range for fermenting 24-hour yogurt is typically between 100°F and 115°F (38°C to 46°C). Maintaining a consistent temperature within this range is crucial for the bacteria to thrive, break down lactose effectively, and produce a thick, tangy yogurt. Slight variations can impact texture and flavor.
How much starter culture should I use per batch of milk?
Generally, for every quart (about 1 liter) of milk, you’ll need 2-3 tablespoons of live yogurt starter or one packet of powdered commercial starter culture. If using powdered starter, always follow the specific instructions provided on the packaging, as amounts can vary slightly by brand.
My homemade yogurt is too thin. What went wrong?
Thin yogurt is a common issue. It could be due to several factors: your milk wasn’t heated to a high enough temperature (180-190°F) to denature proteins, the milk was too hot or too cold when the starter was added, your starter culture was old or inactive, or the fermentation temperature was not consistent and high enough for the full 24 hours. Using ultra-pasteurized milk can also lead to a thinner consistency.