There’s nothing quite like the satisfaction of making your own homemade yogurt, but when your eagerly anticipated batch turns out grainy, lumpy, or just not right, it can be truly disappointing. Instead of the silky-smooth, creamy texture you crave, you’re left with a curdled, unappetizing mess. Don’t worry, you’re not alone in this culinary predicament. Many home yogurt makers encounter texture issues, and fortunately, most of these problems have straightforward solutions. This comprehensive guide will help you understand the common culprits behind grainy or lumpy yogurt and provide actionable steps to ensure your next batch is perfectly smooth and delicious.
Understanding Grainy and Lumpy Homemade Yogurt
Before we dive into the fixes, it’s helpful to understand why your yogurt might develop an undesirable texture. Several factors contribute to the final consistency of your homemade yogurt, and a slight deviation in any one of these can lead to grittiness or lumps. Identifying the root cause is the first step toward achieving that ideal creamy consistency.
Common Causes of Undesirable Yogurt Texture
|
Our Picks for the Best Yogurt maker in 2026
As an Amazon Associate I earn from qualifying purchases.
|
||
| Num | Product | Action |
|---|---|---|
| 1 | Yogurt Maker with Two Containers, Yogurt Maker Machine with Adjustable Temperature & Time Control, Automatic Shut-Off & Constant Temper for Homemade Probiotic Yogurt, Promoting Gut Health |

|
| 2 | Easy Yogurt Maker for Perfect Homemade Yogurt, 1.7 QT Electric Fermenter for Greek Yogurt, Rice Wine, Natto, with Digital Control & Auto Keep Warm, BPA-Free Container |
|
| 3 | Yogurt Maker, Compact Greek Yogurt Maker Machine with Constant Temperature Control, Stainless Steel Container, 1 Quart for Home Organic Yogurt |
|
| 4 | Euro Cuisine Yogurt Maker - YMX650 Automatic Digital Yogurt Maker Machine with Set Temperature - Includes 7-6 oz. Reusable Glass Jars and 7 Rotary Date Setting Lids for Instant Storage |
|
| 5 | Yogurt Maker with Adjustable Temperature & Time Control, Probiotic Yogurt Maker Machine with 8 Glass Jars, Automatic Shut-Off for Homemade Probiotic Yogurt, Promoting Gut Health(48OZ) |
|
| 6 | Euro Cuisine YM80 Electric Yogurt Maker Machine- Promote Gut Health with Probiotic Rich Homemade Yogurt -Home Yogurt Incubator with Glass Jars, White |
|
| 7 | GDOR Yogurt Maker with Adjustable Temp & Timer– Probiotic-Rich – Digital Greek Yogurt Machine with 8×6oz BPA-Free Glass Jars, Easy to Use for Home, Stainless Steel |
|
| 8 | Ultimate Probiotic Yogurt Maker with Adjustable Time & Temp Control - Make Trillions of Live Probiotics with Two 1-Quart Containers for Larger Batches - Greek Yogurt Maker - ULTIMATE LIFETIME WARRANTY |
|
| 9 | Yogurt Dehydrator, Small-Batch Greek Yogurt Maker with Built-In Date Reminder Fresh, Simple & Just the Right Amount — Food-Grade BPA-Free Materials |
|
| 10 | Yogurt Maker Machine, 8 Glass Jars with Lids Reusable for Yoghurt, Oatmeal, Pudding, or Jello, Food-Grade Martial, One-touch Control, Homemade Yogurt |
|
The texture of your homemade yogurt is a delicate balance of science and technique. When this balance is disturbed, you might find yourself with a batch that’s less than perfect. Let’s explore the primary reasons behind grainy or lumpy results.
Milk Preparation Issues: The way you treat your milk before incubation is critical. Heating the milk too quickly can cause proteins to denature too rapidly, resulting in a grainy texture. Conversely, not heating the milk high enough or not holding it at the proper temperature for long enough means the whey proteins won’t fully denature, which is essential for a smooth, gelled consistency. Scorching the milk, even slightly, can also introduce an off-texture and flavor.
Incubation Temperature Control: Temperature is arguably the most crucial factor in yogurt making. If the incubation temperature is too high, it can kill or weaken the delicate starter bacteria, leading to a curdled, separated, or lumpy consistency. Too low a temperature, and the bacteria won’t ferment properly, resulting in a thin, unset yogurt. Furthermore, inconsistent or fluctuating temperatures during the incubation period can stress the cultures, hindering their ability to create a uniform texture.
Starter Culture Problems: The quality and quantity of your starter culture play a significant role. An old, weak, or contaminated starter might not have enough active bacteria to properly ferment the milk, leading to poor setting and an uneven texture. Using too much starter can accelerate fermentation, sometimes resulting in separation or an overly sour taste, while too little may prevent it from setting altogether. Introducing the starter to milk that is too hot will kill the beneficial bacteria, rendering it ineffective.
Incubation Time: While longer incubation often leads to thicker yogurt, culturing for too long, especially at higher temperatures, can cause over-fermentation. This excessive acidity can lead to the milk proteins coagulating too tightly, causing the yogurt to separate into curds and whey, resulting in a lumpy or cottage cheese-like texture. Conversely, not allowing enough incubation time means the yogurt won’t fully set, remaining thin or runny.
Mixing Techniques: The way you mix your ingredients, particularly the starter into the milk, can also impact texture. Vigorous or uneven stirring can introduce air or disrupt the milk proteins, potentially leading to an inconsistent set. It’s also important to avoid disturbing the yogurt during its incubation period, as jostling can break the fragile protein bonds forming, causing a separated or lumpy outcome.
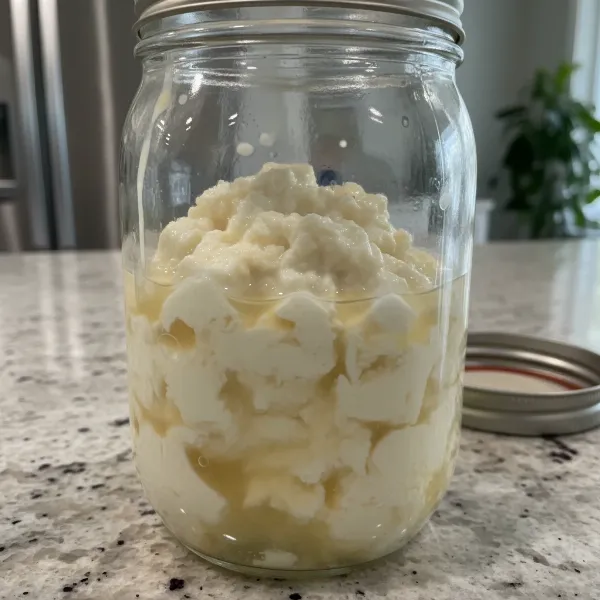 Close-up of grainy, lumpy homemade yogurt texture in a glass jar, showing common problems.
Step-by-Step Solutions for a Silky Smooth Texture
Now that we understand the potential issues, let’s explore practical solutions to transform your grainy or lumpy yogurt into a consistently smooth and creamy delight. Precision and patience are key to perfecting your homemade yogurt.
Perfecting Milk Heating and Cooling
The initial preparation of your milk is foundational for a smooth texture. Getting this step right sets the stage for successful fermentation.
Slow Heating and Holding: Heat your milk slowly over medium-low heat. Rapid heating can cause milk proteins to denature too quickly, leading to graininess. Aim to bring the milk temperature to 180-185°F (82-85°C). Once it reaches this temperature, hold it there for 15 to 30 minutes. This extended heating denatures the whey proteins, allowing them to integrate into the casein structure, which is crucial for a smooth, gelled consistency. Stir frequently to prevent scorching the bottom of the pot.
Proper Cooling: After holding at temperature, cool the milk down to the ideal inoculation temperature of 100-110°F (38-43°C). This temperature range is optimal for most yogurt cultures to thrive. Cooling too slowly is generally fine, but ensure it doesn’t drop below the ideal range. You can speed up cooling by placing the pot in an ice bath, stirring occasionally, but be vigilant with your thermometer. Adding starter to milk that is too hot will kill the bacteria, while milk that is too cold will not allow the culture to activate effectively.
Avoiding Scorching: Constant stirring during the heating process helps prevent milk proteins from sticking and burning at the bottom of the pot. Scorched milk can impart a distinctly unpleasant flavor and gritty texture to your finished yogurt. Use a heavy-bottomed pot for more even heat distribution.
Mastering Incubation Temperature and Time
Consistent temperature control during incubation is paramount for the bacteria to work their magic and create a smooth, firm yogurt.
Maintaining Consistent Temperatures: Most thermophilic (heat-loving) yogurt cultures thrive between 100-112°F (38-44°C). Mesophilic (room temperature) cultures prefer a cooler range, typically 70-78°F (21-25°C). Choose an incubation method that can maintain a stable temperature throughout the entire fermentation process. Yogurt makers, instant pots with a yogurt function, or even an oven with the light on (for warmth) can be effective, provided they hold a steady temperature.
Using a Reliable Thermometer: A good quality, accurate thermometer is your best friend in yogurt making. Relying on guesswork for milk heating and cooling temperatures, as well as incubation temperatures, is a common cause of failure. Digital thermometers offer quick and precise readings, ensuring you hit the sweet spot every time.
Optimal Incubation Duration: The ideal incubation time varies depending on your starter culture, milk type, and desired tanginess/thickness. A common range is 6-10 hours. Shorter times (6-8 hours) generally produce a milder, thinner yogurt, while longer times (8-10+ hours) result in a tangier, firmer product. Over-fermentation leads to increased acidity, which can cause the yogurt to separate or become lumpy. Check your yogurt periodically after about 6 hours; it’s ready when it sets firmly and smells pleasantly tart.
Choosing and Integrating Your Starter Culture
Your starter culture is the living engine of your yogurt, so its quality and proper handling are vital.
Freshness and Type of Starter: Always use a fresh, active starter culture. This can be a commercial freeze-dried starter or a few tablespoons of plain, unflavored yogurt with live active cultures from a previous successful batch (or store-bought). If using store-bought yogurt as a starter, ensure it doesn’t contain thickeners or gelatin, which can give misleading results for subsequent batches. Over time, homemade starters can weaken, so refreshing with a new culture every few batches can be beneficial.
Correct Starter-to-Milk Ratio: Adhere to the recommended ratio of starter to milk. Too much starter can lead to rapid fermentation and over-acidification, causing the yogurt to curdle or separate. Too little, and the fermentation might be too slow or fail to set completely. A general guideline is 1-2 tablespoons of active yogurt culture per quart (liter) of milk.
Gentle Mixing: Once your milk has cooled to the target temperature, gently whisk a small amount of the warm milk into your starter culture in a separate bowl until smooth. Then, pour this starter mixture back into the main batch of milk and stir gently to combine thoroughly. Avoid vigorous whisking that can introduce excess air or disrupt the milk proteins. The goal is even distribution without agitation.
Advanced Tips for Preventing Future Texture Issues
Beyond the basics, a few advanced considerations can further enhance your yogurt-making success and consistently yield a beautifully smooth and creamy product.
Selecting the Right Milk Type
The type of milk you use directly impacts the richness and thickness of your yogurt. Whole milk, with its higher fat content, naturally produces a creamier, thicker yogurt compared to skim or low-fat varieties. While you can make yogurt with any type of dairy milk, whole milk is often recommended for beginners aiming for a luxurious texture. For an extra thick result without straining, you can also add a few tablespoons of dry milk powder per quart of milk when heating, which boosts the protein content.
Gentle Handling and Post-Incubation Care
Once your yogurt has finished incubating, how you handle it can still affect its final texture.
Avoiding Disturbance: During the incubation period, try not to move or jostle your yogurt. The delicate protein matrix is forming, and any disturbance can break these bonds, leading to a thinner, separated, or lumpy consistency. Let it sit undisturbed until fully set.
Chilling and Setting: After incubation, refrigerate your yogurt immediately. Chilling stops the fermentation process and allows the yogurt to firm up further. For the best texture, let it chill for at least 4-8 hours, or preferably overnight, before serving.
Straining if Necessary: If your yogurt still comes out a bit lumpy or with excess whey, you can strain it. Place a fine-mesh sieve lined with cheesecloth or a coffee filter over a bowl and pour the yogurt in. Let it drain in the refrigerator for a few hours (for Greek-style yogurt) or even overnight. Once strained, gently whisk the thickened yogurt solids until smooth. This process won’t fix a fundamentally grainy texture from improper milk heating, but it can improve the consistency of lumpy or excessively thin yogurt.
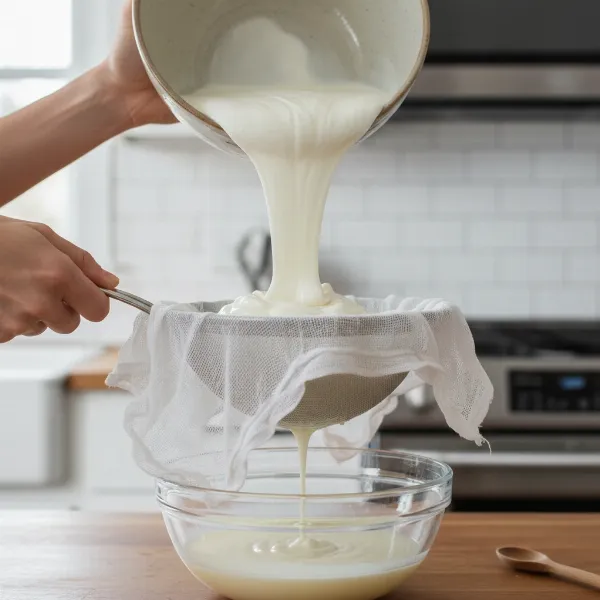 Hands straining homemade yogurt through cheesecloth in a sieve to achieve a smoother, thicker texture.
Ensuring Cleanliness and Preventing Contamination
A clean environment is crucial for healthy fermentation. Any unwanted bacteria or wild yeasts introduced can compete with your starter culture, leading to off-flavors, poor setting, or even slimy textures. Always use thoroughly cleaned and sanitized utensils, pots, and containers. Wash your hands thoroughly before handling ingredients. Cross-contamination from other fermented foods (like sourdough) being cultured nearby can also sometimes be a factor.
When to Discard: Recognizing Spoiled Yogurt
While troubleshooting texture issues is common, it’s important to know when a batch of yogurt is beyond saving and should be discarded for safety reasons. Most texture issues, if the yogurt smells and tastes otherwise fine, are safe to consume, though perhaps not enjoyable.
Signs of Unsafe Yogurt
- Mold: Any visible mold, regardless of color, means the entire batch should be discarded.
- Off-Smell: If your yogurt smells putrid, yeasty, like alcohol, or otherwise unpleasant (beyond normal tanginess), it’s best to err on the side of caution and throw it out.
- Unusual Discoloration: Beyond the normal creamy white or slight yellowish tint, if your yogurt has odd colors, especially pink, orange, or green, do not consume it.
- Slimy Texture (if persistent): While some cultures can naturally produce a slightly viscous yogurt, a distinctly slimy or stringy texture, particularly if accompanied by an unusual smell, can indicate contamination and should be discarded.
When in doubt, it’s always safer to discard and start fresh with new ingredients and a clean process.
In conclusion, achieving perfectly smooth and creamy homemade yogurt is a rewarding culinary endeavor that often requires a bit of practice and attention to detail. By carefully controlling milk heating and cooling, maintaining consistent incubation temperatures, using a fresh and appropriate starter, and practicing gentle handling, you can overcome grainy or lumpy textures. Don’t be discouraged by a few less-than-perfect batches; each attempt is a learning opportunity. Embrace the process, refine your technique, and soon you’ll be enjoying deliciously smooth, homemade yogurt every time. What new flavor combinations will you create with your perfectly textured yogurt?