Dreaming of creamy, tangy vegan yogurt without the store-bought price tag or mysterious ingredients? Crafting your own homemade vegan yogurt is a deeply satisfying culinary adventure that offers complete control over flavors and textures. But the secret to a perfect batch lies in choosing the right starter culture – the tiny microscopic heroes that transform plant milk into a probiotic powerhouse. This guide will demystify vegan yogurt starters, explore your best options, and equip you with the knowledge to create delectable dairy-free delights right in your kitchen.
Understanding Vegan Yogurt Starter Cultures
At its heart, yogurt making is a fascinating process of fermentation, where beneficial bacteria convert the sugars in milk into lactic acid. This acid is what thickens the milk and gives yogurt its characteristic tangy flavor. For vegan yogurt, this intricate dance unfolds within plant-based milks, requiring specialized starter cultures adapted to these non-dairy environments.
What Makes a Vegan Yogurt Starter Unique?
|
Our Picks for the Best Yogurt maker in 2026
As an Amazon Associate I earn from qualifying purchases.
|
||
| Num | Product | Action |
|---|---|---|
| 1 | GDOR Yogurt Maker with Adjustable Temp & Timer– Probiotic-Rich – Digital Greek Yogurt Machine with 8×6oz BPA-Free Glass Jars, Easy to Use for Home, Stainless Steel |

|
| 2 | Yogurt Maker with Adjustable Temperature & Time Control, Probiotic Yogurt Maker Machine with 8 Glass Jars, Automatic Shut-Off for Homemade Probiotic Yogurt, Promoting Gut Health(48OZ) |
|
| 3 | Yogurt Maker, Compact Greek Yogurt Maker Machine with Constant Temperature Control, Stainless Steel Container, 1 Quart for Home Organic Yogurt |
|
| 4 | Euro Cuisine YM80 Electric Yogurt Maker Machine- Promote Gut Health with Probiotic Rich Homemade Yogurt -Home Yogurt Incubator with Glass Jars, White |
|
| 5 | Easy Yogurt Maker for Perfect Homemade Yogurt, 1.7 QT Electric Fermenter for Greek Yogurt, Rice Wine, Natto, with Digital Control & Auto Keep Warm, BPA-Free Container |
|
| 6 | Yogurt Maker with Two Containers, Yogurt Maker Machine with Adjustable Temperature & Time Control, Automatic Shut-Off & Constant Temper for Homemade Probiotic Yogurt, Promoting Gut Health |
|
| 7 | Euro Cuisine Yogurt Maker - YMX650 Automatic Digital Yogurt Maker Machine with Set Temperature - Includes 7-6 oz. Reusable Glass Jars and 7 Rotary Date Setting Lids for Instant Storage |
|
| 8 | Yogurt Dehydrator, Small-Batch Greek Yogurt Maker with Built-In Date Reminder Fresh, Simple & Just the Right Amount — Food-Grade BPA-Free Materials |
|
| 9 | Ultimate Probiotic Yogurt Maker with Adjustable Time & Temp Control - Make Trillions of Live Probiotics with Two 1-Quart Containers for Larger Batches - Greek Yogurt Maker - ULTIMATE LIFETIME WARRANTY |
|
| 10 | Yogurt Maker Machine, 8 Glass Jars with Lids Reusable for Yoghurt, Oatmeal, Pudding, or Jello, Food-Grade Martial, One-touch Control, Homemade Yogurt |
|
While traditional dairy yogurt relies on strains like Streptococcus thermophilus and Lactobacillus delbrueckii subsp. bulgaricus, vegan yogurt cultures often utilize these same robust strains, or a combination of them, alongside other probiotic powerhouses such as Lactobacillus acidophilus, Bifidobacterium bifidum, and Lactobacillus casei. These specific bacterial combinations are selected for their ability to thrive in and ferment the unique sugar profiles found in plant milks, delivering that desired yogurt consistency and flavor. The right blend ensures a successful fermentation process, resulting in a thick, creamy, and wonderfully tangy final product that’s bursting with gut-friendly probiotics.
Types of Vegan Yogurt Starters
The world of vegan yogurt starters offers a few distinct pathways, each with its own advantages, making it easy to find a method that suits your preferences and experience level.
- Direct-Set Cultures: These are often pre-packaged, freeze-dried cultures containing a specific blend of bacterial strains designed for optimal vegan yogurt fermentation. Brands like Cultures for Health and Revolution Fermentation offer popular direct-set options. They are typically single-use, meaning each packet cultures one batch of yogurt, providing consistent and reliable results every time. Their convenience makes them a favorite for beginners and those seeking predictable outcomes.
- Probiotic Capsules: A surprisingly versatile option, many high-quality probiotic capsules can double as a vegan yogurt starter. The key is to select capsules that contain the right live bacterial strains (often including Lactobacillus acidophilus) and are certified dairy-free and vegan. Simply open the capsules and sprinkle the powder into your plant milk. This method can be more cost-effective and offers flexibility, though results might vary slightly depending on the potency and specific strains in the probiotic.
- Store-Bought Vegan Yogurt: For those just dipping their toes into homemade vegan yogurt, using a few spoonfuls of a plain, unsweetened store-bought vegan yogurt with live active cultures can serve as an effective starter. Look for labels that explicitly state “live and active cultures” and ensure it’s free from added thickeners or sweeteners that could interfere with your fermentation. While convenient for initial batches, the potency of these cultures can diminish over successive uses, so it’s generally recommended for a few generations before starting a new batch with fresh store-bought yogurt or a dedicated starter.
Choosing the Right Starter Culture for Your Needs
Selecting the perfect vegan yogurt starter involves considering several factors beyond just getting the job done. Your choice will influence the final taste, texture, and the overall ease of your yogurt-making journey.
Factors to Consider When Selecting a Starter
Before you commit to a starter, think about what you want from your homemade vegan yogurt:
- Desired Texture & Taste: Some cultures are formulated to produce a milder yogurt, while others yield a distinctly tangy flavor. The type of plant milk you use also plays a significant role in texture, with high-protein milks like soy generally creating a firmer set. Consider if you prefer a pourable yogurt or something thick enough to stand a spoon in.
- Type of Plant Milk: While many starters are versatile, some perform exceptionally well with specific plant milks. Soy milk is often praised for its ability to produce a firm, tangy yogurt due to its high protein content. Almond, coconut, and oat milks can also be used successfully, but often benefit from the addition of a thickener to achieve a desirable consistency.
- Reusability (Reculturing): If you aim to make continuous batches from your previous homemade yogurt, a re-culturable starter is ideal. Most direct-set cultures are designed for single use, but some probiotic capsules might allow for a few generations of re-culturing. Always check the product specifications for reusability.
- Ease of Use: Direct-set cultures are generally the most straightforward, requiring minimal fuss. Using probiotic capsules is also relatively simple, but might involve a bit more experimentation to find the right quantity.
- Allergen Information: Always scrutinize labels, especially if you have allergies. Some starters, even if vegan, might be manufactured in facilities that also process dairy or soy, potentially leading to trace amounts. For example, some Cultures for Health products note they are manufactured in facilities that also produce products containing soy and dairy, and may contain trace amounts of gluten from fermentation nutrients.
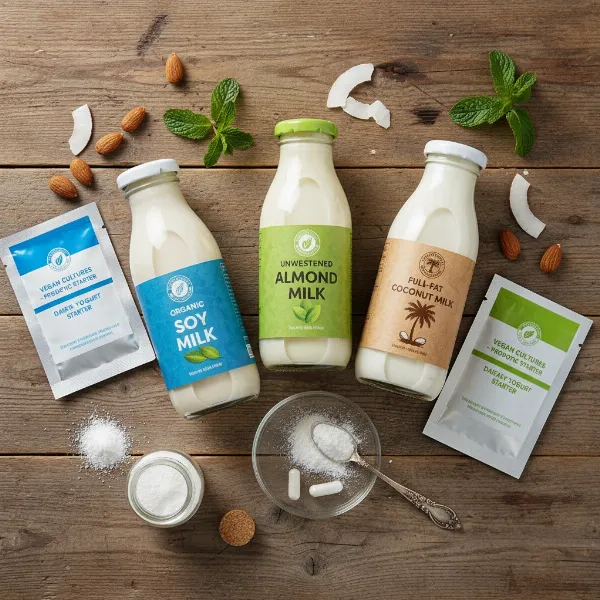 Assortment of plant milks, vegan yogurt starter cultures (packets and capsules), and various natural thickeners on a wooden table for homemade vegan yogurt making.
Top-Rated Vegan Yogurt Starter Cultures
Based on user experience and product effectiveness, a few vegan yogurt starters consistently rise to the top for their reliability and quality.
- Cultures for Health Vegan Yogurt Culture: This brand is frequently praised for its ease of use and consistent results. Many users report excellent success with both soy and coconut milk, noting good taste and a desirable consistency. The pre-portioned packets make it virtually fail-proof, offering a great value for making multiple batches. It’s an excellent choice for those seeking a reliable and straightforward experience.
- Revolution Fermentation Vegan Yogurt Starter: Known for producing a mild, slightly tangy yogurt with a smooth, firm texture. A standout feature of this starter is that it’s a mesophilic culture, meaning it ferments at lower temperatures (around 77-95°F or 25-35°C), often eliminating the need for a dedicated yogurt maker. This makes it a fantastic option for those who prefer a simpler setup or want to ferment on a countertop in a warm room.
- High-Quality Probiotic Capsules (e.g., featuring Lactobacillus acidophilus): While not a single brand, many individuals successfully use probiotic capsules as a starter. The key is to look for reputable brands with a high CFU count and a diverse range of strains, especially Lactobacillus acidophilus, which is crucial for lactic acid production. This method offers flexibility and can be very cost-effective if you already take probiotics regularly. Just ensure the capsules are free of dairy or other animal products.
Mastering the Art of Homemade Vegan Yogurt Making
Making your own vegan yogurt is less intimidating than it sounds. With the right ingredients, equipment, and a few simple steps, you’ll be enjoying fresh, creamy yogurt in no time.
Essential Ingredients and Equipment
Before you begin, gather your supplies to ensure a smooth process:
- Plant-Based Milk: The foundation of your yogurt. Opt for unsweetened and additive-free varieties. Soy milk is generally the easiest to work with for a thick yogurt due to its protein content. Coconut milk, almond milk, and oat milk are also popular choices, but may require extra thickening.
- Vegan Yogurt Starter Culture: Choose from direct-set packets, probiotic capsules, or a few tablespoons of store-bought vegan yogurt with live cultures.
- Thickeners (Optional but Recommended for Thinner Milks): For almond, oat, or light coconut milk, thickeners can significantly improve consistency. Common options include:
- Agar-agar powder: A gelatin alternative that creates a firm, jelly-like set. Use about 1/4 to 2 tsp per liter, heating with the milk until simmering to activate.
- Tapioca starch or cornstarch: These starches can add body and creaminess.
- Cashews: Blending pre-soaked raw cashews into your plant milk can add richness and thickness.
- Gelatin (if not strictly vegan): Some non-vegans use gelatin for thickness, but agar-agar is the vegan alternative.
- Equipment:
- Saucepan or Microwave: For heating the plant milk.
- Food Thermometer: Crucial for monitoring milk temperature to ensure optimal conditions for your starter.
- Whisk: For thoroughly mixing the starter into the milk.
- Jars or Containers: Clean, sterilized glass jars work best for fermentation and storage.
- Yogurt Maker, Instant Pot (with yogurt setting), or Warm Place: To maintain a consistent temperature during the fermentation process. An oven with just the light on can also work as a makeshift incubator.
Step-by-Step Guide to Making Vegan Yogurt
Follow these general steps to create your homemade vegan yogurt:
- Prepare Plant Milk: If using thickeners like agar-agar, combine it with your plant milk in a saucepan and heat to a simmer, whisking constantly, to activate the thickener. Otherwise, gently heat your plant milk to approximately 100-110°F (38-43°C) for thermophilic cultures, or cool to 77-95°F (25-35°C) for mesophilic cultures. Always check the specific temperature requirements of your chosen starter. Let the milk cool to the recommended inoculation temperature before proceeding.
- Add Starter: Once the plant milk is at the correct temperature, whisk in your chosen vegan yogurt starter. If using a direct-set packet, follow the package instructions for the quantity per liter of milk. For probiotic capsules, typically 1-5 capsules per liter may be needed, depending on the CFU count. If using store-bought yogurt, about 1-2 tablespoons per liter is a good starting point. Mix thoroughly to ensure the culture is evenly distributed.
- Incubate: Pour the inoculated milk into your clean jars. Place the jars in your yogurt maker, Instant Pot (on the yogurt setting), or a warm, consistent environment (like an oven with the light on, or a food dehydrator). Maintain the recommended temperature for 5 to 12 hours, or until the yogurt reaches your desired tanginess and thickness. Mesophilic cultures may take longer at lower temperatures (e.g., 11 hours at 71°F/22°C for a softer set, or 5.5 hours at 95°F/35°C for firmer yogurt).
- Chill: Once fermented, remove the jars and refrigerate your yogurt for at least 4-8 hours. This chilling period is crucial as it allows the yogurt to firm up further and stops the fermentation process.
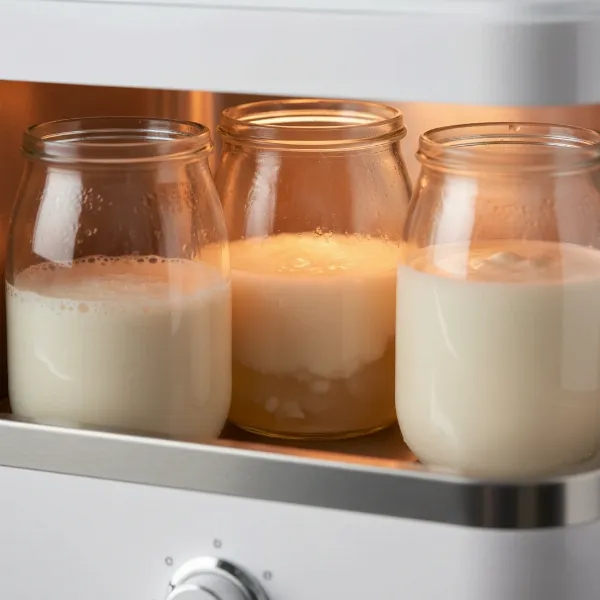 Glass jars of vegan yogurt fermenting in a yogurt maker, showing various stages of thickness
Tips for Perfecting Your Vegan Yogurt
Achieving that perfect homemade vegan yogurt can be a journey of subtle adjustments. Here are some pro tips to guide you:
- Temperature Control is King: The bacteria in your starter culture are sensitive to temperature. Too hot, and you kill them; too cold, and they won’t activate. A good food thermometer is your best friend.
- Sweetening and Flavoring: Always add sweeteners (maple syrup, agave, sugar), fruit, or other flavorings after the fermentation process is complete and the yogurt has chilled. Sugar added before fermentation acts as food for the bacteria, but adding too much can inhibit their activity or result in an overly sweet yogurt that lacks tang.
- Adjusting Consistency: If your yogurt is too thin, consider adding more thickener to your next batch. For a Greek-style yogurt, you can strain your finished, chilled yogurt through cheesecloth or a nut milk bag overnight in the refrigerator to remove excess liquid (whey).
- Hygiene Matters: Always sterilize your jars, spoons, and any equipment that will come into contact with your plant milk and starter. This prevents unwanted bacteria from interfering with your culture.
- Troubleshooting Common Issues: If your yogurt isn’t setting, review your temperature, incubation time, and the freshness/potency of your starter. If it’s not tangy enough, try a longer fermentation period in your next batch.
Beyond the Basics: Storage and Creative Uses
Once you’ve mastered the art of making homemade vegan yogurt, you’ll find it quickly becomes a staple in your kitchen. Knowing how to store it and the myriad ways to enjoy it will maximize your efforts.
Storing Homemade Vegan Yogurt
Proper storage is key to extending the life of your fresh vegan yogurt. Once chilled, transfer your homemade yogurt to airtight containers or keep it in the original fermentation jars with lids. Store it in the refrigerator, where it will typically last for 2 to 3 weeks. As with any homemade food, use your senses – if it smells off or shows signs of mold, it’s best to discard it.
Delicious Ways to Enjoy Your Homemade Vegan Yogurt
The versatility of homemade vegan yogurt is truly remarkable. Beyond enjoying it plain, here are some delightful ways to incorporate it into your diet:
- Breakfast Bliss: Swirl it with fresh berries, granola, a drizzle of maple syrup, or a spoonful of chia seeds for a wholesome start to your day. It’s also perfect for creating vibrant smoothies and parfaits.
- Savory Sensations: Don’t limit yogurt to sweet dishes! It makes an excellent base for creamy salad dressings, tangy dips like a dairy-free tzatziki, or as a cooling accompaniment to spicy curries and grain bowls. You can even use it to create luscious, creamy sauces for pasta or soups.
- Baking Adventures: Substitute dairy yogurt in baking recipes for a vegan twist on muffins, quick breads, or cakes, adding moisture and a tender crumb.
Conclusion
Embarking on the journey of making homemade vegan yogurt is a rewarding experience that puts you in control of what goes into your food. By understanding the different types of vegan yogurt starter cultures, selecting the best one for your needs, and following a few simple guidelines, you can consistently produce creamy, flavorful, and probiotic-rich dairy-free yogurt at home. Don’t be afraid to experiment with different plant milks and thickeners to find your perfect recipe. So, are you ready to unlock the delicious potential of homemade vegan yogurt and transform your kitchen into a hub of healthy fermentation?
Frequently Asked Questions
Can I reuse homemade vegan yogurt as a starter for new batches?
Yes, you can often use a few tablespoons of your freshly made homemade vegan yogurt as a starter for subsequent batches. However, the potency of the cultures can diminish after several generations, leading to thinner yogurt or slower fermentation. It’s generally recommended to restart with a fresh commercial starter or probiotic capsules every few batches for consistent results.
Do I need a special yogurt maker to make vegan yogurt?
Not necessarily! While a Yogurt Maker or an Instant Pot with a yogurt setting provides excellent temperature control, many mesophilic vegan cultures ferment successfully at room temperature or in a warm spot like an oven with just the light on. The key is maintaining a consistent temperature within the recommended range for your specific starter.
Why is my homemade vegan yogurt not thickening?
Several factors can contribute to thin vegan yogurt. Common culprits include using a low-protein plant milk without enough added thickener (like agar-agar or cashews), insufficient fermentation time, or an incubation temperature that was too low or too high for the starter culture. Ensure your starter is fresh and active, and adjust your plant milk, thickener, and fermentation conditions accordingly.
What is the best plant milk to use for vegan yogurt?
Soy milk is often considered the best choice for beginners as its high protein content naturally yields a thicker, tangier yogurt without much need for additional thickeners. However, almond, coconut, oat, and cashew milks can also produce delicious results, especially when paired with appropriate thickeners and a suitable starter culture. Your “best” milk will ultimately depend on your preferred flavor and texture.
How long does homemade vegan yogurt typically last in the refrigerator?
When stored in an airtight container in the refrigerator, homemade vegan yogurt generally stays fresh for about 2 to 3 weeks. The exact duration can vary based on your specific culture, the cleanliness of your equipment, and the type of plant milk used. Always check for any off-smells or visual signs of spoilage before consuming.