Have you ever savored a spoonful of that perfectly tangy, slightly sweet, and unbelievably creamy homemade yogurt and thought, “I wish I could make this at home”? Well, you absolutely can, and it’s easier than you might think. Getting started on your homemade yogurt journey often leads to one key question: What Is A Vietnamese Yogurt Maker and is it the secret weapon I need? Forget the store-bought stuff with its long list of ingredients; we’re about to dive into how this simple gadget can unlock a world of delicious, healthy, and fresh yogurt right in your own kitchen.
At its heart, making yogurt is all about creating the perfect, cozy environment for good bacteria to work their magic. Think of a yogurt maker as a little incubator that holds your milk and starter culture at a consistent, gentle temperature for several hours. This process, called fermentation, is what transforms plain milk into the thick, tangy yogurt we all love. While there are many types of yogurt makers out there, the Vietnamese style has a special charm and simplicity that makes it a fantastic starting point for any home cook.
How Does a Yogurt Maker Actually Work?
So, how does this little machine turn liquid milk into a creamy delight? The principle is surprisingly simple. A yogurt maker’s main job is to provide a stable, low-heat environment, typically between 100°F and 115°F (38°C to 46°C), for an extended period. This is the ideal temperature range for the live cultures (the good bacteria in your yogurt starter) to thrive, consume the lactose in the milk, and produce lactic acid. It’s the lactic acid that causes the milk proteins to coagulate, resulting in that thick, characteristic yogurt texture.
Think of it like a slow cooker designed specifically for dairy. You mix your ingredients, pour them into the provided jars, place them in the machine, turn it on, and walk away. The machine does all the heavy lifting by maintaining that “just right” temperature, ensuring your yogurt ferments perfectly without you having to fuss over it.
|
Our Picks for the Best Yogurt Maker in 2026
As an Amazon Associate, we earn from qualifying purchases.
|
||
| Num | Product | Action |
|---|---|---|
| 1 | Ultimate Probiotic Yogurt Maker with Adjustable Temperature & Time Control - Make Trillions of Live Probiotics & Get Better Gut Health - ULTIMATE LIFETIME WARRANTY - Wellness Gifts for Men & Women |

|
| 2 | Suteck Yogurt Maker - Stainless Steel Yogurt Makers with Adjustable Time & Temp Control,Automatic Shut-Off & Constant Temper for Homemade Greek, Probiotic Yogurt, BPA-Free 8 Glass Jars (48 oz) |
|
| 3 | Yogurt Maker, Automatic Digital Yoghurt Maker Machine with 5 Glass Jars 42 Ozs, with Constant Temperature Control for Home Organic Yogurt, Cheese, Fruit Wine (No Cups) |
|
| 4 | Suteck Yogurt Maker with 8 Glass Jars, Time & Temp Adjustable Control Yogurt Machine, Homemade Greek & Probiotic Yogurt, Automatic Shut-Off, BPA-Free, 48 oz Total, |
|
| 5 | Yogurt Maker, Automatic Digital Yoghurt Maker Machine with 5 Glass Jars 42 Ozs, with Constant Temperature Control for Home Organic Yogurt, Cheese, Fruit Wine (with 5 Cups) |
|
| 6 | Ultimate Yogurt Jars - Make More Delicious Yogurt! 8 Count Small Glass Yogurt Cups With Lids - 100% BPA Free, Airtight & Dishwasher Safe! Perfect Containers for Yoghurt, Oatmeal, Pudding, or Jello |
|
| 7 | Ultimate Probiotic Yogurt Maker with Adjustable Temperature & Time Control - Make Trillions of Live Probiotics & Get Better Gut Health - ULTIMATE LIFETIME WARRANTY - Wellness Gifts for Men & Women |
|
| 8 | Euro Cuisine YM360 Yogurt Maker with Adjustable Time & Temperature Control - 2-Quart Glass Jar, FREE Thermometer & Cotton Strainer Bag, 2025 Edition, Black, Make Yummy Organic Probiotic Yogurt at Home |
|
| 9 | Bear Yogurt Maker, Greek Yogurt Maker Machine with Strainer and Timer Control, Stainless Steel Inner Pot, Automatic Digital with 2 Glass Jars 1 Quart for Home Organic Yogurt, Cheese, Fruit Wine |
|
| 10 | DASH My Mug Ice Cream Maker Machine (Aqua): Multi-Purpose Soft Serve Ice Cream Machine with (2) Bowls for Homemade Gelato, Sorbet, Frozen Yogurt, Built-In Ingredient Chute, Easy to Clean and Store |
|
What Makes a Vietnamese Yogurt Maker Special?
Now, let’s get specific. When people ask, “what is a Vietnamese yogurt maker?”, they are usually referring to a popular and beautifully simple design. These machines are known for a few key characteristics that set them apart:
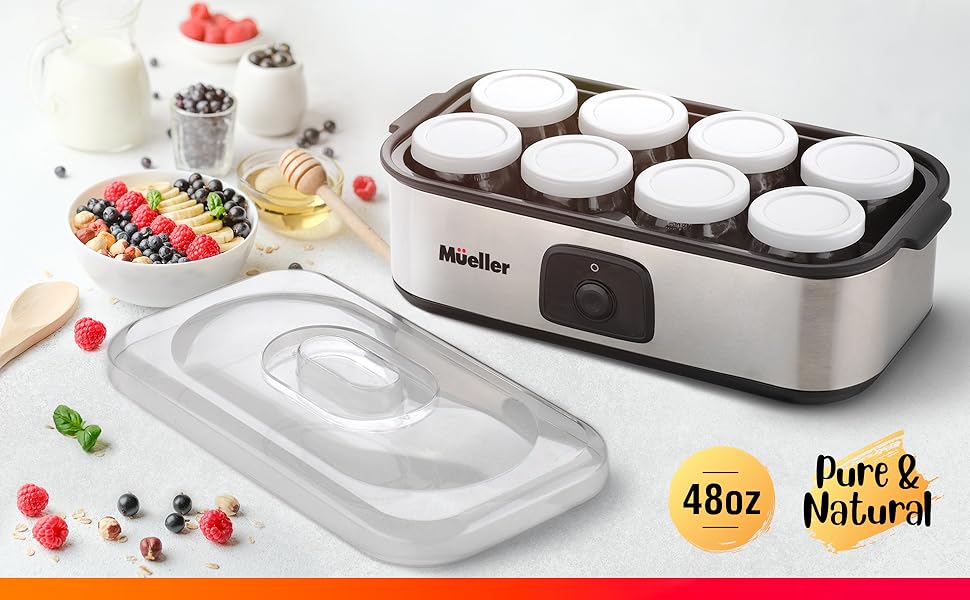
- Individual Glass Jars: Instead of one large tub, Vietnamese yogurt makers typically come with a set of 6 to 8 individual, single-serving glass jars with lids. This is perfect for portion control, easy storage, and serving. It’s also the traditional way sữa chua (Vietnamese yogurt) is made and enjoyed.
- Simplicity: They are often incredibly straightforward to use. Many models have just one button: on/off. There are no complicated temperature settings or timers. They are built to do one thing and do it exceptionally well—maintain the perfect fermentation temperature.
- Compact Design: These units are usually round and compact, designed to not take up a ton of counter space. The jars fit snugly inside, ensuring even heat distribution.
- Affordability: Because of their simple design, these yogurt makers are often one of the most budget-friendly options on the market, making them an excellent entry point for beginners.
This design is intrinsically linked to making Vietnamese-style yogurt, which is often a little sweeter (made with condensed milk) and has a distinctively smooth yet firm texture. The individual jars are perfect for creating these personal-sized treats.
Key Features to Look For in a Yogurt Maker
While the classic Vietnamese model is beautifully simple, if you’re shopping around, it’s good to know what features are available. Here’s a quick checklist of what to consider:
- Capacity and Jar Type: Do you want one large batch or individual servings? Glass jars are a great choice as they are non-reactive, easy to clean, and don’t retain odors.
- Timer and Automatic Shut-off: More advanced models include a digital timer and an automatic shut-off feature. This is a “set it and forget it” convenience that prevents your yogurt from over-fermenting and becoming too sour.
- Temperature Control: Some machines allow you to adjust the temperature, which is useful if you want to experiment with different types of cultures (like those for non-dairy or Greek yogurt) that might thrive at slightly different temperatures.
- Ease of Cleaning: Look for a model with dishwasher-safe jars and lids. A simple interior design also makes wiping down the main unit a breeze.
Your Step-by-Step Guide: Using a Vietnamese Yogurt Maker
Ready to make your first batch? I remember being so excited the first time I used mine. The process felt like a fun science experiment that ended with a delicious result. Here’s how simple it is:
- Prepare Your Milk Base: Gently heat your milk (whole milk works best for creaminess) to about 180°F (82°C). This step is crucial because it kills any competing bacteria and denatures the milk proteins, which helps create a thicker yogurt. Let it cool back down to a lukewarm 110°F (43°C).
- Introduce the Starter: In a separate bowl, whisk a few tablespoons of your warm milk with your starter culture. Your starter can be a few spoonfuls of a plain, store-bought yogurt with live active cultures or a freeze-dried yogurt starter packet. This process is called tempering and helps the starter mix in smoothly without clumping.
- Combine and Mix: Gently pour the tempered starter mixture back into the main pot of warm milk. If you’re making Vietnamese-style yogurt, this is also when you would whisk in sweetened condensed milk. Stir everything together until it’s well combined.
- Fill Your Jars: Carefully pour the milk mixture into your individual glass jars. Don’t put the lids on just yet!
- Incubate: Place the open jars into the yogurt maker. Put the main lid of the machine on top and plug it in. If your model has an “on” switch, turn it on.
- Wait Patiently: Let the machine work its magic for 8-12 hours. A shorter time (around 8 hours) will yield a milder, sweeter yogurt, while a longer time (10-12 hours) will result in a tangier, firmer set.
- Chill Out: Once the incubation time is up, carefully remove the jars, put their individual lids on, and transfer them to the refrigerator. Chilling is a critical step! It stops the fermentation process and allows the yogurt to set and thicken further. Let them chill for at least 4 hours, but overnight is even better.
- Enjoy! Your delicious, homemade yogurt is ready. Serve it plain, with fruit, or a drizzle of honey.
Pro Tips for Perfect Homemade Yogurt Every Time
After making countless batches, I’ve picked up a few tricks that make a huge difference.
Choosing Your Milk and Starter
The quality of your ingredients is everything. For the creamiest results, use whole milk. For the starter, using a high-quality plain yogurt from the store (make sure the label says “live and active cultures”) is a great way to begin. Once you make your first successful batch, you can use a few tablespoons of it to culture the next one!
The Incubation Sweet Spot
Finding your perfect incubation time is a matter of taste. I’d suggest starting with 8 hours. If you taste it and wish it were tangier, try 9 or 10 hours next time. Keep a little notebook of your times and results—it’s part of the fun!
What If My Yogurt Is Runny?
This is the most common issue for beginners. It usually comes down to one of two things: the temperature was off, or the starter wasn’t active enough. Ensure your milk has cooled to the right temperature before adding the starter (too hot and you’ll kill the bacteria). Also, make sure your starter yogurt is fresh.
“Making yogurt at home with a dedicated machine ensures that you are cultivating beneficial probiotics in their optimal environment. The consistent temperature control is key to a successful fermentation, which maximizes the live culture count in the final product, offering significant benefits for gut health.” – Dr. Elena Petrova, Nutritionist and Fermentation Specialist
The Delicious Benefits of Making Your Own Yogurt
Why bother when you can just buy it? Oh, let me count the ways!
- Healthier: You have 100% control over the ingredients. That means no artificial thickeners, preservatives, or excessive amounts of sugar. Plus, homemade yogurt is packed with beneficial probiotics.
- Cost-Effective: A gallon of milk and a small starter can produce a huge amount of yogurt for a fraction of the cost of buying individual cups at the store.
- Incredible Flavor: The taste of fresh, homemade yogurt is simply unbeatable. It’s fresher, creamier, and you can customize the flavor and sweetness exactly to your liking.
- Reduced Waste: By using reusable glass jars, you’re cutting down significantly on plastic waste from single-use containers.
Keeping It Clean: How to Care for Your Machine
Thankfully, yogurt makers are incredibly low-maintenance. After you’re done, let the machine cool down completely. The glass jars and their lids can usually go right into the dishwasher. For the main unit, simply wipe the inside with a damp cloth to clean up any spills or condensation. Never submerge the main electrical unit in water. That’s it! A clean machine is a happy machine, ready for your next batch.
Frequently Asked Questions
Can I make Greek yogurt in a Vietnamese yogurt maker?
Yes, you can! After your yogurt is finished incubating and chilling, simply strain it through a cheesecloth or a fine-mesh strainer for a few hours in the refrigerator. The liquid that drains off is whey, and you’ll be left with thick, creamy Greek-style yogurt.
How long does homemade yogurt last in the fridge?
Properly chilled and stored in airtight containers, your homemade yogurt will stay fresh and delicious for about 1 to 2 weeks.
Can I use non-dairy milk?
You can, but it’s a bit trickier. Plant-based milks like soy, almond, or coconut milk lack the lactose and protein structure of dairy milk. You will likely need to use a specific non-dairy starter culture and may need to add a thickener (like agar-agar) to achieve a good consistency.
Why do I have to heat the milk first?
Heating the milk to 180°F (82°C) does two important things: it kills any unwanted bacteria that could compete with your starter culture, and it changes the protein structure in the milk, which helps it set into a thicker, smoother yogurt. Don’t skip this step!
My yogurt separated into curds and whey. What happened?
This usually means it was incubated for too long or at too high a temperature. The culture became too acidic, causing the proteins to clump tightly and squeeze out the whey. Try reducing your incubation time on the next batch.
Your Yogurt-Making Adventure Awaits
So, what is a Vietnamese yogurt maker? It’s a simple, reliable, and affordable gateway to the wonderfully rewarding world of homemade yogurt. It takes the guesswork out of fermentation, giving you a perfect environment for creating creamy, delicious, and healthy yogurt every single time. Whether you’re dreaming of classic tangy plain yogurt or the sweet, decadent sữa chua of Vietnam, this little machine is your perfect partner. It’s time to take control of your food, have fun in the kitchen, and taste the incredible difference of homemade.