Welcome to the wonderful world of homemade yogurt! There’s something truly magical about transforming a couple of simple ingredients into a creamy, tangy, and incredibly fresh batch of yogurt right in your own kitchen. Your trusty yogurt maker is the hero of this story, tirelessly working to create the perfect environment for those beneficial cultures to do their thing. But after the magic happens, there’s a crucial step we often overlook. That’s why we’re here to tackle the question of How To Clean The Base Of A Yogurt Maker, ensuring your machine stays in tip-top shape for years of delicious creations to come.
Let’s be honest, spills happen. A bit of milk sloshes over, or a drip of yogurt finds its way onto the heating element. It might seem harmless, but proper cleaning is non-negotiable for both hygiene and the longevity of your appliance. This guide will walk you through everything, turning a potentially tricky chore into a simple, stress-free habit.
What is a Yogurt Maker and Why Do You Need One?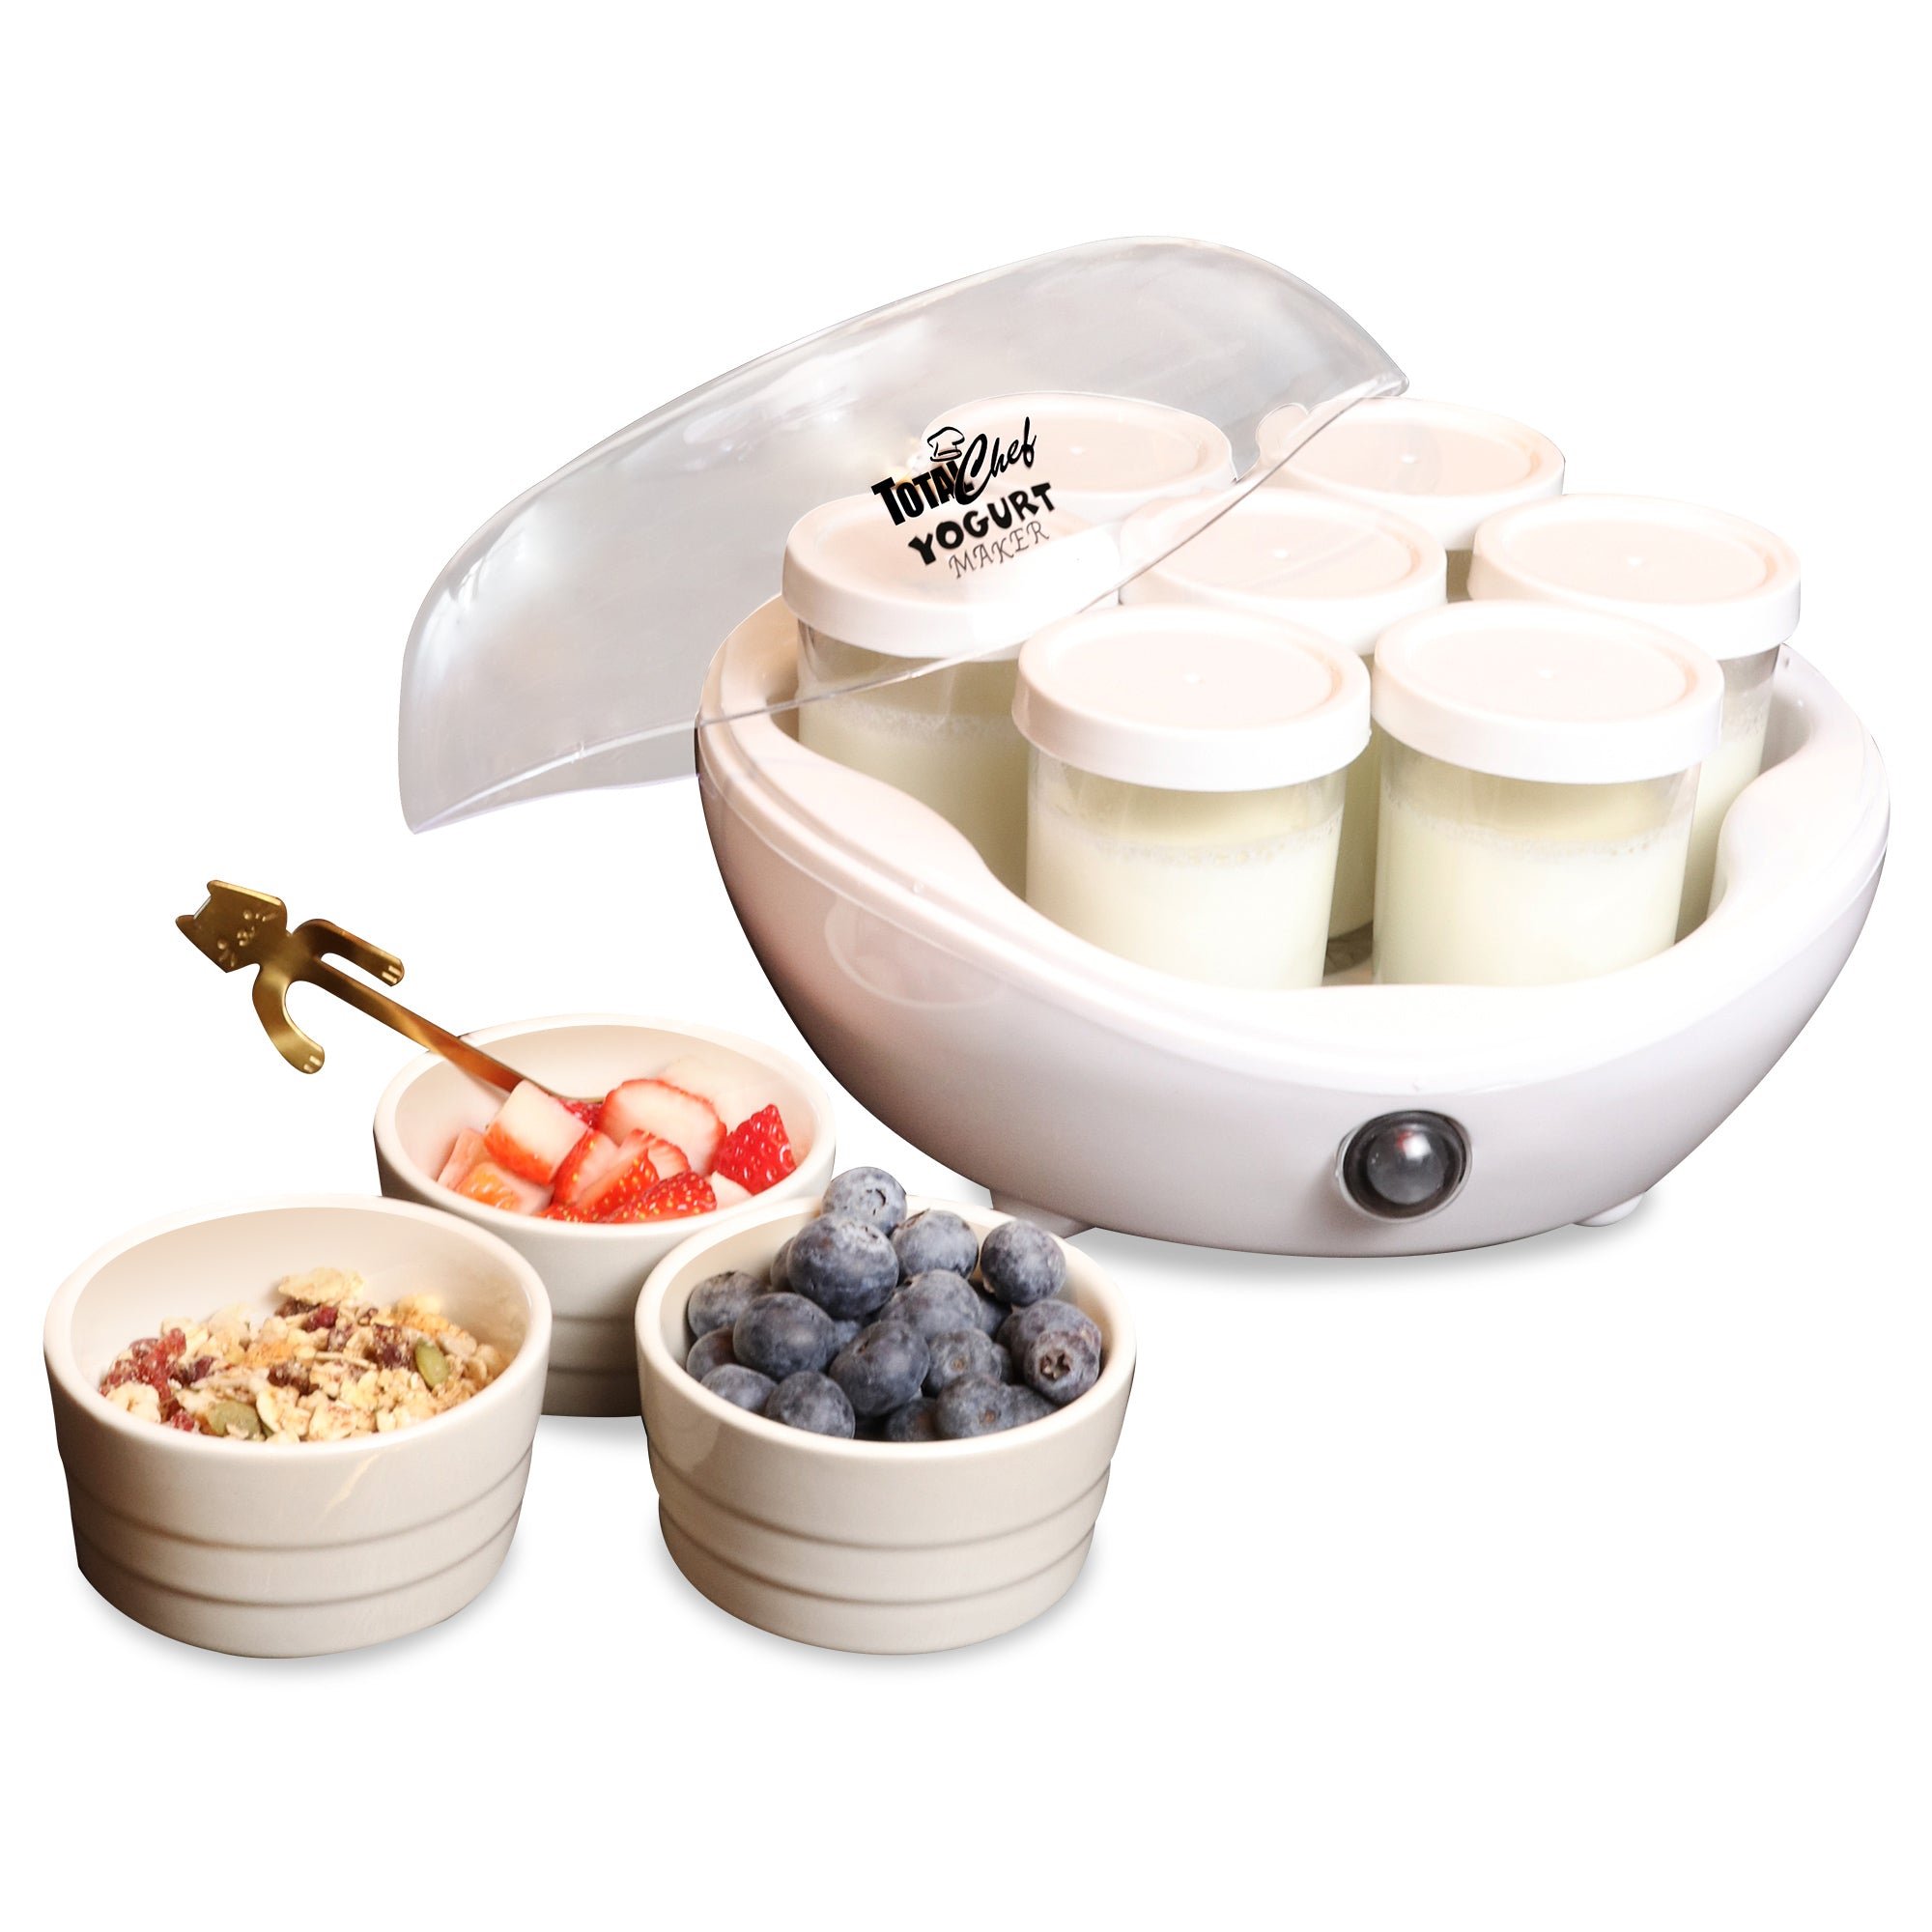
A yogurt maker is a simple, yet brilliant, kitchen appliance designed to do one thing perfectly: maintain a consistent, low temperature for an extended period. This creates the ideal breeding ground for the live cultures (the good bacteria) that turn milk into yogurt. Think of it as a cozy, temperature-controlled incubator for your future breakfast.
While you can make yogurt without one using ovens or slow cookers, a dedicated yogurt maker takes out all the guesswork. It eliminates temperature fluctuations, which are the number one enemy of a good yogurt batch, giving you consistent, reliable results every single time. It’s the difference between hoping for the best and knowing you’ll get creamy perfection.
How Does a Yogurt Maker Work?
The mechanism is beautifully simple. The base of the unit contains a low-wattage heating element. When you place your jars of milk and starter culture inside and turn it on, this element gently heats the interior chamber to a precise temperature—usually between 100°F and 115°F (38°C to 46°C). It then holds that temperature steady for the entire incubation period, which can be anywhere from 4 to 12 hours. This unwavering warmth allows the bacteria in your starter to multiply, consume the lactose in the milk, and produce lactic acid, which thickens the milk and gives yogurt its signature tangy flavor.
|
Our Picks for the Best Yogurt Maker in 2025
As an Amazon Associate, we earn from qualifying purchases.
|
||
| Num | Product | Action |
|---|---|---|
| 1 | Euro Cuisine YM360 Yogurt Maker with Adjustable Time & Temperature Control - 2-Quart Glass Jar, FREE Thermometer & Cotton Strainer Bag, 2025 Edition, Black, Make Yummy Organic Probiotic Yogurt at Home |

|
| 2 | Suteck Yogurt Maker with 8 Glass Jars, Time & Temp Adjustable Control Yogurt Machine, Homemade Greek & Probiotic Yogurt, Automatic Shut-Off, BPA-Free, 48 oz Total, |
|
| 3 | Suteck Yogurt Maker - Stainless Steel Yogurt Makers with Adjustable Time & Temp Control,Automatic Shut-Off & Constant Temper for Homemade Greek, Probiotic Yogurt, BPA-Free 8 Glass Jars (48 oz) |
|
| 4 | Yogurt Maker, Automatic Digital Yoghurt Maker Machine with 5 Glass Jars 42 Ozs, with Constant Temperature Control for Home Organic Yogurt, Cheese, Fruit Wine (with 5 Cups) |
|
| 5 | Bear Yogurt Maker, Greek Yogurt Maker Machine with Strainer and Timer Control, Stainless Steel Inner Pot, Automatic Digital with 2 Glass Jars 1 Quart for Home Organic Yogurt, Cheese, Fruit Wine |
|
| 6 | DASH My Mug Ice Cream Maker Machine (Aqua): Multi-Purpose Soft Serve Ice Cream Machine with (2) Bowls for Homemade Gelato, Sorbet, Frozen Yogurt, Built-In Ingredient Chute, Easy to Clean and Store |
|
| 7 | Ultimate Probiotic Yogurt Maker with Adjustable Temperature & Time Control - Make Trillions of Live Probiotics & Get Better Gut Health - ULTIMATE LIFETIME WARRANTY - Wellness Gifts for Men & Women |
|
| 8 | Yogurt Maker, Automatic Digital Yoghurt Maker Machine with 5 Glass Jars 42 Ozs, with Constant Temperature Control for Home Organic Yogurt, Cheese, Fruit Wine (No Cups) |
|
| 9 | Ultimate Probiotic Yogurt Maker with Adjustable Temperature & Time Control - Make Trillions of Live Probiotics & Get Better Gut Health - ULTIMATE LIFETIME WARRANTY - Wellness Gifts for Men & Women |
|
| 10 | Ultimate Yogurt Jars - Make More Delicious Yogurt! 8 Count Small Glass Yogurt Cups With Lids - 100% BPA Free, Airtight & Dishwasher Safe! Perfect Containers for Yoghurt, Oatmeal, Pudding, or Jello |
|
Key Features to Look for in a Yogurt Maker
If you’re in the market for a new machine or just curious about what makes a good one, here are a few key features to consider:
- Capacity and Jar Type: Do you want one large container or several individual serving-size jars? Glass jars are a fantastic, non-reactive option, while a large tub is great for making big batches for recipes.
- Automatic Shut-Off: This is a game-changer. An automatic timer means you can “set it and forget it” without worrying about over-culturing your yogurt, which can make it taste too sour.
- Temperature Control: Some advanced models allow you to adjust the temperature, giving you more control over the final texture and tanginess of your yogurt. This is great for experimenting with different types of cultures.
- Ease of Cleaning: Look for models with dishwasher-safe jars and lids, and a smooth, uncomplicated base design. This brings us right back to our main topic!
How to Clean the Base of a Yogurt Maker: A Step-by-Step Guide
Cleaning the base of your electric yogurt maker isn’t just about looks; it’s about food safety and appliance maintenance. A buildup of old milk or yogurt can harbor unwanted bacteria and, in a worst-case scenario, damage the heating element. Here is the safest and most effective method.
Step 1: Safety First – Unplug Everything!
Before you even think about cleaning, always unplug the yogurt maker from the wall outlet. This is the most important step. We’re dealing with an electrical appliance, and water and electricity are a dangerous mix. Let the unit cool down completely if you’ve recently used it.
Step 2: Assess the Mess
Take a look inside the base. Are you dealing with a fresh, liquid spill or some dried, caked-on yogurt from a previous batch? The approach will be slightly different.
- For Fresh Spills: You’re in luck! This is the easiest to clean.
- For Dried-On Gunk: This will require a little more patience and elbow grease.
Step 3: The Gentle Wipe-Down
Take a soft, damp cloth or sponge. Microfiber cloths work wonders here. Wring it out so it’s damp, not dripping wet. Gently wipe the entire interior surface of the base, including the sides and around the heating element. For fresh spills, this is often all you need to do.
“When cleaning any kitchen appliance with an electric base, the golden rule is ‘less is more’ when it comes to water,” advises home appliance expert, David Chen. “A damp cloth is your best friend. Never submerge the base or run it under a faucet.”
Step 4: Tackling Stubborn, Dried-On Stains
If you’ve got some stubborn spots, don’t reach for a scouring pad or harsh chemical! You could scratch the surface or damage the heating element. Instead, try this:
- Create a Paste: Mix a small amount of baking soda with a few drops of water to create a thick paste.
- Apply and Wait: Dab this paste directly onto the dried-on spots. Let it sit for 10-15 minutes. The baking soda will help to break down and loosen the food residue without being abrasive.
- Wipe Away: Use your damp cloth to gently scrub the area in a circular motion. The paste and the softened gunk should wipe away easily.
- Rinse (Carefully!): Use a separate, clean cloth dampened with only water to wipe away any remaining baking soda residue. You may need to rinse and wring out this cloth a couple of times to get it all.
Step 5: The Vinegar Trick for Odors
Sometimes, even after cleaning, a faint sour milk smell can linger. A little white vinegar is the perfect solution.
- Lightly dampen a section of your cloth with white vinegar.
- Wipe down the inside of the base one more time.
- Follow up with a cloth dampened with plain water to remove the vinegar smell.
Step 6: Dry Thoroughly
This is another critical step. Use a dry, soft cloth to wipe the entire base dry. Then, leave the lid off for an hour or so to allow it to air-dry completely before storing it. Trapped moisture is something we want to avoid.
Pro Tips for Perfect Homemade Yogurt
Now that you know how to clean the base of a yogurt maker, let’s make sure the yogurt you’re making is worth the effort!
- Choose Your Milk: Whole milk will give you the creamiest, thickest yogurt. Low-fat milk works too but will result in a thinner consistency. Ultra-pasteurized (UHT) milk is a great shortcut as it doesn’t require pre-heating.
- Pick the Right Starter: You can use a spoonful of a previous batch of homemade yogurt, a high-quality store-bought plain yogurt with live active cultures, or a freeze-dried starter culture, which you can find in our guide on [the best starter cultures for thick yogurt].
- Mind the Temperature: If you’re using regular pasteurized milk, you’ll need to heat it to about 180°F (82°C) first and then cool it down to 110°F (43°C) before adding your starter. This step changes the milk proteins and results in a thicker final product.
- Incubation Time is Key: A shorter time (4-6 hours) yields a milder yogurt. A longer time (8-12 hours) creates a tangier, more acidic flavor. Experiment to find your sweet spot!
Benefits of Making Your Own Yogurt
Why bother with all this when you can just buy it at the store? The rewards are huge.
- Healthier: You control the ingredients. That means no added sugars, thickeners, or artificial flavors. You can also make it with high-quality milk of your choice.
- Cost-Effective: A gallon of milk and a small starter can produce a massive amount of yogurt for a fraction of the cost of buying individual cups.
- Tastier: The freshness is unbeatable. The flavor of homemade yogurt is richer and more complex than most mass-produced options.
- Environmentally Friendly: You’re reducing plastic waste by reusing your own glass jars.
Frequently Asked Questions (FAQ)
Q1: Can I put the base of my yogurt maker in the dishwasher or submerge it in water?
A: Absolutely not. The base contains the electrical components and heating element. Submerging it in water will permanently damage the appliance and create a serious electrical hazard. Only the removable jars and lids are typically dishwasher safe.
Q2: How often should I clean the base of my yogurt maker?
A: You should wipe down the base after every use as a preventative measure. A deep clean, using the baking soda or vinegar method, should be done immediately if there’s a spill or whenever you notice any residue or odor.
Q3: What should I do if I spilled a lot of milk inside the base?
A: First, unplug the machine immediately. Use paper towels to soak up as much of the liquid as possible. Then, follow the step-by-step cleaning guide above. Pay extra attention to the drying step, and let it air out for several hours before plugging it back in.
Q4: I have a burnt smell coming from my yogurt maker. What’s wrong?
A: A burnt smell is almost always caused by old, spilled milk or yogurt making direct contact with the heating element. Unplug the unit, let it cool completely, and then perform a thorough cleaning, paying special attention to the area on and around the heating element itself.
Q5: Can I use harsh cleaners or bleach on my yogurt maker base?
A: No. Harsh chemical cleaners can damage the plastic or metal surfaces of your yogurt maker and can leave behind residues that could be harmful or affect the taste of your yogurt. A simple solution of water, baking soda, or vinegar is all you need.
Your Journey to Perfect Yogurt Starts Here
Mastering how to clean the base of a yogurt maker is a simple but essential skill for any home yogurt enthusiast. It protects your investment, ensures every batch is safe and delicious, and makes the entire process more enjoyable. By keeping your machine pristine, you’re setting the stage for countless batches of creamy, healthy, and satisfying homemade yogurt. So go ahead, embrace the process, and enjoy the delicious rewards of your well-cared-for kitchen companion.